
ADVANCED PASTRY SHOP
Deep dive into more advanced bakes and techniques in the bakeshop.
COURSE INDEX
List of Services
-
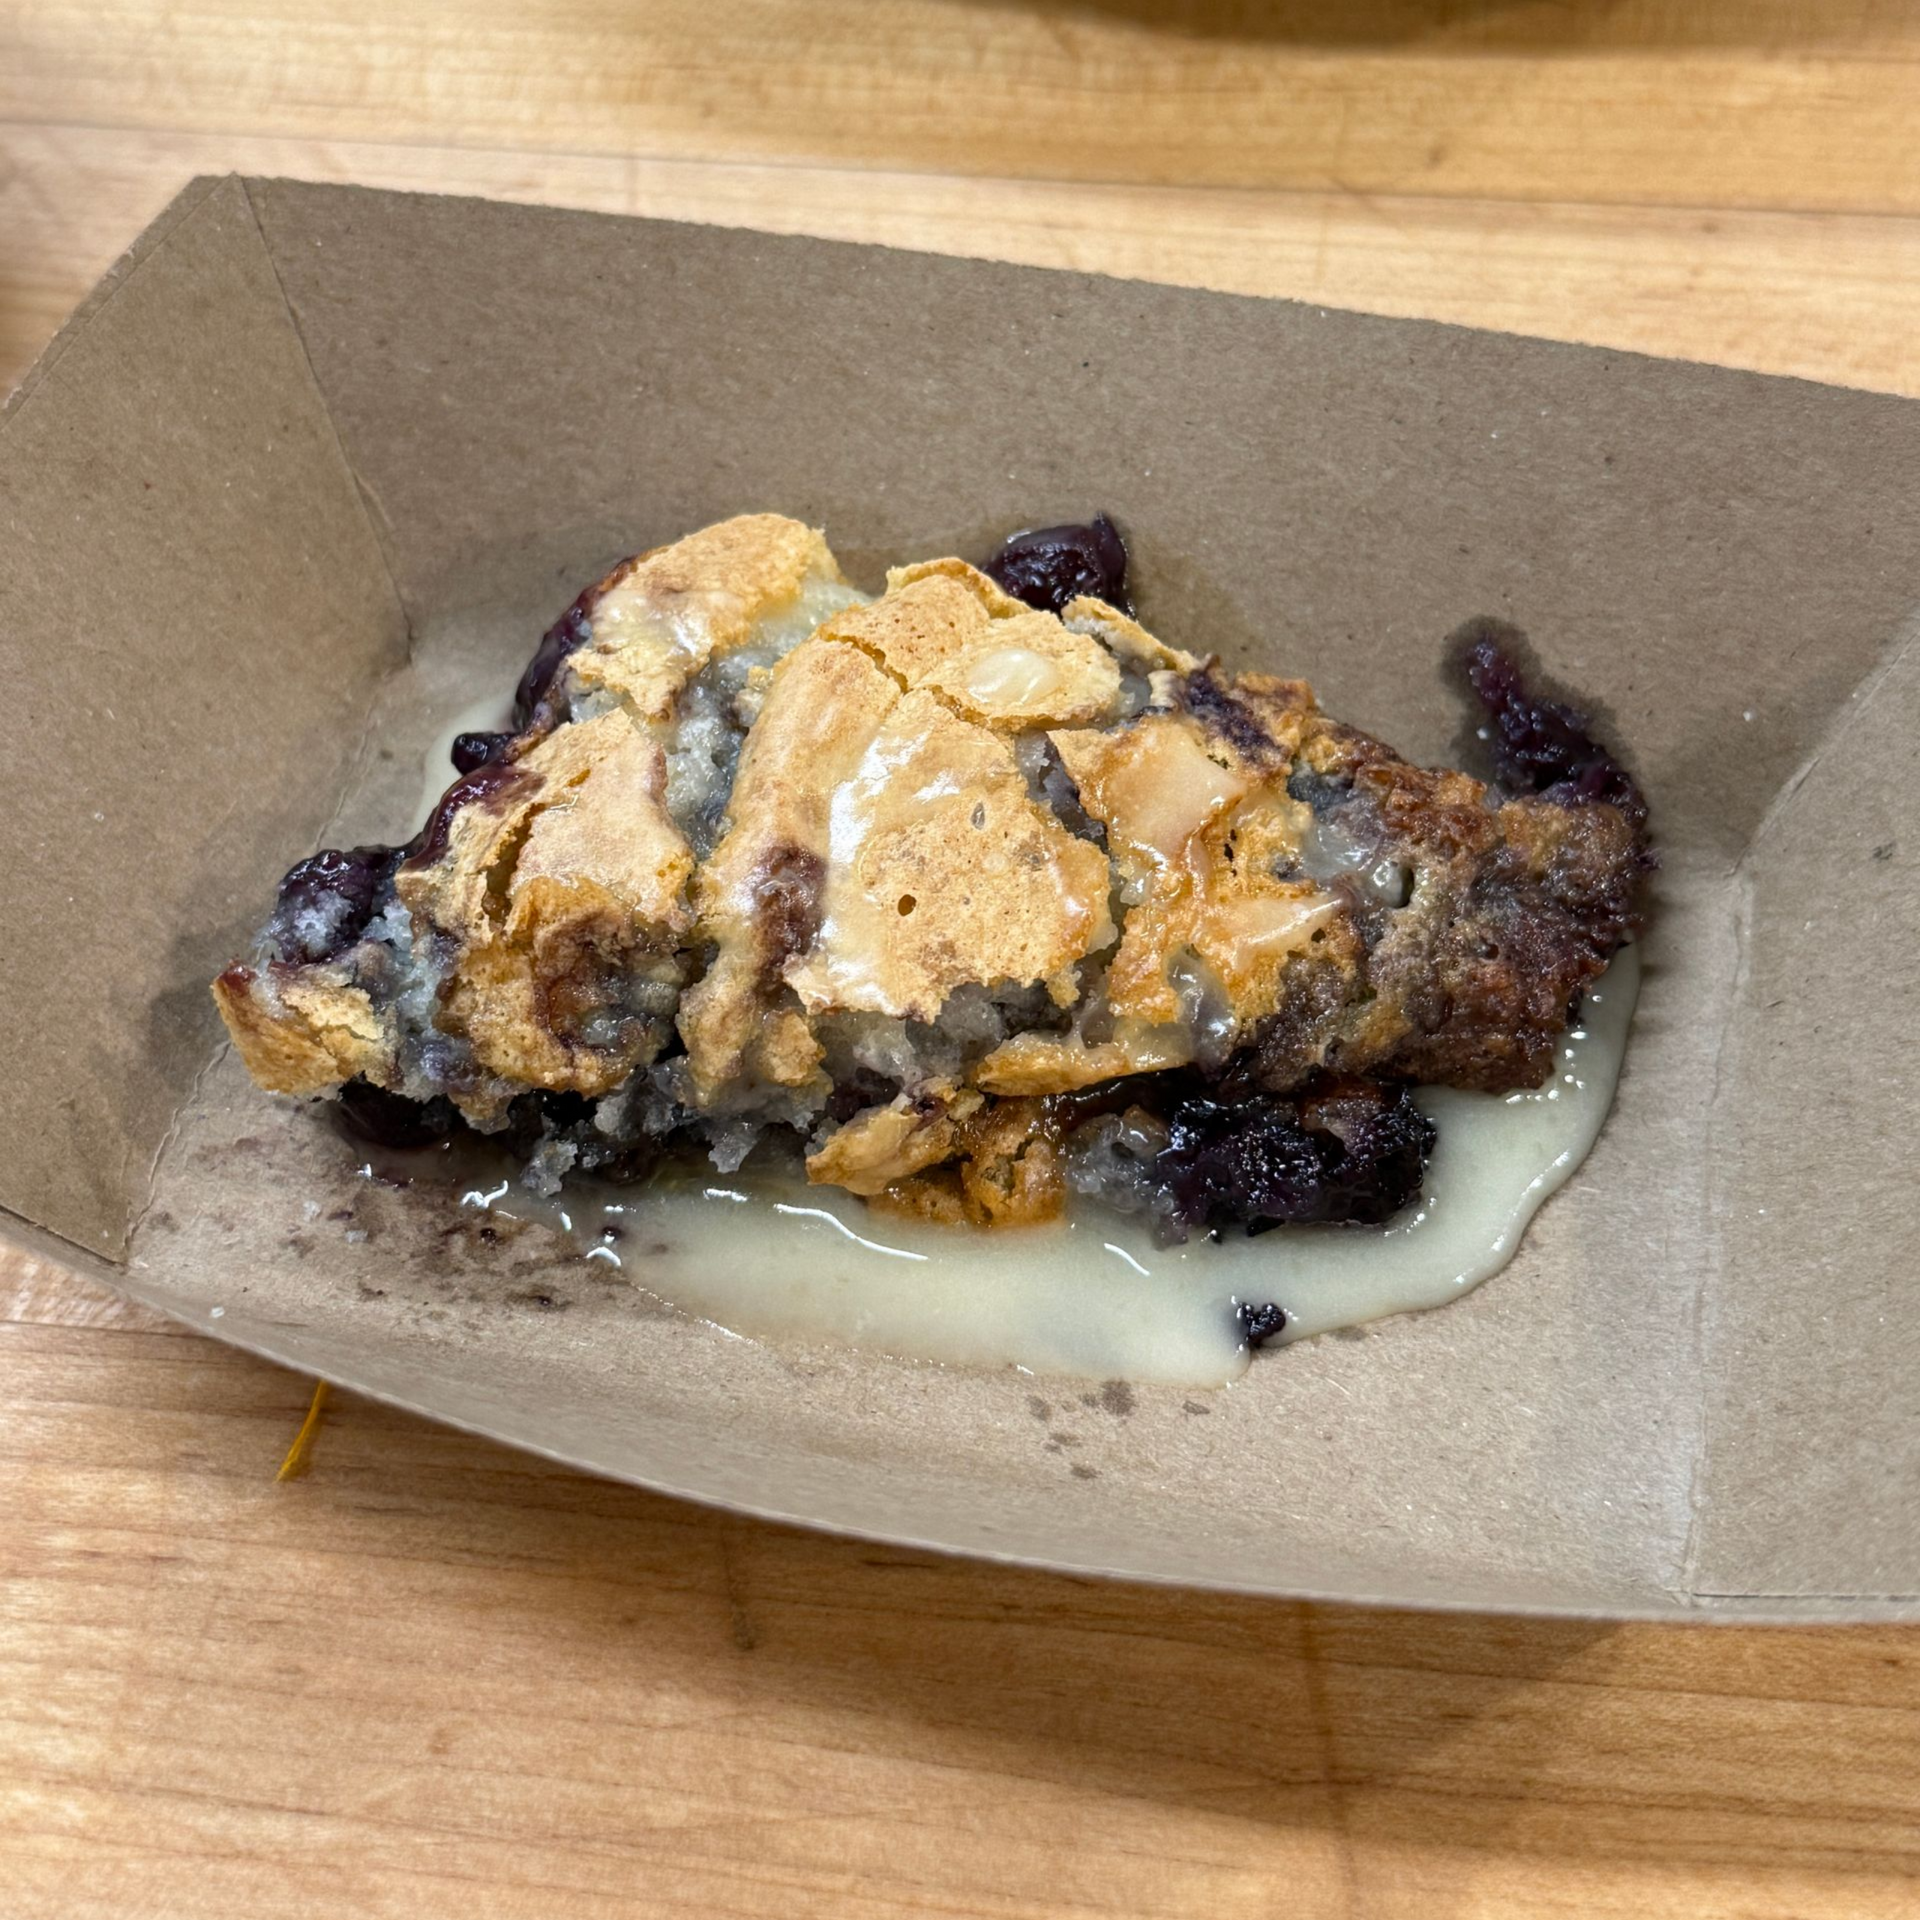
Cobblers & CrispsList Item 1
From the cake-like nature of cobblers to crisps that are like cobblers but with streusel topping instead of a pastry crust.
-
Homework Assignments #1List Item 2
Homework Assignment #1 covers basic baking principles, including terms from Fundamentals of Baking and other procedures of the bakeshop.
-
Crêpes & WafflesList Item 3
Crepes, with their delicate, thin texture, can be filled with sweet or savory delights. Waffles boast their signature crispy exterior and fluffy interior.
-
Homework Assignment #2List Item 4
Custards, mousses, puddings, and souffles.
-
Custards & Souffles
A custard is a liquid thickened or set by the coagulation of egg protein. There are stirred custards, and baked custards.
-
Pâte a Choux
Èclairs and cream puffs are made from a dough called choux paste. Pâte a choux means cabbage paste, referring to the resemblance of cream puffs to little cabbages.
-
Homework Assignment #3
Simple sweet roll doughs are easy to make and handle, but they need care because they're softer and stickier than bread doughs. This includes rich yeast doughs like brioche, croissants, and Danish rolls.
-
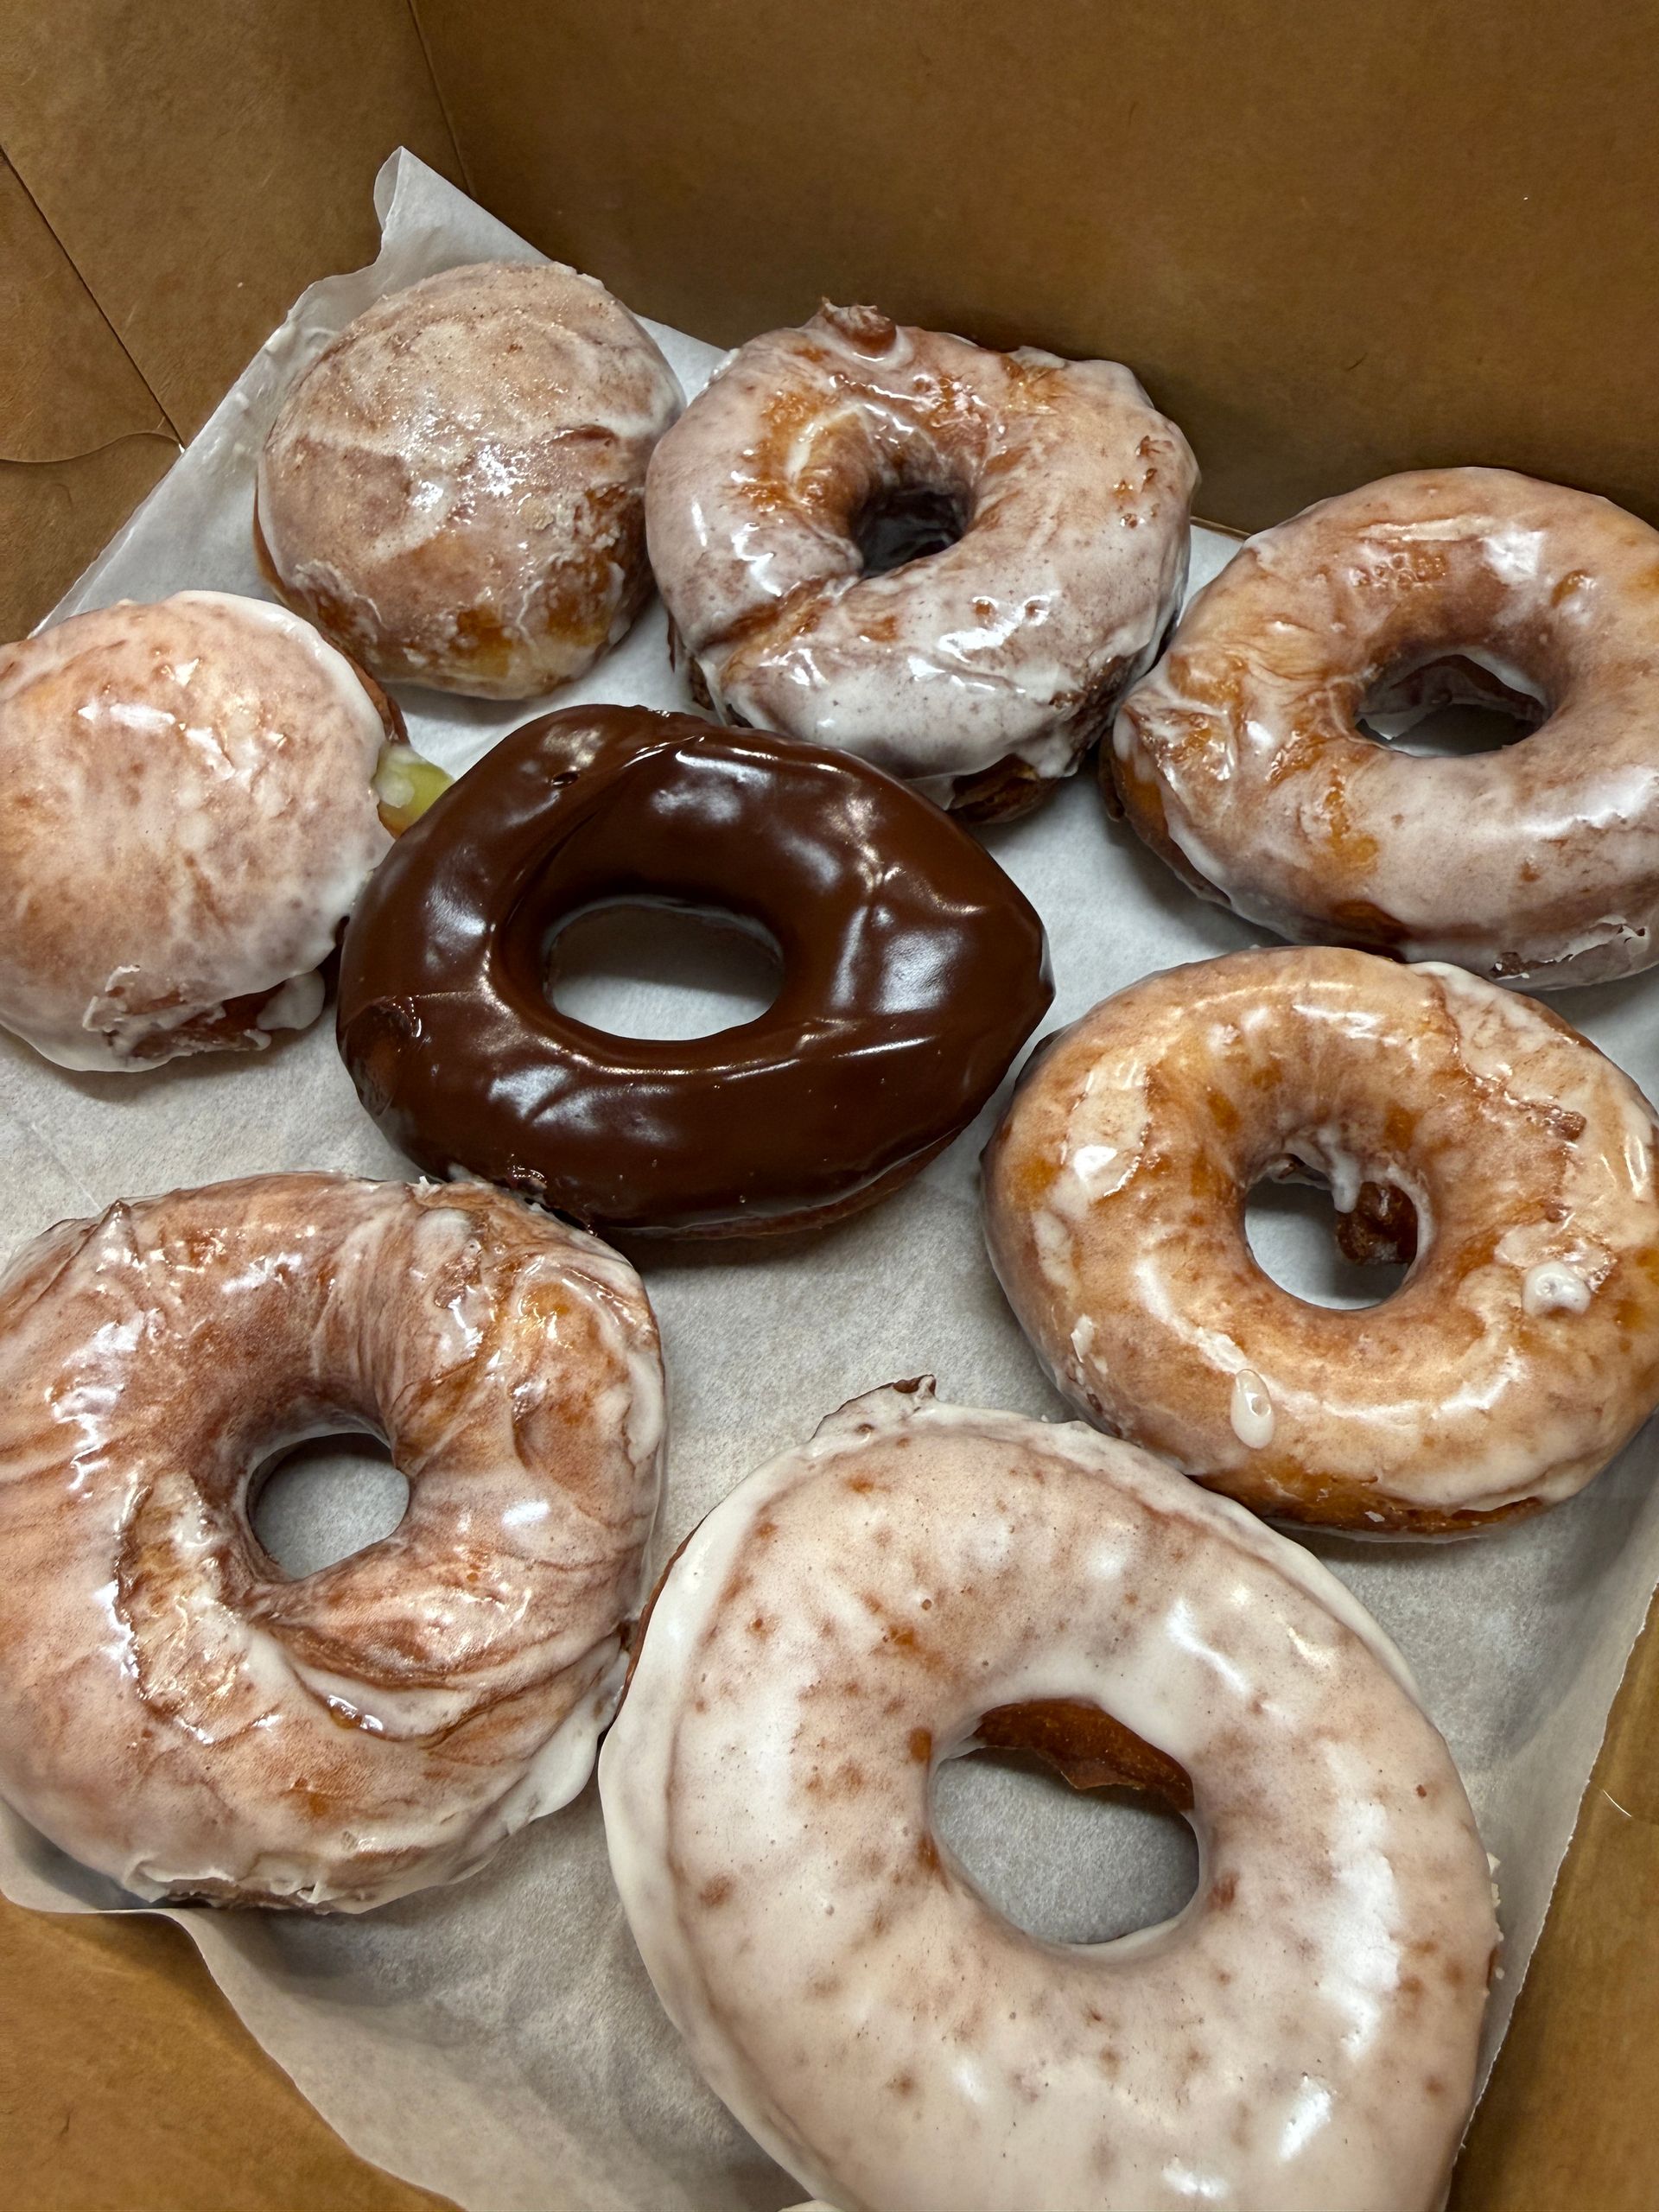
Doughnuts
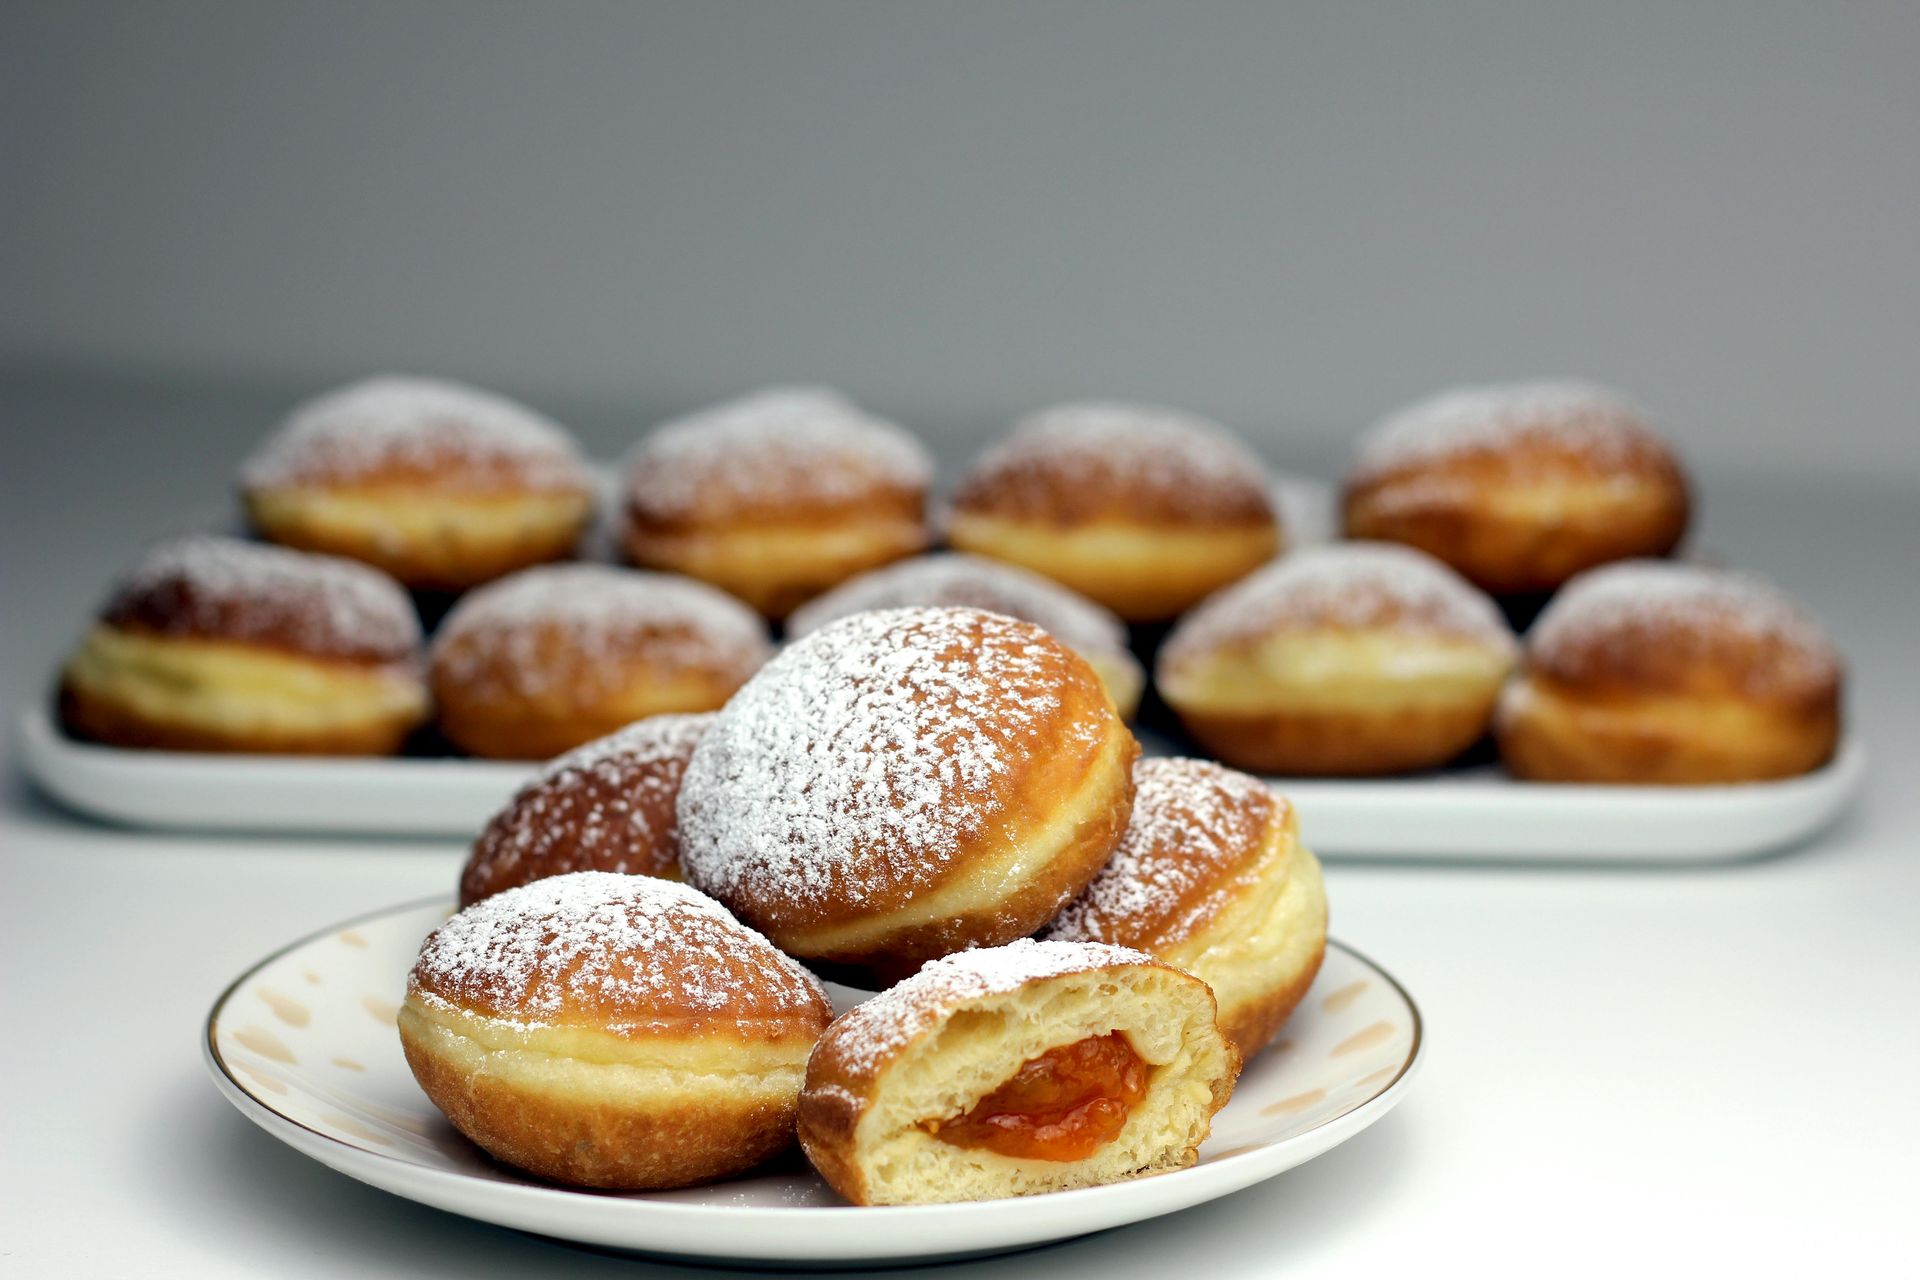
Sweet, deep-fried dough or batter. The two most common types are the torus-shaped ring doughnut and the filled doughnut, a flattened sphere injected with jam, jelly, cream, custard, or other sweet filling.
-
Homework Assignment #4
Chapters 9 and 14 covering rich yeast doughs and pastry basics. We are beginning the section on laminated doughs, covering Danish dough, puff pastry, and croissant dough.
-
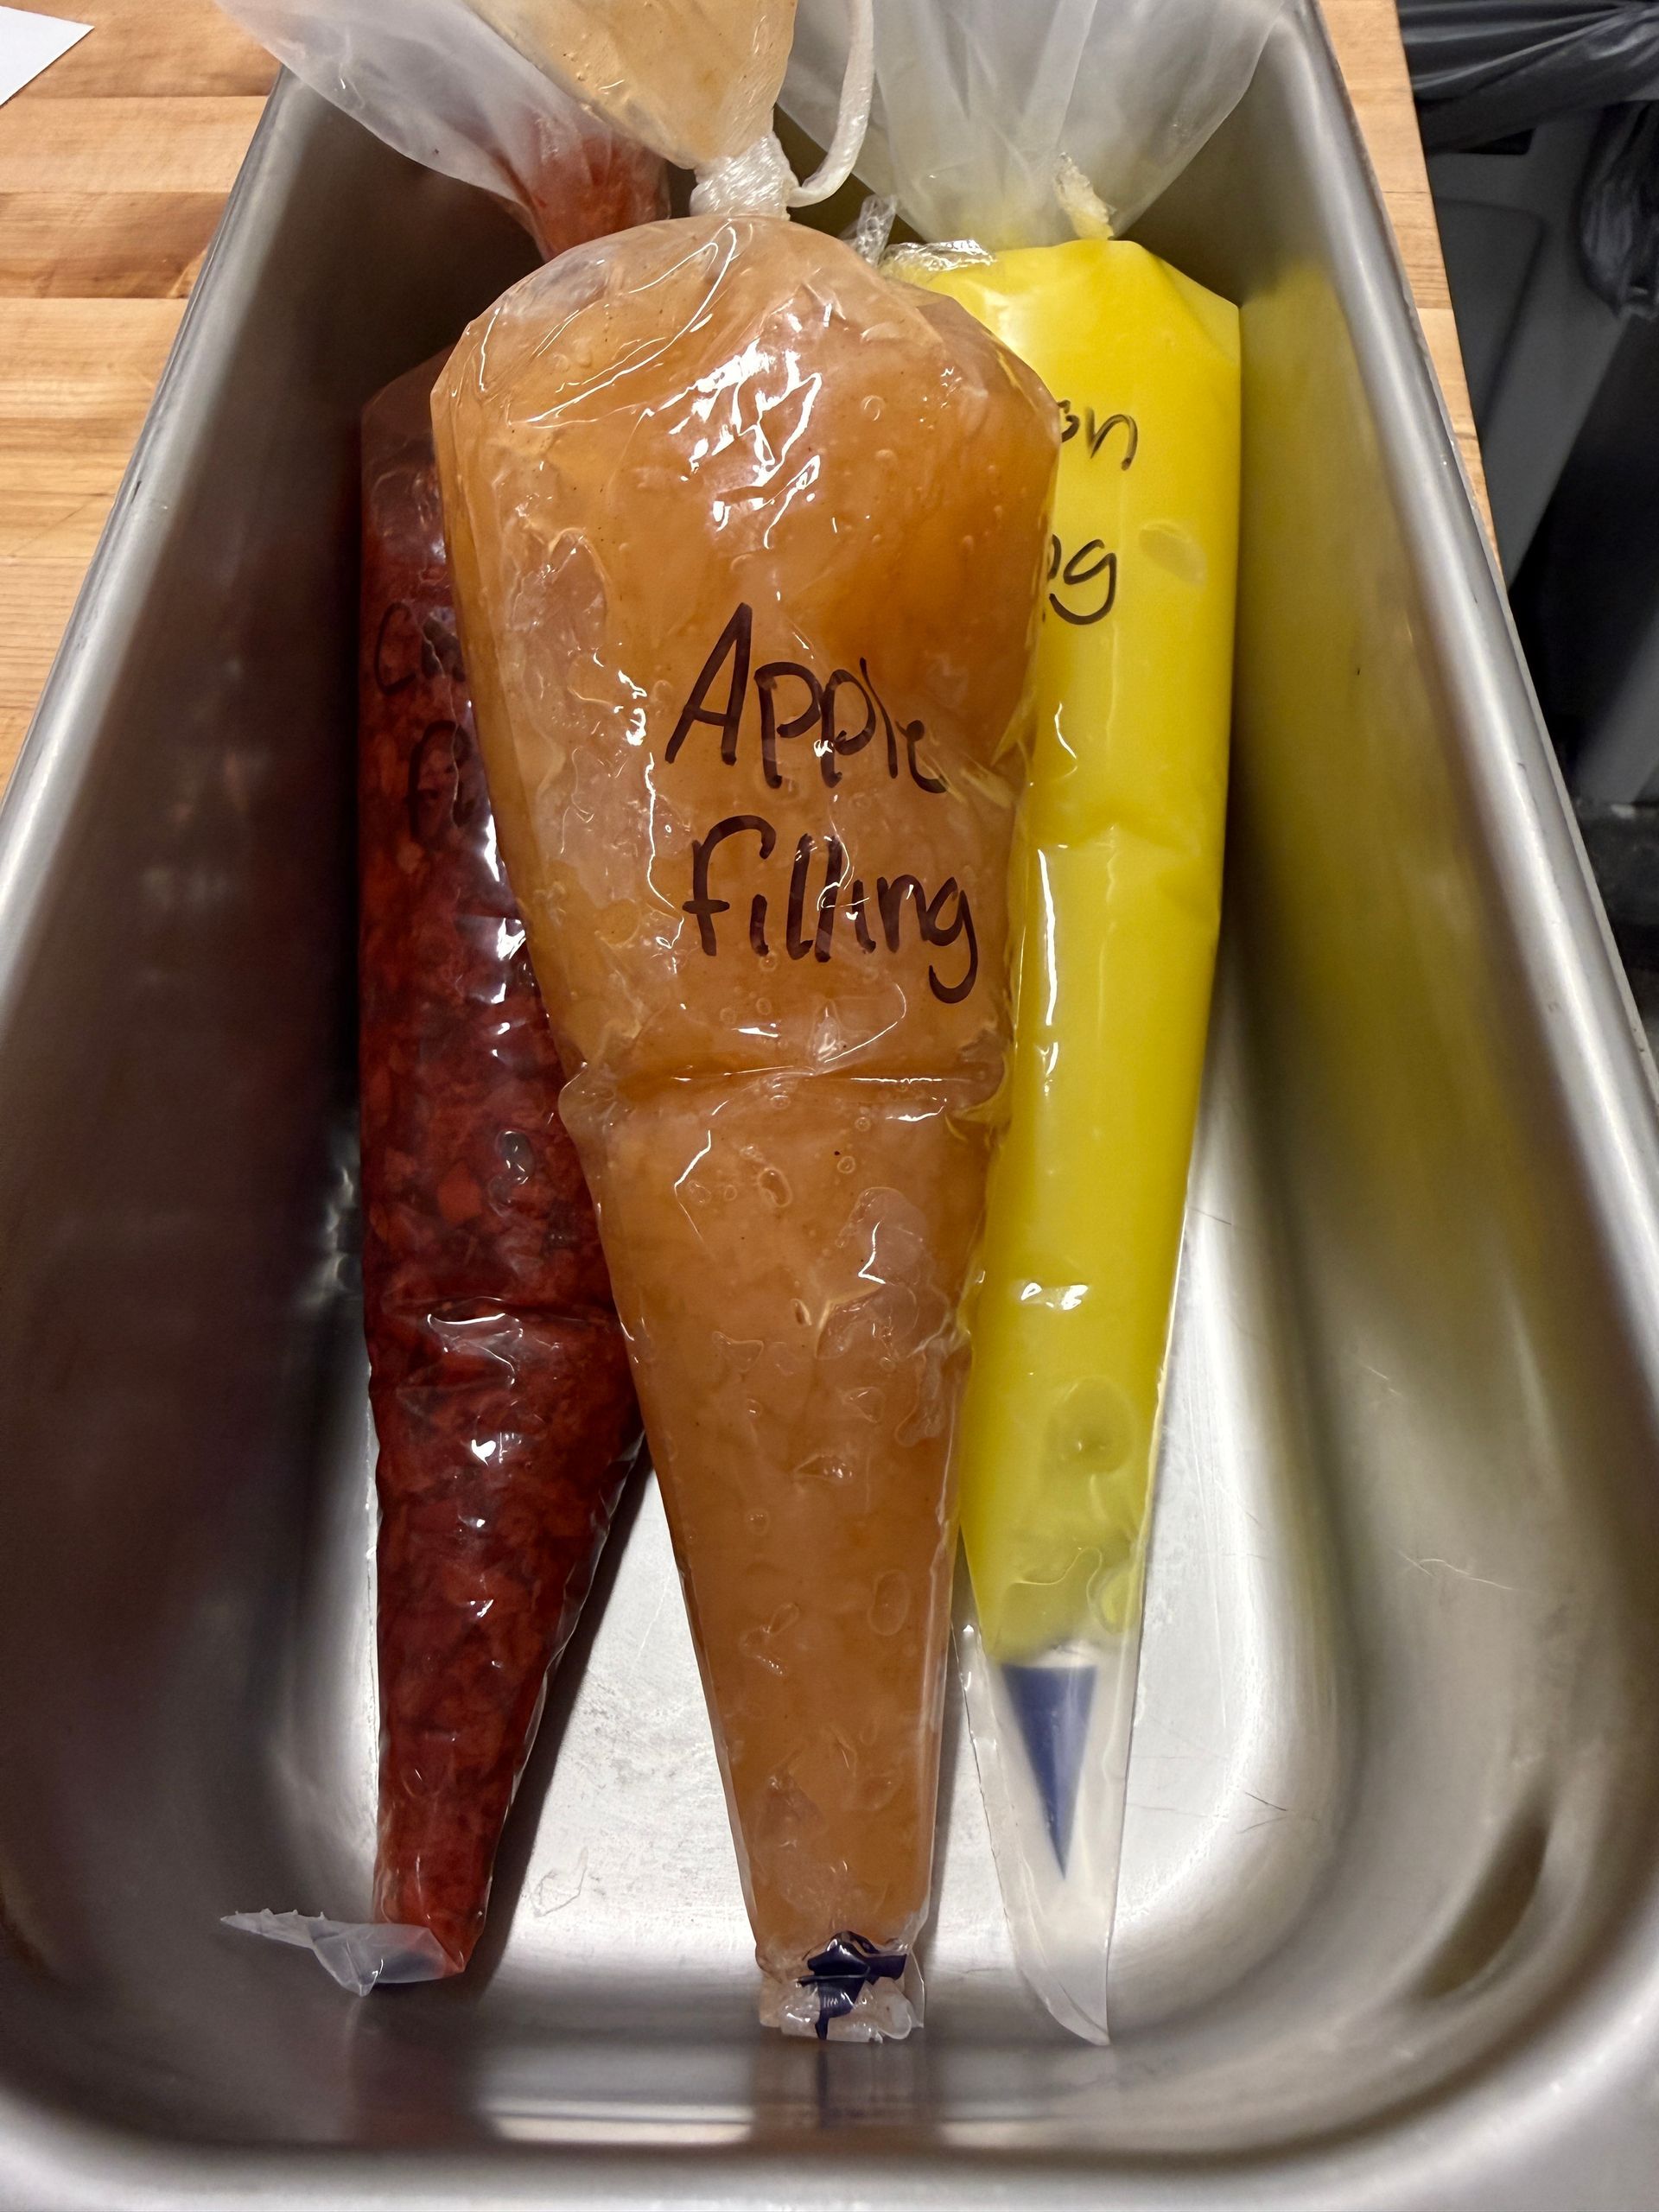
Laminated Dough
Laminated dough or rolled-in doughs contain many layers of fat sandwiched between layers of dough.
-
Mousse
Mousse is light yet indulgent, built through careful technique to achieve a texture that feels almost weightless on the palate.
-
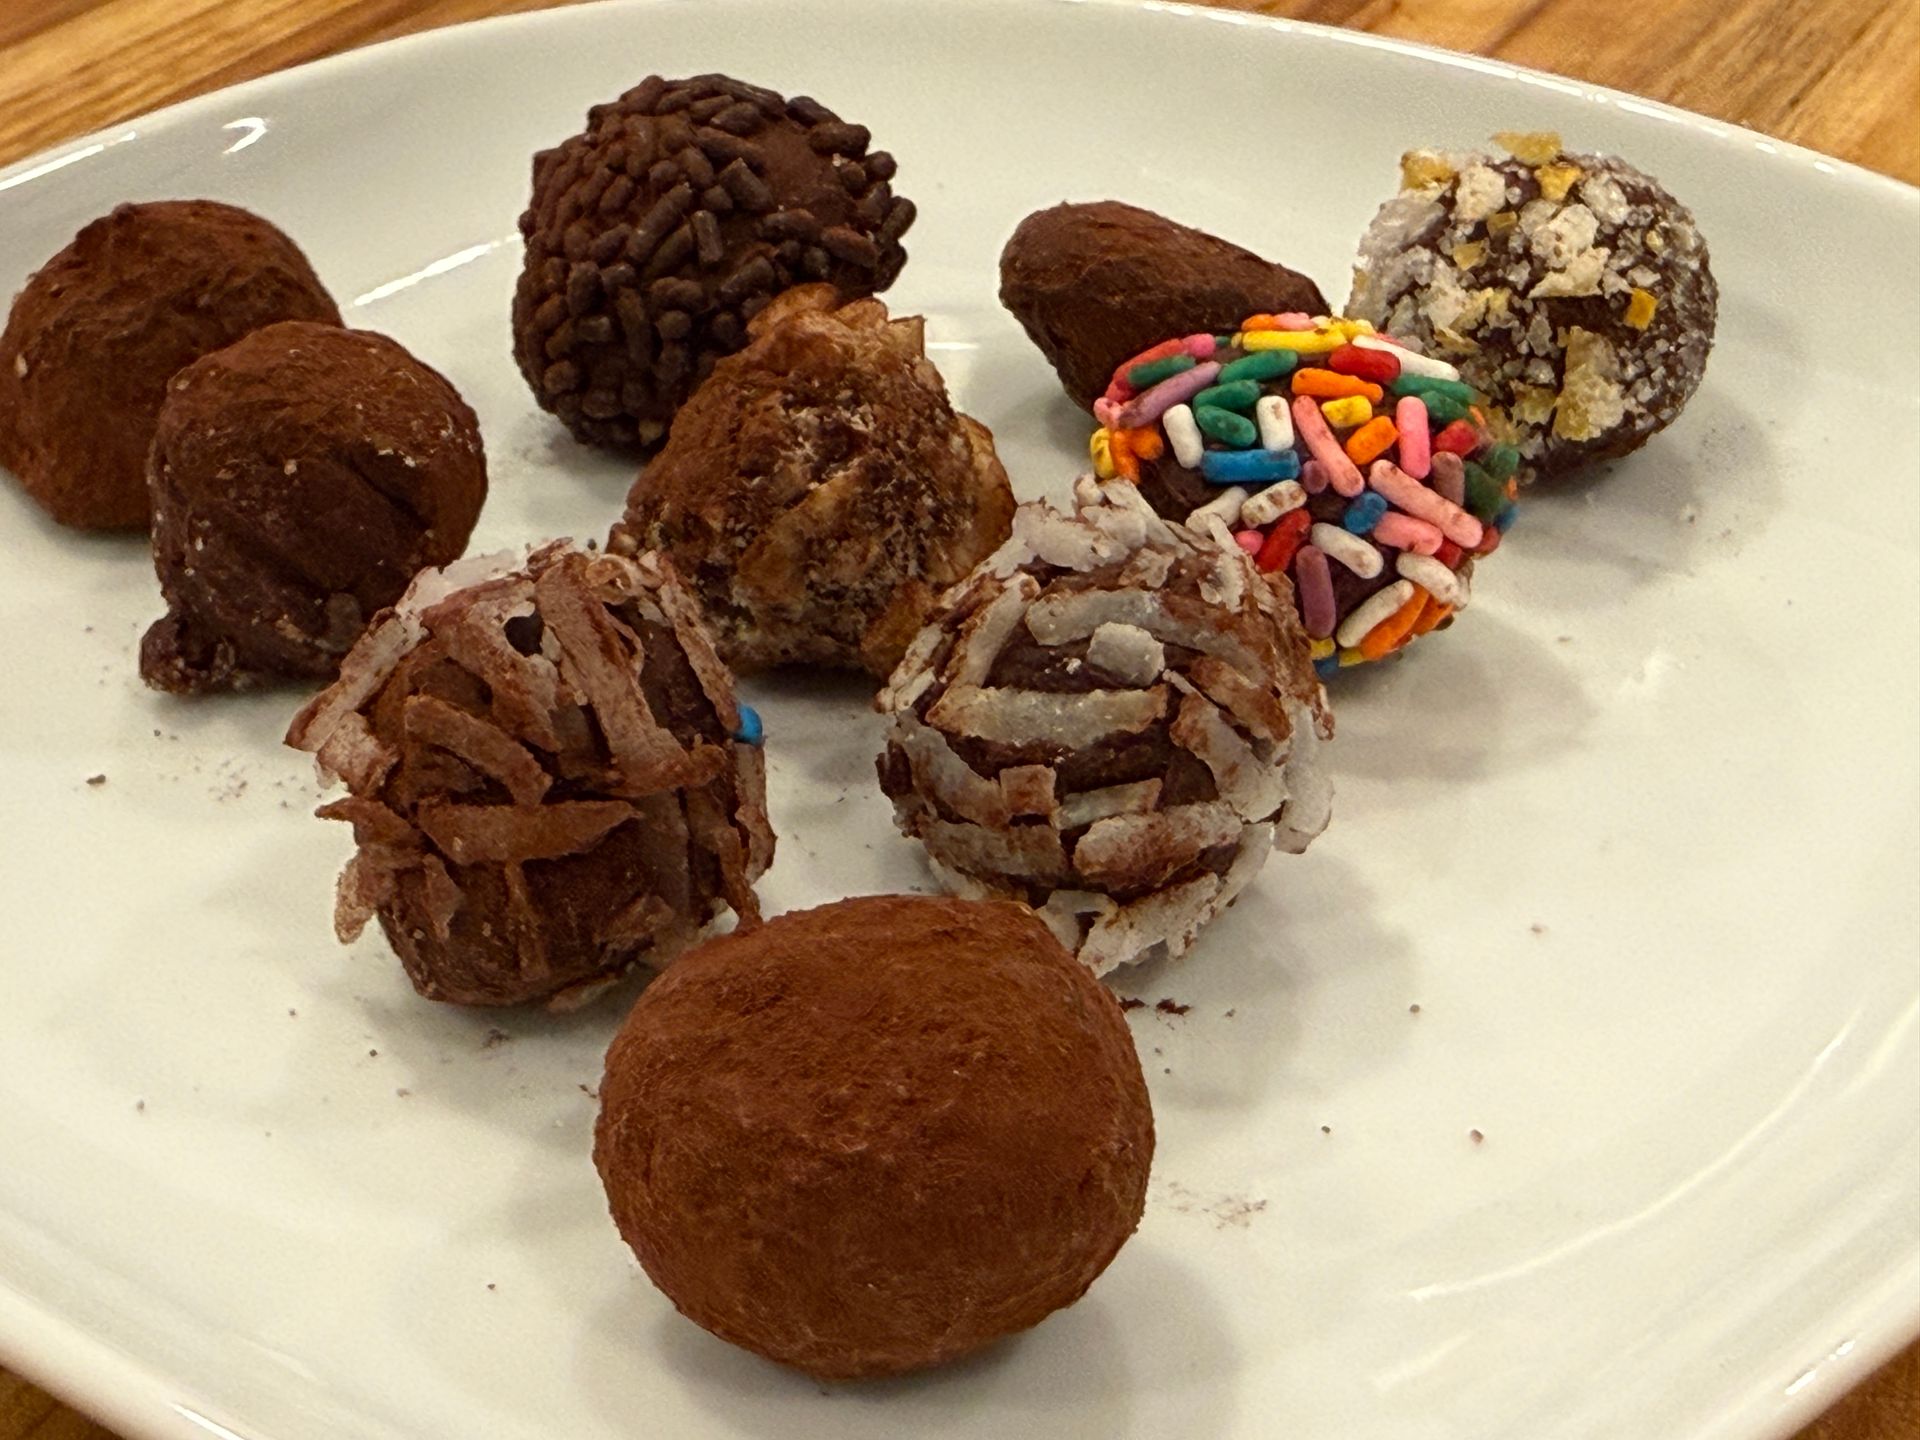
Chocolate Truffles
Chocolate truffles begin with a smooth ganache center, enrobed and finished with toppings like cocoa or coconut.
-
Meringues
Crisp, airy, and just sweet enough. Meringues are whipped to glossy peaks and baked low and slow.
-
Plated Dessert
Our final product, combining elements from Fundamentals of Baking to techniques explored in Advanced Pastry.
COBBLERS & CRISPS
Traditional and speciality fruit desserts:
In Chapter 21 of Professional Baking (p. 599) we take a look at cobblers and crisps. Betty's are also mentioned.
Cobblers are like fruit pies made in large baking pans, but without a bottom crust. They include a cake-like top crust. Crisps are like cobblers but with a streusel topping instead of a pastry crust. The characteristics of a betty are alternating layers of rich cake crumbs and fruit.
Especially after a rich meal, a piece of fresh fruit can be light and refreshing, but perhaps with something from the kitchen that requires a little extra effort such as fruit with cream sauce or a cobbler.
We'll go over compotes in the Crepes and Waffles section, but a simple and versatile category of fruit desserts is the compote, which may be defined as cooked fruit, usually small fruits or cut fruit, served in its cooking liquid. Mixed-fruit compotes are versatile because they can be seasoned and sweetened as desired, and the combination of fruits is infinitely variable.
Recipes
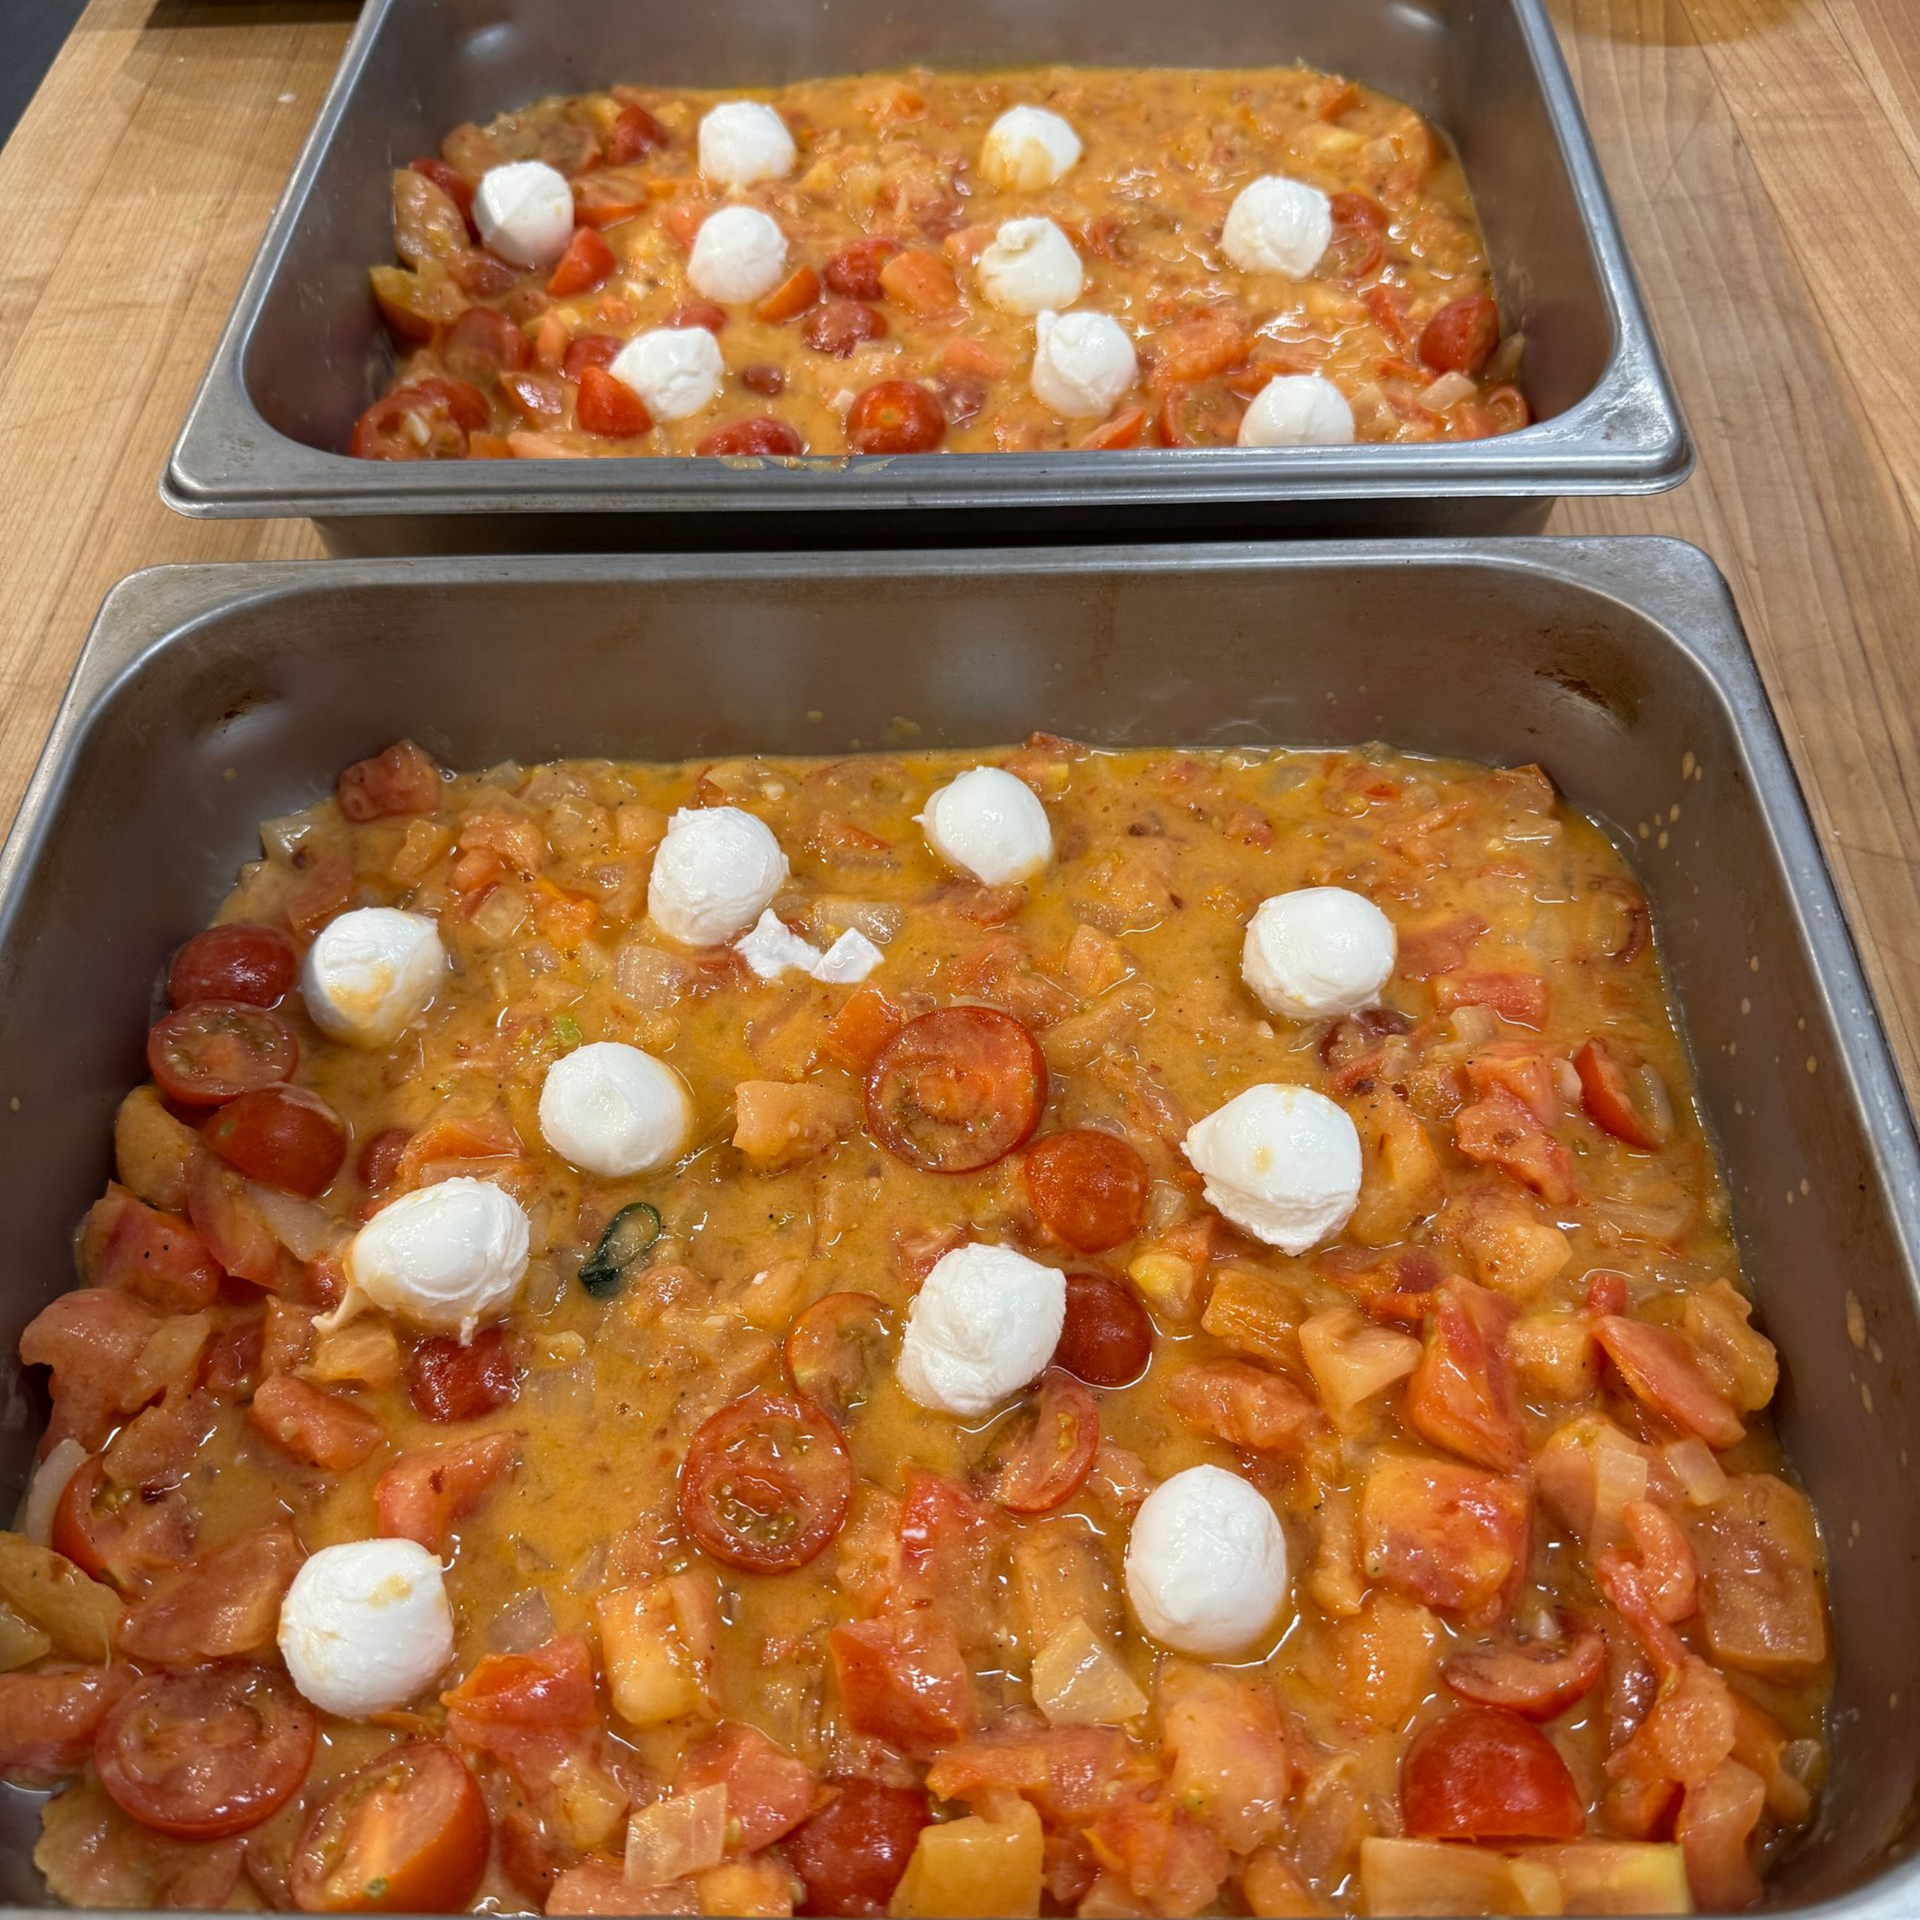
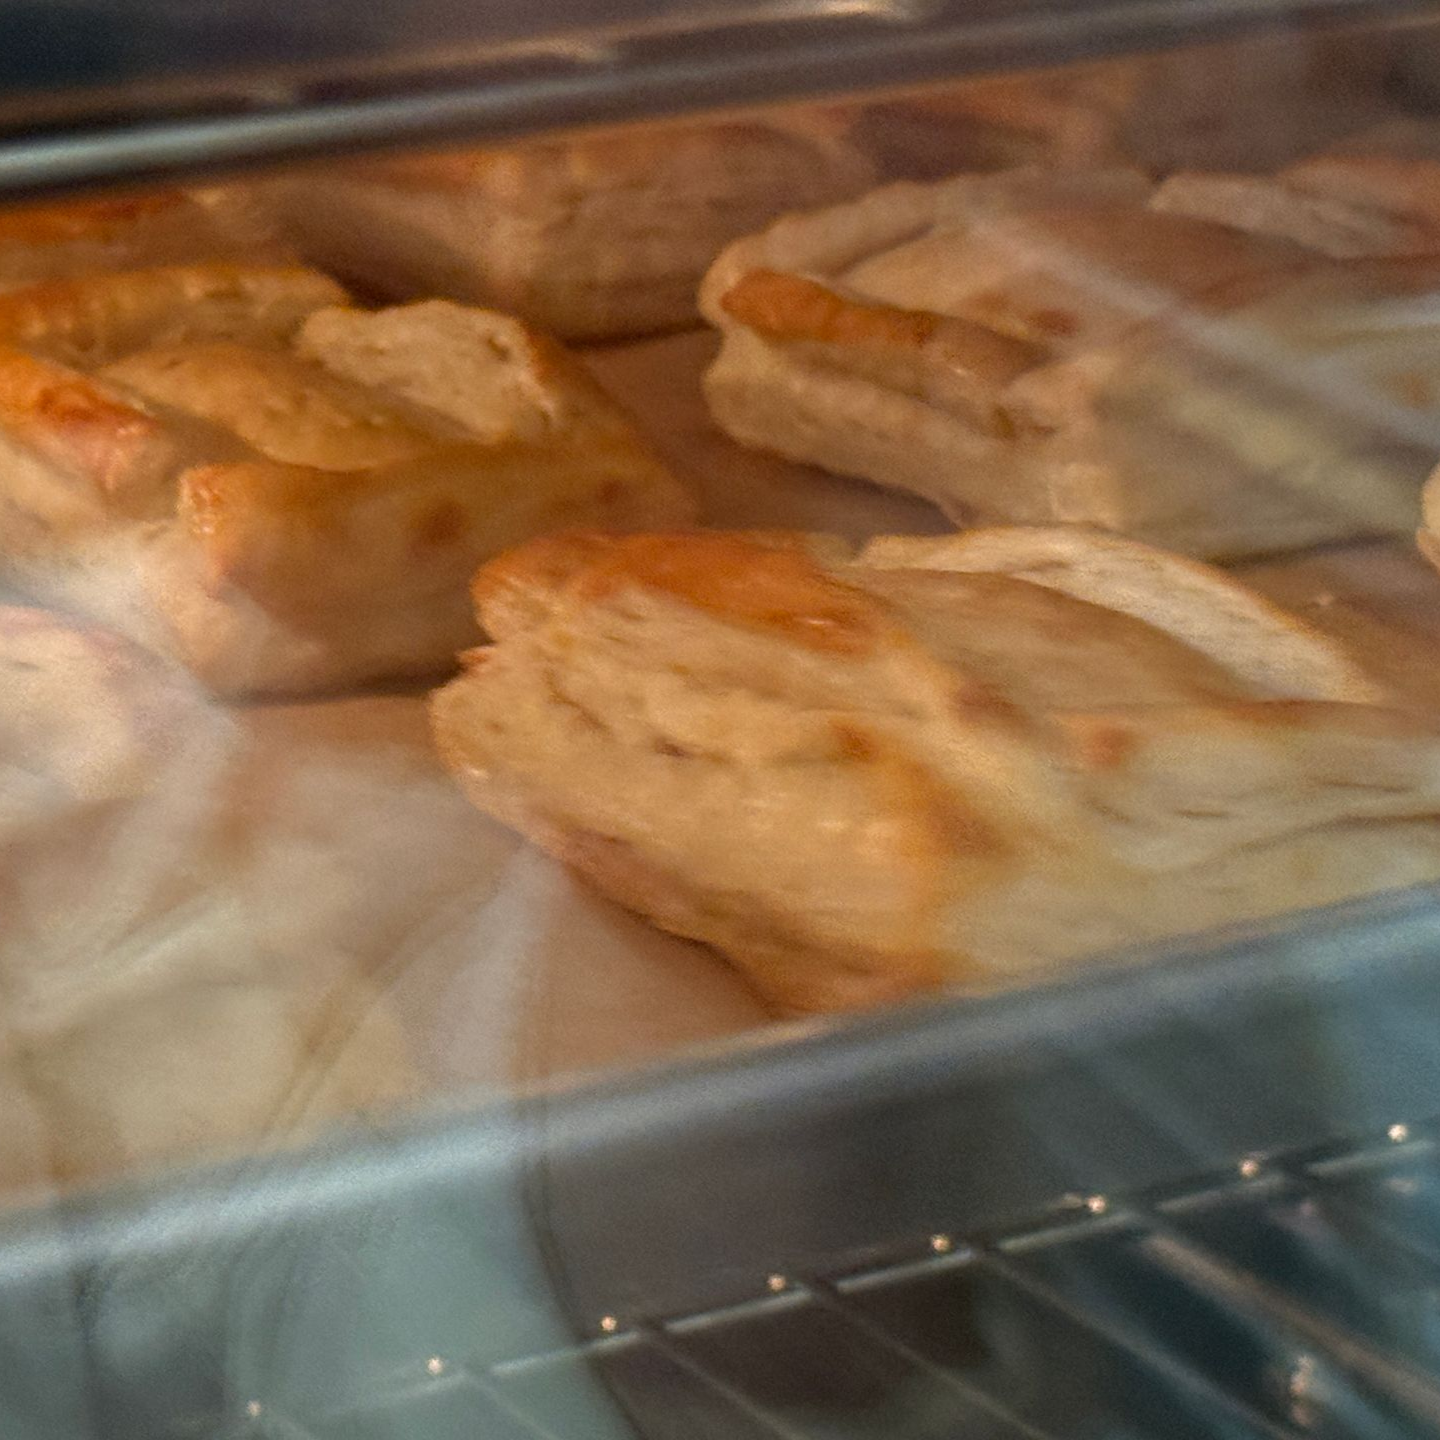
Celebrate a bounty of summer tomatoes with a dish that takes cues from classic Italian flavors. A savory cobbler is a baked dish consisting of a flavorful, stew-like filling topped with a pastry or biscuit crust.
Unlike its sweet counterpart which typically features fruit, the savory version utilizes ingredients such as cooked meats (chicken, beef, lamb), vegetables, and a rich, often creamy or gravy-based sauce.
The "cobbled" appearance comes from the topping which, instead of a solid pie crust, is made of dollops of scone or biscuit-style dough placed over the filling before baking. As it bakes, the dough puffs up and becomes golden brown, with a rugged, uneven top surface that resembles a cobblestone street
INGREDIENTS
- 32 oz frozen peaches sliced into wedges
- 1.8 oz granulated sugar
- 1.9 oz brown sugar
- 1/4 teaspoon cinnamon
- 1/8 teaspoon nutmeg
- 1 teaspoon fresh lemon juice
- 2 teaspoons cornstarch
Cake Topping:
- 8.8 oz all-purpose flour
- 3.6 oz granulated sugar
- 3.8 oz brown sugar
- 2 teaspoons baking powder
- 1 teaspoon salt
- 6 oz cold unsalted butter cut into small pieces
- 4 oz boiling water
Sugar Topping:
- 3 tablespoons white sugar
INSTRUCTIONS
- Preheat oven to 400 degrees.
- In a large bowl, fold the peaches, 1/4 cup each white and brown sugars, cinnamon, nutmeg, lemon juice and cornstarch until all ingredients are well combined.
- Divide into 6 – 4oz aluminum ramekins or hotel pan. Place in preheated oven and bake for 10 minutes.
- While peaches are in the oven, mix together all the cake topping ingredients, except the boiling water, to a medium bowl.
- Use a pastry blender to cut the butter into the dry ingredients until the mixture looks like coarse meal.
- Pour in the boiling water and stir just until the mixture comes together and is just mixed through.
- After the peaches have baked the 10 minutes, pull them from the oven and drop large spoonfuls of the dough topping over peaches.
- Evenly sprinkle the top of the dough with the 3 tablespoons of sugar.
- Place the baking dish on a cookie sheet, in case the cobbler bubbles over and drips, and bake for 30 minutes or until the topping is golden and baked through and the peaches are tender.
Ingredients
- 4 cups blueberries, (fresh or frozen) (600 g)
- /2 cup granulated sugar, (100 g)
- 1 teaspoon lemon zest, (2 g)
- 6 Tablespoons butter, (85 g)
For the batter:
- 1 cup all-purpose flour, (120 g)
- 1 cup granulated sugar, (200 g)
- 2 teaspoons baking powder, (8 g)
- 1/4 teaspoon salt, (1.5 g)
- 3/4 cup milk, (180 ml)
- Ground cinnamon
Instructions
- Preheat oven to 350 degrees F.
- Slice butter into pieces and add to a 9x13 inch baking dish. Place the pan in the oven while it preheats, to allow the butter to melt. Once melted, remove the pan from the oven.
- Add blueberries, sugar and zest to a bowl and stir to combine.
- In a separate bowl mix together the batter ingredients: flour, sugar, baking powder, and salt. Stir in the milk, just until combined.
- Pour blueberries over melted butter in pan. Drizzle batter over the top. Sprinkle with a little bit of cinnamon.
- Bake at 350 degrees for about 35-40 minutes, or until lightly golden on top.
- Serve warm, with a scoop of ice cream, if desired!
HOMEWORK ASSIGNMENT #1
Homework Assignment #1
Read - Chapter 5: Basic Baking Principles Pgs. 99-107
Answer the Questions for Review #'s 1-7 (Pg. 107)
Define the following terms:
- Crumb
- Hydration
- Glutenin
- Gliadin
- Gluten
- Coagulation
- Shortening
- Dough Relaxation
- Gelatinization
- Caramelization
- Maillard Reaction
Review Questions
- List the three stages of mixing a dough or batter
- Blending
- Forming
- Developing
- What are air cell walls made of? Describe how air cells are formed and 2 functions of air cells.
- The cells consist of open spaces surrounded by elastic cell walls made primarily of proteins such as gluten or egg albumin.
- When gases are formed by leavening agents, they collect inside the air cells. As the gases expand during baking, the cell walls stretch and enlarge. Eventually, the heat causes the cell walls to become firm, giving structure and support to the baked item.
- The cells give structure and support.
- What happens when gluten proteins come in contact with water during mixing?
- They become hydrated and form a stretchable substance called gluten. The proteins attach to each other and form long chains that form the gluten structure.
- What is the result of overmixing on bread dough? Pie dough?
- If mixing goes past the state of mature (ideal state of development) the gluten strands can break and the dough becomes sticky and stringy. Overmixing results in poor loaf volume because the broken gluten is no longer able to support the structure. Pie dough will not hold together. Overmixing results in toughness.
- Discuss the 7 factors that affect the development of gluten in batters and doughs.
- Melting of fats – solid fats mixed into a dough or batter trap air, water, and some leavening gases. When the fats melt, these gases are released and the water turns to steam, both of which contribute to leavening.
- Formation and expansion of gases – carbon dioxide is the gas primarily responsible for leavening. It’s released by action of yeast and by baking powder/soda; air, which is incorporated during mixing, and steam, which happens during baking.
- Killing of yeast and other microorganisms – most microorganisms and the yeast die when the interior reaches about 140 degrees F. When the yeast dies, fermentation stops and no more carbon dioxide is released.
- Coagulation of proteins – gluten and egg proteins are primarily responsible for the structure of most baked goods and provide structure when they are heated enough to coagulate or become firm.
- Gelatinization of starches – absorption of starch molecules.
- Escape of water vapor and other gases – throughout baking, some of the water turns to steam and escapes into the air. When this happens before the proteins coagulate, it helps the leavening. Carbon dioxide and other gases escape as well.
- Crust formation and browning – the crust is formed as water evaporates from the surface and leaves it dry. Browning doesn’t occur until the surface temperature reaches about 300 degrees F and until the surface dries.
- Why do some cakes fall if they are removed from the oven too soon?
- If the product is underbaked, the contraction of gases may cause it to collapse.
- Which kind of cake would you expect to have better keeping qualities: a sponge cake, which is low in fat, or a high-ratio cake, which is high in both fat and sugar?
- The text talked about hard-crust breads like French bread staling rapidly since there is little fat. For longer keeping, bakers often add a very small amount of fat and/or sugar to the formula. I would think that high-ratio cakes that are high in both fat and sugar would keep longer.
Definitions
The interior of the baked good is referred to by bakers as the crumb. A loaf of bread consists of two parts: the crust and the crumb.
Hydration is the process of absorbing water. The many ingredients in baked goods absorb or react with water in different ways. All these processes are necessary for dough formation.
Glutenin and gliadin are two proteins found in wheat flour and, in much smaller quantities, in a few other grains, such as rye and spelt. During mixing, these two proteins combine with water (that is, they are hydrated) and form a stretchable substance called gluten. Gluten forms when hydrated glutenin and gliadin proteins uncoil and attach to each other to form long chains. During mixing, these protein chains gradually stretch and become intertwined, forming an elastic network we call the gluten structure.
Coagulation is the firming or hardening of gluten proteins, usually caused by heat. When gluten proteins coagulate during baking, they solidify into a firm structure. A side effect of coagulation is that the proteins release much of the water they absorbed during mixing. Some of this water evaporates and some is absorbed by the starch.
Any fat used in baking is called a shortening because it shortens gluten strands. It does this by surrounding the particles and lubricating them, so they do not stick together. Thus, fats are tenderizers. A cookie or pastry that is very crumbly, which is due to high fat content and little gluten development, is said to be short. French bread has little or no fat, while cakes contain a great deal.
Dough relaxation is an important technique in the production of most doughs. After mixing or kneading, gluten becomes stretched and tight. At this point, it becomes difficult to work or mold the dough. A period of rest or relaxation allows the gluten strands to adjust to their new length and shape, and they become less tight. The dough can then be handled more easily, and it has less tendency to shrink.
Starch molecules make up the majority of most baked goods. Starches make a softer structure when baked than proteins; the softness of the crumb of baked bread is due largely to starch. The more protein, the chewier. Starch molecules are packed into tiny, hard granules that attract water during mixing and, although the water is not absorbed by the granules when cold, it bonds to the outside of the granules. As they are heating during baking, the water is then absorbed into the granules, which swell greatly in size. Some of the starch granules break open and release starch molecules. During this process, starch molecules bond with any available water. That’s why the interior of baked doughs are fairly dry, while unbaked doughs are moist. Most, but not all, of the water is still present but has bonded with starch. This process is gelatinization and begins when the interior reaches 105 degrees F and continues throughout baking or until about 200 degrees F. Not all of the starches gelatinize – depending on how much water is present. Dry products like cookies and pie doughs, a lot of the starch remains ungelatinized. Products from a batter with high water content like some cake has a larger percentage of starches that gelatinize.
Browning occurs when chemical changes occur to starches, sugars, and proteins. This is referred to as caramelization, but it’s only part of the story. Caramelization involves only browning of the sugars. A process that is similar is called the Maillard Reaction. It involves most of the crust browning in baked goods – the process occurs when proteins and sugars together are subjected to high heat. Maillard also takes place on the surface of meats and other high-protein foods. The chemical changes as a result of these two types of browning contribute to the flavor and appearance of the baked item. Items like milk, sugar, and eggs, when included in doughs and batters, increase browning.
CRÊPES & WAFFLES
Crepe Batter
The batter consists of five simple ingredients: eggs, milk, flour, melted butter and salt. You could whisk the ingredients together by hand, however, for the silkiest batter, a blender is recommended. The consistency of the batter is key: It should be slightly thinner than heavy cream, with no lumps. Add sugar and vanilla for a sweet crepe; chopped herbs or grated parmesan steer you in a savory direction.
30 minutes of resting time
Resting the batter allows the flour to fully absorb the liquid and gives the gluten a chance to relax. While it’s not the end of the world if you skip this step, it is the secret to the most delicate, melt-in-your-mouth crepes. Let the batter stand at room temperature for 30 minutes, or refrigerate for up to two days. (If you mix it the night before, you don't have to worry about bringing the batter to room temperature before using it.) Once rested, give the batter a stir before cooking and if it appears too thick (sometimes this happens when the flour becomes fully hydrated), gently whisk in milk, a tablespoon at a time, until it's thinned to the right consistency.
Crepe pan vs. frying pan
A well-seasoned crepe pan is ideal for cooking crepes because the short sides make them easy to flip, while the heavy bottom ensures consistent heat and even cooking. But if you don't have a crepe pan, a medium non-stick or well-seasoned, cast-iron frying pan will do the trick. The size of your pan depends on how big you want your crepes, but seven to eight inches is standard.
Even, medium heat
Set your heat to medium and let the pan get hot (but not too hot). You might even need to adjust the heat to medium-low as the cooking continues. If the heat's too high the batter won't spread to the edges of the pan before setting, and can result in holes or uneven thickness.
Fat
Butter is ideal—it will keep the crepes from sticking and add amazing flavor. Use a pastry brush or paper towel to coat the pan very lightly with melted butter. Too much butter can result in greasy crepes that are crispy, dark brown and not as pliable as you'd like.
Measure out the portions
For the thin, lacy crepes of your dreams, add only 2 to 3 tbsp of batter to the center of a standard seven-to-eight-inch pan. Pouring the batter from a pitcher with a spout can be helpful, or use a small ladle or measuring cup to help get the portion right each time.
The proper technique
Lift the pan from the heat and tilt your wrist so that the batter pours to one side, then swirl it around so it coats the whole pan bottom evenly. Check out the technique in the video at the top.
Use a rubber spatula
When the crepe looks dry on top and it releases from the pan (this usually takes 1 to 2 minutes), it’s ready to flip. Loosen the edges with a rubber spatula. You can use the spatula to flip, but your fingers are your best tool: lift an edge, peel the crepe up, then gently turn it over (just don’t touch the pan). The second side cooks in about half the time as the first. You’ll know it’s done when the bottom is lightly golden.
Like pancakes, the first crepe is never perfect. So don’t sweat it. Consider crepe #1 as a test to see if you have enough batter in the pan, if the heat of the pan is right and if your technique needs tweaking.
A clean towel
Stack crepes on a plate or baking sheet and cover with a clean kitchen towel until the whole batch is cooked. They'll stay quite warm; crepes don't need to be piping hot when they're filled.
How to store leftover crepes
Place sheets of parchment or wax paper between crepes, cover tightly with plastic wrap and refrigerate up to two days or freeze up to one month. Rewarm refrigerated or thawed frozen crepes in the microwave for about 30 seconds or a 325F oven for five minutes.
How do you keep crepes warm and crispy?
To keep crepes warm, arrange them on a baking sheet, overlapping slightly and using parchment paper between the layers. Keep these warm in a 200-degree oven for up to 30 minutes or until needed. If you are making the crepes in advance, you can either refrigerate or freeze them for later use.
How do you reheat crepes that have been refrigerated?
Skillet Method
Step 1
Preheat a non-stick skillet on the stove over medium heat.
Step 2
Brush the skillet lightly with butter or spray lightly with non-stick cooking spray.
Step 3
Place the crepe in the skillet. Heat the crepe for 30 to 60 seconds on the first side.
Step 4
Flip the crepe with a spatula and heat it for about 30 seconds on the other side, or until hot. Flip slowly and carefully to avoid tearing the thin crepe and to ensure that it lays flat in the pan without creasing.


Recipes
Half Batch: 15 oz
- Pastry flour 4 oz
- Salt - ¼ t .04 oz
- Baking powder – 2 t .25 oz
- Egg yolk, beaten – 2 1 oz
- Milk 6 oz
- Butter, melted, or oil 2 oz
- Egg whites – 2 1.5 oz
- Sugar – 1 Tbsp .5 oz
Make Up Instructions:
Muffin method
1. Sift together dry ingredients.
2. Combine the egg yolks, milk, and fat.
3. Add the liquid ingredients to the dry ingredients. Mix until just combined. Don’t over mix.
4. Just before they are to be cooked, whip the egg whites until they form soft peaks. Then beat in the sugar until the meringue is stiff. Fold into the batter.
5. Pour enough batter onto a lightly greased, pre-heated waffle iron to almost cover the surface. Close the iron.
6. Cook the waffles until the signal light indicates they are done, or until steam is no longer emitted. The waffles should be brown and crisp.
7. Serve warm with confectioners’ sugar, syrup, jam, or fresh fruit.
Yield: 18 oz (about 12 crêpes)
- Bread Flour 2.2 oz
- Cake Flour 2.2 oz
- Sugar – 1 T .5 oz
- Salt – ½ t .1 oz
- Eggs – 2 3.2 oz
- Milk 8.6 oz
- Clarified Butter 1.3 oz
Make Up Instructions:
1. Sift flours, sugar, and salt in a bowl.
2. Add the eggs and just enough of the milk to make a soft paste with the flour. Mix until smooth and lump-free.
3. Gradually mix in the rest of the milk and the oil. The batter should be about the consistency of heavy cream. If it is too thick, mix in a little water. If it has lumps, pour it through a strainer.
4. Let batter rest for 30 min. to 2 hours. Room temp or refrigerate up to 2 days. Once rested, give the batter a stir before cooking. If too thick, gently whisk in some milk a Tbsp at a time until the right consistency.
*According to the tip sheet, with the 5 simple ingredients, you could whisk by hand or for silkier batter, a blender is recommended. The consistency of the batter is key. It should be slightly thinner than heavy cream with no lumps. Add sugar and vanilla for sweet crepes; chopped herbs or grated parmesan steer you in a savory direction.
5. Rub a 6 or 7” crepe pan or skillet lightly with oil. Heat the pan over moderately high heat until it is very hot. Brush lightly with melted butter and pour off excess.
6. Remove from heat and pour in about 3-4 Tbsp of the batter. Quickly tilt the pan to cover the bottom with a thin layer. Immediately dump out any excess batter because the crepe must be very thin.
7. Return to heat for about 1-1 ½ minutes, until the bottom is lightly browned. Flip the crepe and brown the second side. The second side will brown only in a few spots and will not be as attractive as the first side. Therefore, the first side should always be visible when the crepe is served.
8. Slide crepe onto a plate. Continue making the crepes and stacking them as they are finished. Grease the pan lightly when necessary.
9. Cover the finished crepes and refrigerate until needed.
Compote is a chunky fruit sauce made by simmering whole or chopped fruit (fresh or frozen) with sugar, and sometimes spices or liquor, until softened and syrupy. It's similar to jam but chunkier and typically served warm or chilled as a dessert topping for yogurt, ice cream, pancakes, or as a side for cheese. Key ingredients are fruit, a sweetener, and optional flavorings like cinnamon, ginger, or lemon, with a quick cooking time that preserves texture.
Key characteristics
-Texture: Chunky, with whole or large pieces of fruit in a syrup.
-Preparation: Fruit is gently cooked in a saucepan with sugar and liquid, often for 10-20 minutes.
-Ingredients: Can be made with any fruit (berries, apples, peaches, etc.), sugar, and flavorings like spices, citrus juice, or herbs.
-Versatility: Can be sweet or savory and served in many ways.
How to serve
Dessert: Over ice cream, pound cake, yogurt, or custard.
Breakfast: On pancakes, waffles, oatmeal, or French toast.
Savory: With cheese or roast pork.
How it differs from jam and coulis
Jam: Cooked longer and strained to be smooth and spreadable.
Coulis: Cooked and then pureed and strained for a very smooth sauce.
HOMEWORK ASSIGNMENT #2
Homework Assignment #2
Chapter 19: Custards, Puddings, Mousses and Soufflés
Read - Chapter 19 pgs. 528-529, 531, 541-543, and 557.
Answer Questions for Review #'s 1-6 (Pg. 565)
Please submit this assignment as a typed Word Document. Use complete sentences and please number your answers.
Answer the Questions for Review #'s 1-7 (Pg. 107)
Define the following terms:
· Custard
· Stirred Custard
· Baked Custard
· Crème Anglaise
· Pastry Cream
· Soufflé
Review Questions
- What is the internal temperature at which the eggs in custard mixtures become cooked or coagulated? What happens to stirred custards and baked custards if they are cooked beyond this point?
- 185 degrees F. If cooked beyond this point, it will begin to curdle.
- The basic techniques used to make crème anglaise and baked custards are also used for some of the following preparations. Identify which of the following desserts are made using a stirred custard (custard sauce) technique, which are made using a baked custard technique, and which are made without any custard:
- Bread pudding – baked custard technique
- Christmas pudding – no custard (and it is a steamed dessert)
- Chocolate Bavarian – stirred custard technique
- Baked cheesecake – baked custard
- Apple cobbler – No custard
- Charlotte russe – stirred custard (made of a Bavarian cream – custard sauce or crème anglaise, gelatin and whipped cream) that is a molded dessert
- Chocolate pots de crème – baked custard
- Apple charlotte – no custard
- What is the main difference between cornstarch pudding and cream pudding?
- Cream pudding is the same as pastry cream; that is, a stirred custard that contains starch and eggs as thickeners and yields a much thicker, more stable product.
- Constarch or blancmange uses milk, sugar, and flavorings and is thickened with cornstarch or another starch – so it does not use eggs like cream pudding
- In the production of Bavarian creams and other desserts stabilized with gelatin, why is it important to measure the gelatin carefully?
- If not enough gelatin is used, it’ll be too soft and not hold its shape. If too much is used, the cream will be too firm and rubbery.
- When making a Bavarian or chiffon pie filling, what difficulty would you encounter if you chilled the gelatin mixture too long before folding in the whipped cream or egg white?
- It will become too firm to fold in the whipped cream and would likely be lumpy and uneven.
- When making dessert soufflés, what is the advantage of adding part of the sugar to the whipped egg white?
- It will give provide a more stable product.
Definitions
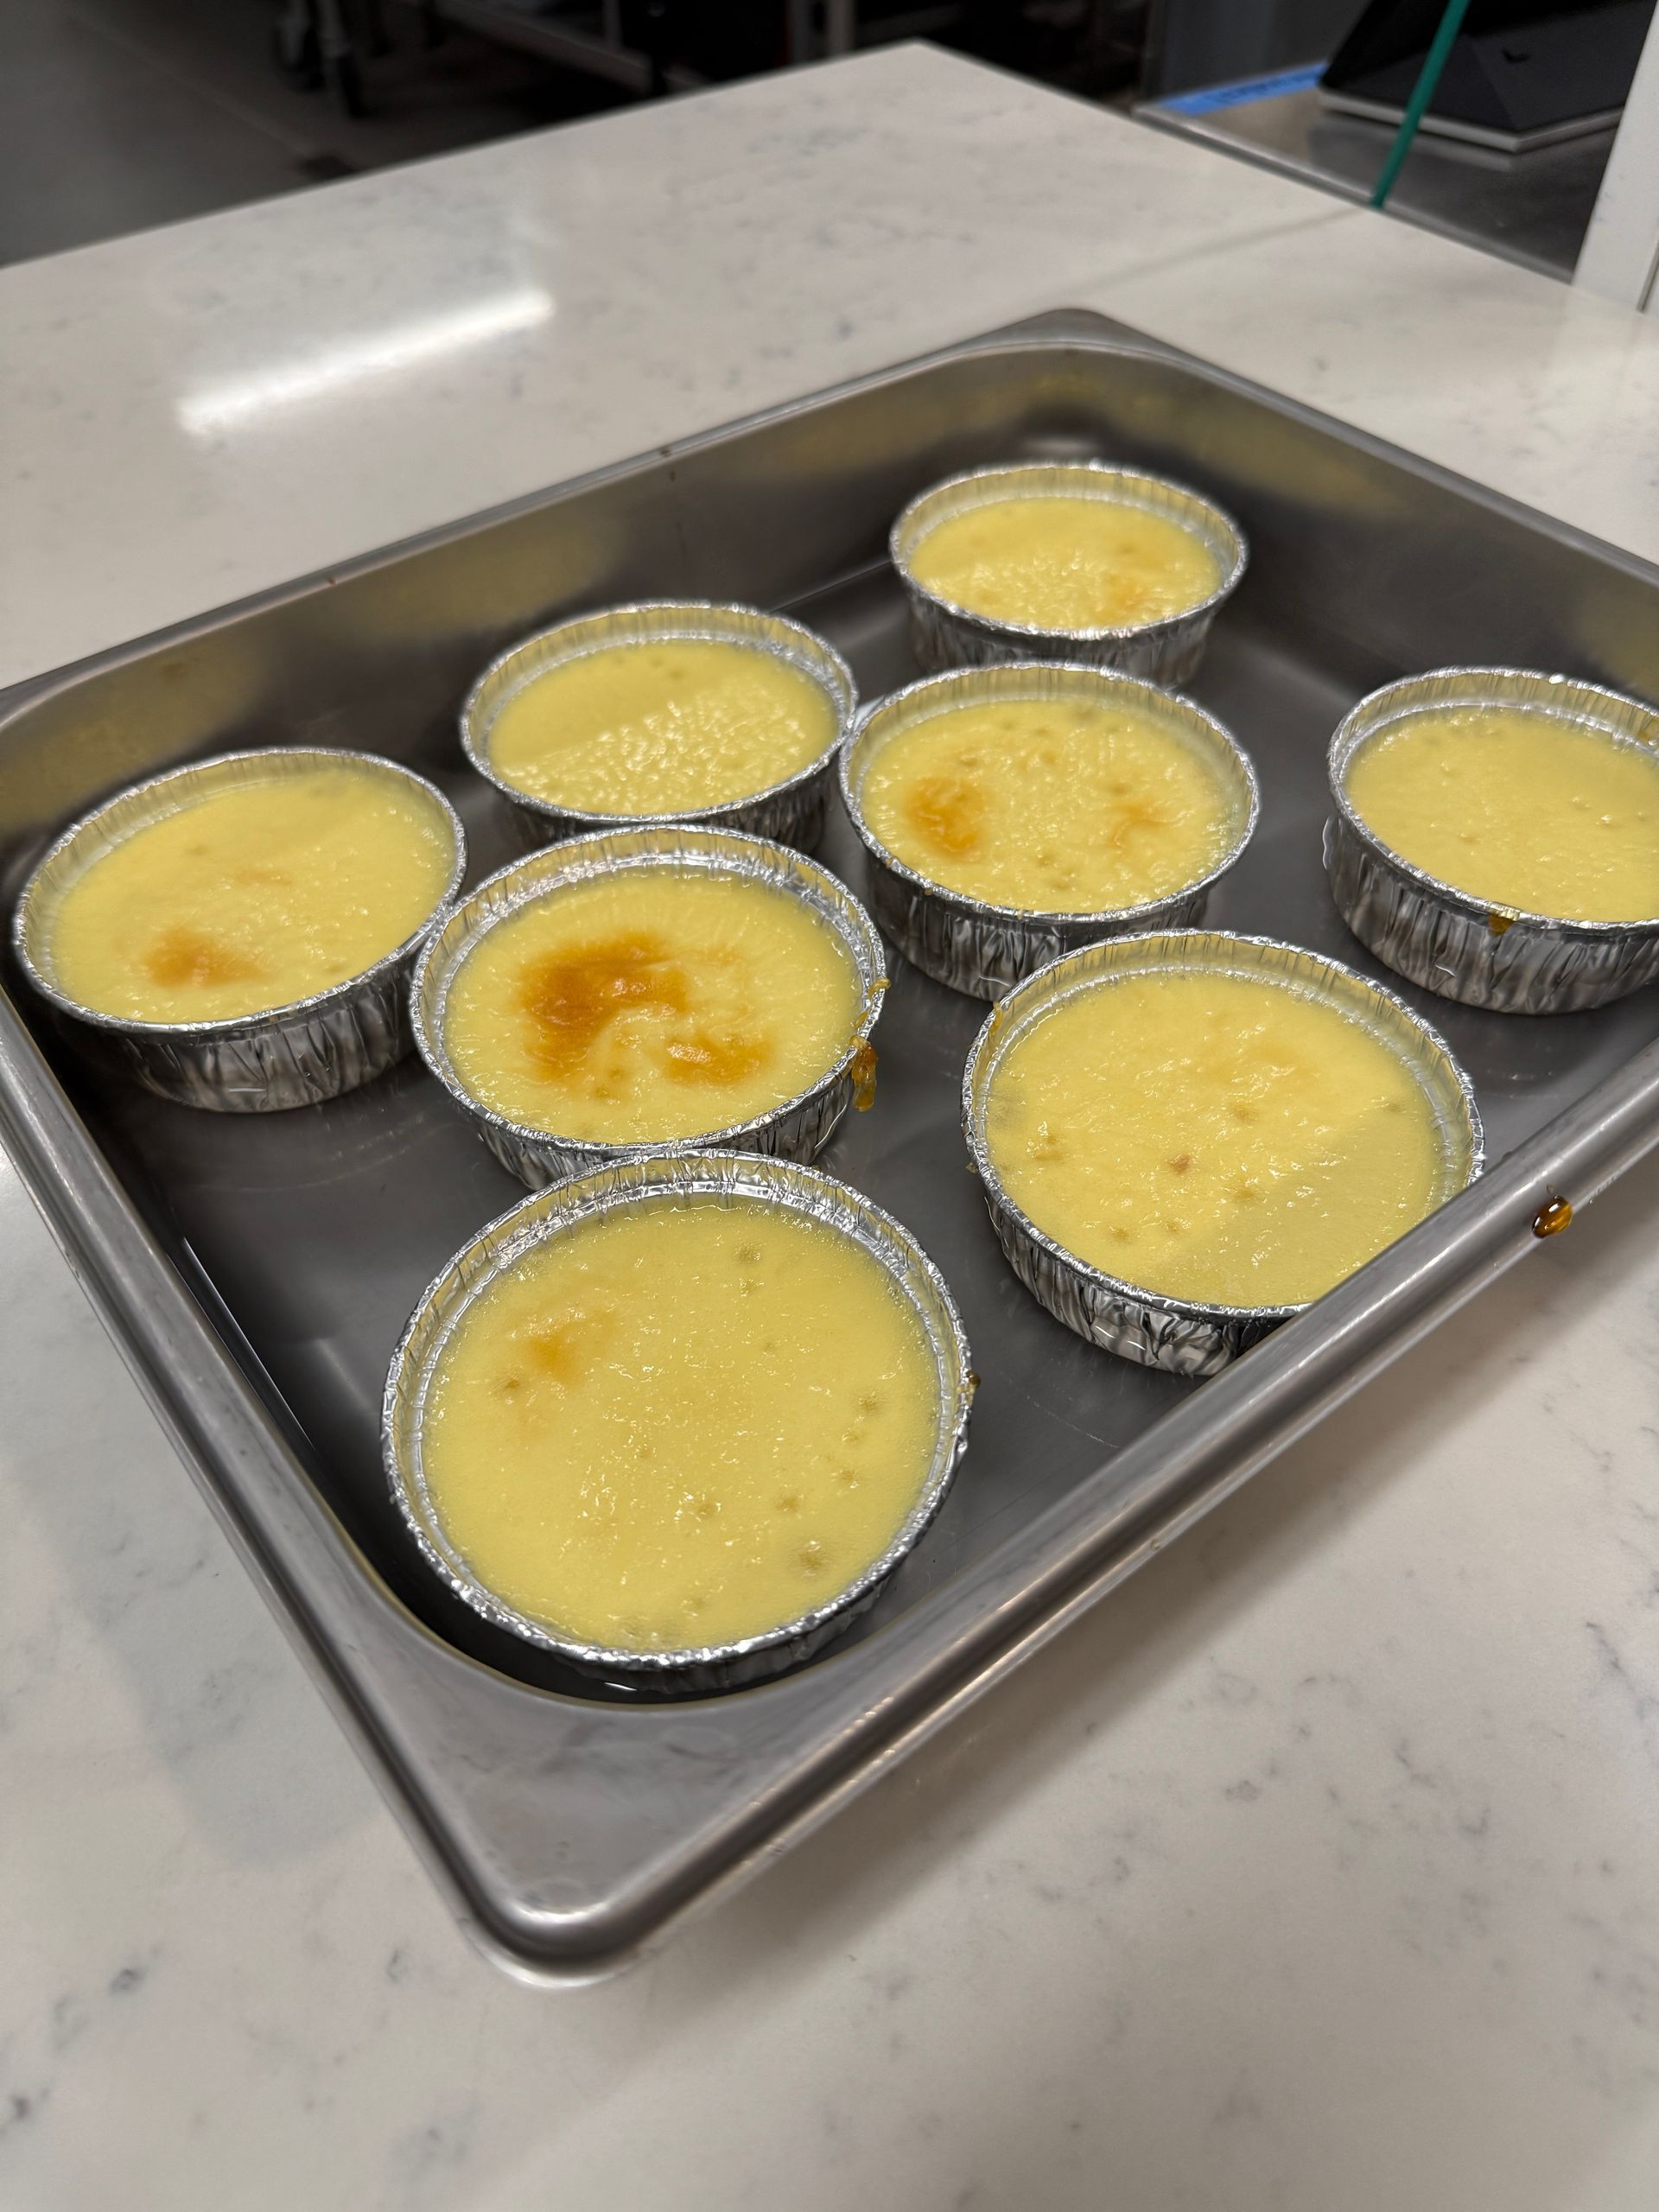
Custards are the basis of many puddings – it is a liquid thickened or set by the coagulation of egg protein.
There are two basic kinds – stirred custard is stirred as it cooks and remains pourable when cooked (except for pastry cream) and baked which is not stirred and sets firm.
A basic rule governs the preparation of both custards: do not heat custards higher than an internal temperature of 185 degrees F. That’s the temp at which egg-liquid mixtures coagulate and will curdle if heated beyond this. An overbaked custard will be watery because the moisture separates from the toughened protein.
Crème anglaise is a vanilla custard sauce, is a stirred custard. It consists of milk, sugar, egg yolks, and is stirred over very low heat until lightly thickened.
Pastry cream is stirred custard that contains starch thickeners as well as eggs, resulting in a much thicker and more stable product. Because of the stabilizing effect of the starch, pastry cream is an exception to the rule just given not to heat custards over 185 degrees F. In addition to its use as a component of many pastries and cakes, pastry cream is also the basis for cream puddings.
Soufflés are lightened with beaten egg whites and then baked. Baking causes the soufflé to rise like a cake because the air in the egg foam expands when heated. Toward the end of the baking time the egg whites coagulate or become firm. However, soufflés are not as stable as cakes. They will fall shortly after they are removed from the oven. They should be served immediately. A standard soufflé contains three elements: a base which are in most cases heavy, starch-thickened preparations, like pastry creams or sweetened white sauces; flavoring ingredient added to the base and mixed in well such as melted chocolate, lemon, and liqueurs (small quantities of solid ingredients like dried candied fruits or finely chopped nuts may be added); egg whites whipped with some of the sugar with makes dessert soufflés more stable.
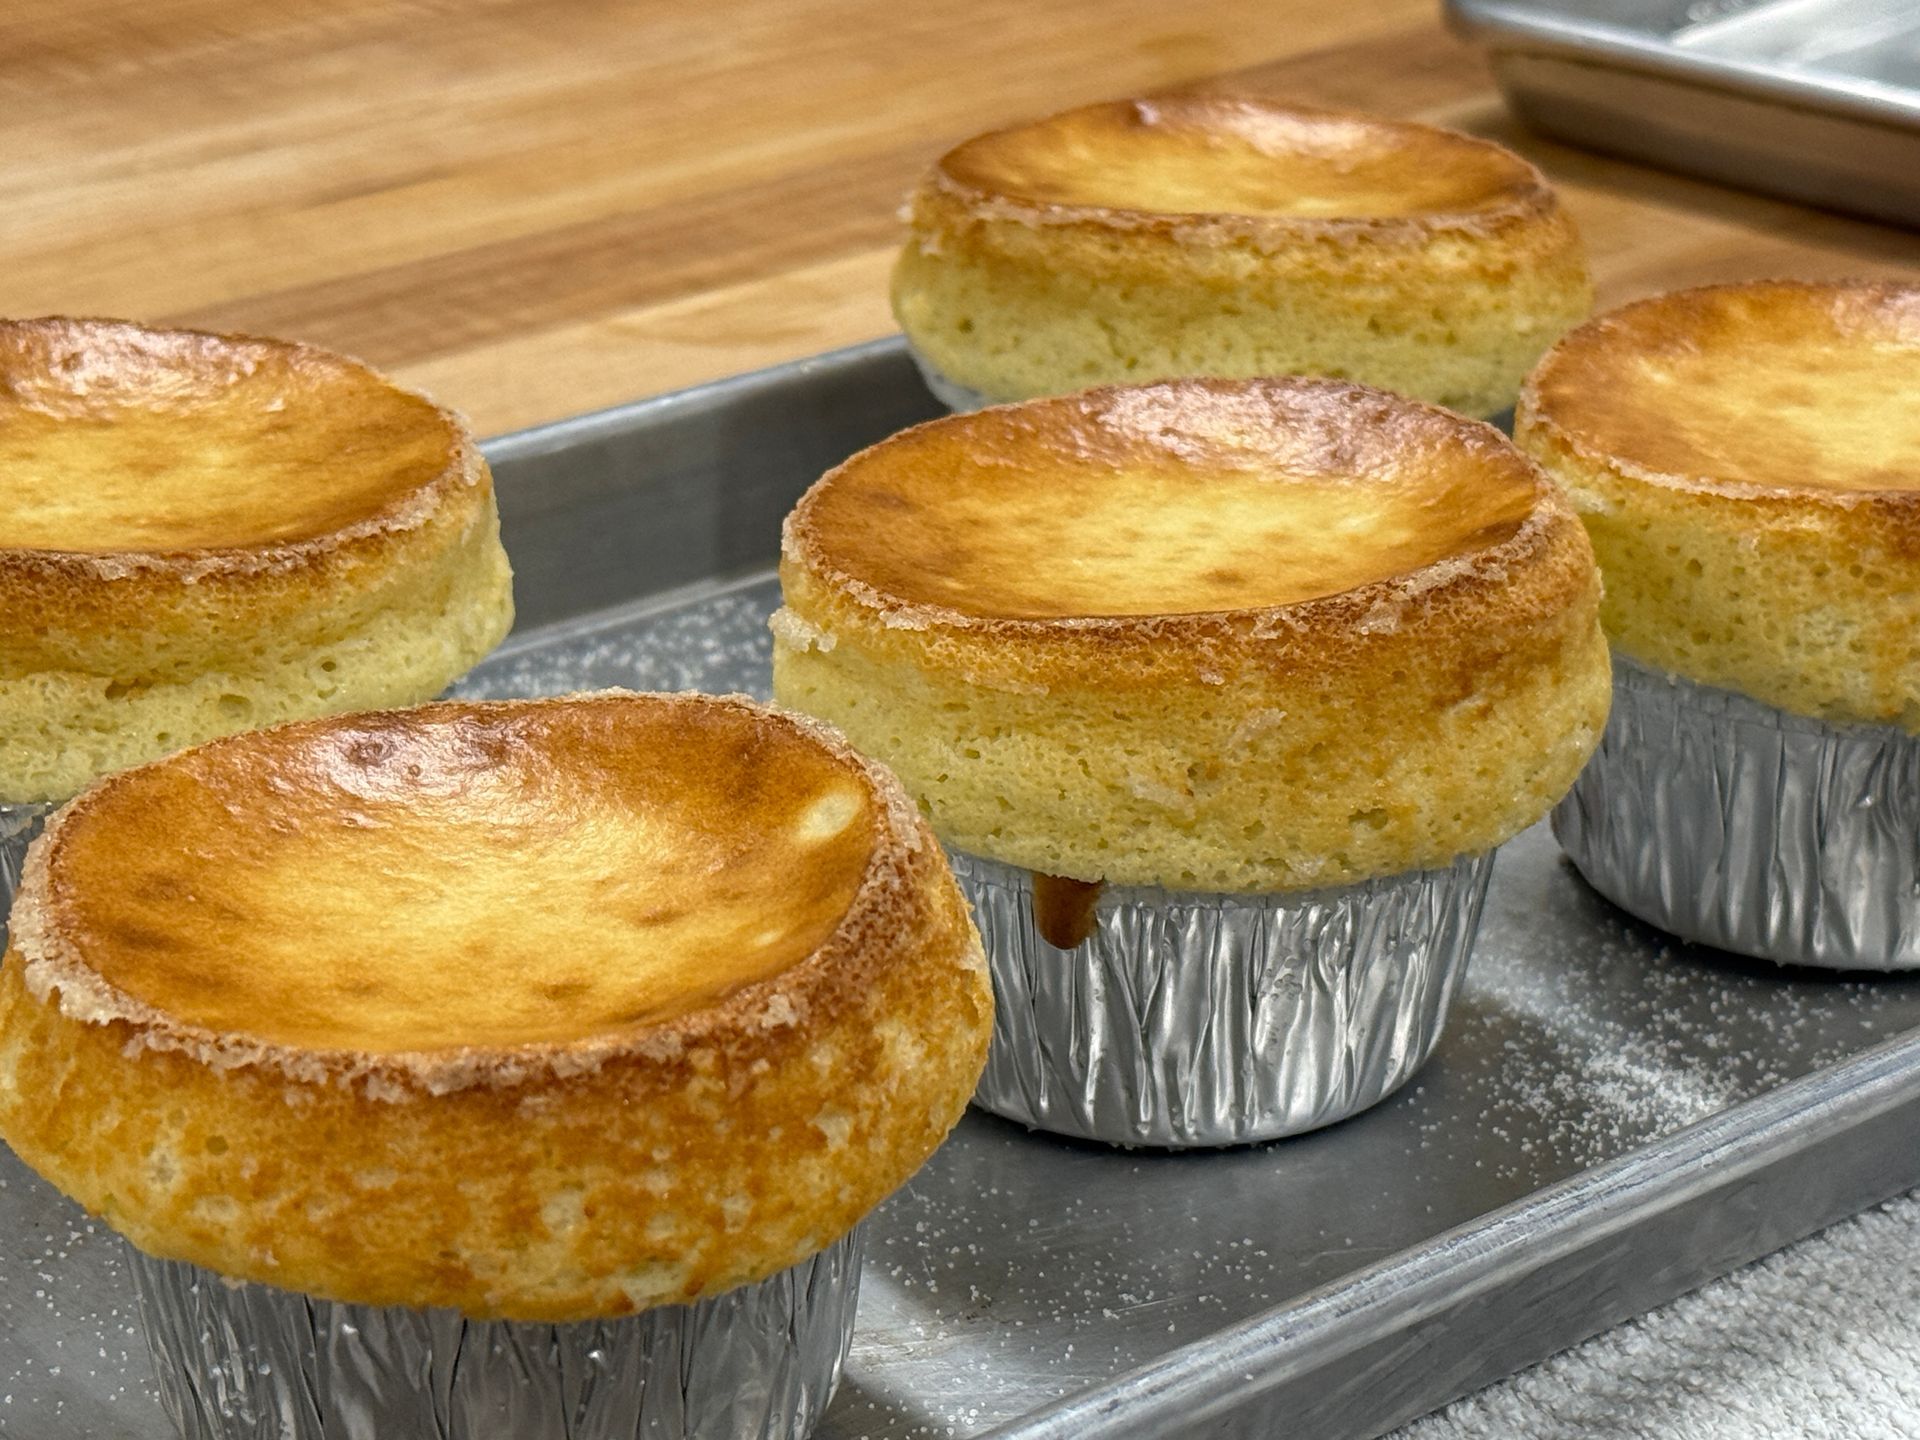
CUSTARDS & SOUFFLES

Custards- Can be characterized as being stirred, baked or as sauces.
Types:
Custards are categorized by how they’re thickened.
Pure or basic custards are thickened and set by eggs alone. These are the most delicate custards; they require careful attention during cooking, which is usually done in the even heat of a water bath, as they can quickly go from undercooked to broken and curdled.
Starch-thickened custards contain ingredients such as flour or cornstarch for added thickening power. These starches give custards more body, making them sturdy enough to endure cooking with direct heat.
Gelatin-set custards have an alluring richness from the structural boost that only gelatin can provide.
Anyway you make it temperature is very important!!!!
The science behind basic custards
What sets them apart ? These delicate custards are thickened only with eggs. When heated, the egg proteins slowly unwind from a coil-like shape and elongate. The proteins can then easily catch onto one another to form a gel, which thickens the mixture.
Delicious examples Crème anglaise, a classic dessert sauce made with lightly sweetened milk and cream and just barely thickened with egg yolks, is the thinnest of all basic custards. If you freeze this custard sauce, you get ice cream. If you add more egg and bake it, you have flan, pot de crème, crème brulee, or crème caramel. If you pour it over bread cubes and bake it, you’ve made bread pudding.
Getting them right Sweet custards typically thicken between 160°F and 180°F, well below the boiling point. If you go past that point, the egg proteins lose their shape and can no longer hold liquid, so baked custard like crème caramel will appear curdled and runny, and a stirred custard sauce like crème anglaise may have bits of scrambled egg in it.
To prevent overcooking, basic custards are usually cooked over a double boiler or baked in a water bath. These techniques ensure slow, even cooking and provide a layer of insulation that cooking directly over a burner simply can’t—it’s just too easy to scorch delicate custards over direct heat. Whether you’re using a double boiler or not, when cooking a basic custard on the stove-top, check its temperature frequently to ensure that it doesn’t go above 180°F. Remove baked custards from the oven when they have just a slight wobble in the center when nudged; residual heat will continue to cook them until fully set.
Terminology
Pastry Sauce is stirred custard. We make pastry sauces from eggs, whole or yolks or a combination, sugar, milk or cream or a combination, salt, a thickener such as flour, or cornstarch and butter and vanilla.
Pastry Cream is the only custard that can be brought to a boil safely over direct heat.
The starch protects the egg from curdling.
The Process
- Warm the Milk: Warm the milk in the saucepan until you start to see wisps of steam. It should not actually be boiling.
- Make the Egg-Sugar Base: In a medium bowl, whisk together the sugar, flour, and salt. Add the egg yolks and whisk them into the dry ingredients. This will form a thick paste. It's fine if the paste looks crumbly or smooth; the important thing is that the ingredients are thoroughly combined.
- Add the Milk to the Egg Mixture: Pour a little of the hot milk into the eggs and whisk to combine. Continue pouring the milk slowly into the eggs, whisking continuously. It's ok to switch back and forth between pouring milk and whisking if you can't manage both at the same time. When all the milk has been added to the eggs, pour everything back into the saucepan. Set a strainer over a bowl and place this near the stove.
- Heat the Pastry Cream: Set the pan back over medium heat. Whisk constantly. At first, the pastry cream will look very thin and frothy, but it will start to thicken after a few minutes. Whe 1. Warm the Milk: Warm the milk in the saucepan until you start to see wisps of steam. It should not actually be boiling.
- Make the Egg-Sugar Base: In a medium bowl, whisk together the sugar, flour, and salt. Add the egg yolks and whisk them into the dry ingredients. This will form a thick paste. It's fine if the paste looks crumbly or smooth; the important thing is that the ingredients are thoroughly combined.
- Add the Milk to the Egg Mixture: Pour a little of the hot milk into the eggs and whisk to combine. Continue pouring the milk slowly into the eggs, whisking continuously. It's ok to switch back and forth between pouring milk and whisking if you can't manage both at the same time. When all the milk has been added to the eggs, pour everything back into the saucepan. Set a strainer over a bowl and place this near the stove.
- Heat the Pastry Cream: Set the pan back over medium heat. Whisk constantly. At first, the pastry cream will look very thin and frothy, but it will start to thicken after a few minutes. When it has thickened to a pudding-like consistency, pause whisking every few seconds to see if the cream has come to a boil. If you see large bubbles popping on the surface, whisk for a few more seconds and then remove the pan from heat.
- Strain and Cool the Pastry Cream: Stir the vanilla into the pastry cream and then pour the cream into the strainer set over the bowl. Stir to push it through the strainer. This will catch any bits of cooked egg that may be in your pastry cream.
- Cover the pastry cream with a piece of plastic wrap pressed right up against the surface of the cream and chill completely.
Crème Anglese: Is similar to pastry cream only a thinner version. No additional thickener added. It is thickened to Nape Stage which can be reached with eggs natural thickening power. No added starches. It is usually richer in the use of only yolks instead of whole eggs as with pastry cream. It is not exposed to direct heat but indirect heat while cooking as well. Traditionally a double boiler is required to get gentle heating.
The process:
The cream is made by whipping egg yolks and sugar together until the yolk is almost white, and then slowly adding hot milk, while whisking. Vanilla beans (seeds) may be added for extra flavor and visual appeal. The sauce is then cooked over low heat (otherwise the yolks will cook, resulting in scrambled eggs) and stirred constantly with a spoon until it is thick enough to coat the back of a spoon, and then removed from the heat. If the sauce reaches too high a temperature, it will curdle. Cooking temperature should be between 70 °C (156 °F) and 85 °C (185 °F); the higher the temperature, the thicker the resulting cream, as long as the yolks is fully incorporated into the mixture.
Chantilly Cream
In the classical pastry shop, sweetened vanilla flavored whipped cream in known as crème Chantilly.
Guidelines for whipping cream
- Cream to be whipped should be at least 1 day old. Very fresh cream doesn’t whip well.
- Chill cream and all equipment to whip the cream well. Cream that is too warm is hard to whip and curdles easily.
- Use wire whip is whipping by hand and whisk attachment if by machine.
- If cream is to be sweetened use extra fine sugar or for better stability use confectioners’ sugar.
- Do not over whip! Stop when cream forms stiff peaks. If over whipped it becomes grainy and separates into butter and whey.
Coulis
Coulis can be made from any fruit and sometimes vegetables as well. It is in its simplicity a puree of fruits or vegetables, seasoned or sweetened to taste. Some of the best fruit sauces are also the simplest. Strawberry Coulis is simply fresh or cooked fruits sweetened with sugar and pureed to a smooth consistency. Straining the sauce can be a particular detail depending on its use and desired appearance. Trick to pairing sauces is consistency!
Ganache
Whether you know it or not, that creamy, delicately flavored chocolate stuff found in the center of a rich truffle is called ganache. You may also recognize it as a glaze on a cake, as a whipped filling or frosting or as a piped decoration.
All ganache starts out with a rich mixture made from varying proportions of chopped chocolate and boiled heavy pasteurized cream or a liquid, cooled to various degrees of temperature and mixed in certain ways, yielding different uses. Ganache can be flavored, have extra ingredients added, such as butter for richness, and corn syrup for shine and flow properties!
At first glance, it appears that ganache is a simple mixture of just two ingredients, heavy cream and
chocolate. But, there's a lot more science going on behind the scenes to give you a successful ganache mixture that won't separate, become grainy, hard, crack, curdle or too firm.
Ganache is a really a complex combination of an emulsification and a suspension that occurs between the chocolate and cream ingredients. An emulsification is a suspension of small globules of one liquid in a second liquid with which the first will not mix, ie: an emulsion of oil in vinegar or cream is an emulsion of butterfat in water. A suspension is a material in which a substance is dispersed in a liquid in clusters or particles consisting of many molecules. Nonfat milk is a suspension of milk-protein particles in water. The continuous phase of the mixture, or the "appearance" of its molecules or matter (ie: solid, liquid or gas), is a syrup made from the cream's water and the chocolate's sugar. Suspended in the syrup are the milk are the cream's fat globules and the cocoa butter's fat droplets and solid cocoa particles from the chocolate.
To emulsify the chocolate and cream, the cream is first heated which reduces its water content. The hot cream is poured over the chocolate and it melts after sitting for a few minutes. The waiting time also serves to bring down its temperature down because emulsions form better at 90 degrees to 110 degrees F. Start slowly, and then rapidly mix the ingredients together in ONE direction, starting from the outside edge moving inward. The emulsification takes place by the combination of work or stirring, which breaks down the fat in both the cream and chocolate into microscopic droplets, small enough to be suspended within the water - and the use of an emulsifier to stabilize the system, or fatty acids present in the cream or milk.
As a general rule, the higher the fat content of the cream, the richer and more stable the finished ganache will be. (The milk solids in the cream also help thicken the ganache and the butterfat lends smoothness and moistness). I like to use heavy whipping cream to make ganache. Even crème fraîche or sour cream can be used instead of heavy cream. Ganache Danger Zone: 74-85 degrees fats still in liquid form and will more likely separate.


Half Batch = 39.29 oz, 5-6 miniature tins (full batch = 78.58 oz)
Eggs 16 oz X = 8 oz
Sugar 8 oz X = 4 oz
Salt .08 oz X = .04 oz (1/4 tsp)
Vanilla .5 oz X = .25 oz (1 ½ tsp)
Milk 40 oz X = 20 oz
Sugar 12 oz X = 6 oz
Water 2 oz X = 1 oz
Make Up Instructions:
1. Combine eggs, sugar, salt, and vanilla in a mixing bowl. Mix until thoroughly blended, but do not whip.
2. Scald the milk in a double boiler or in a sauce pan over low heat.
3. Gradually pour the milk into the egg mixture, stirring constantly.
4. Skim all foam from the surface of the liquid.
5. Arrange custard cups in a shallow baking pan.
6. Carefully pour the custard mixture into the cups. If bubbles form during this step, skim them off.
7. Set the baking pan on the oven shelf. Pour enough hot water into the pan around the cups so the level of the water is about as high as that of the custard mixture.
For crème caramel… cook the sugar with the water until it caramelizes. Line bottom of custard cups with this hot caramel. Be sure the cups are clean and dry.
Baking Instructions:
1. After bottom of custard cups have the crème caramel on bottom, fill with custard on top.
2. Bake at 325 until set, about 45 minutes.
3. Carefully remove the custard from the oven and cool. When cooled, refrigerate for 24 hours to allow some of the caramel to dissolve and form a sauce for the dessert when unmolded.
Half Batch = 24.66 oz (full batch = 49.33)
Bread flour 3 oz X = 1.5 oz
Butter 3 oz X = 1.5 oz
Milk 16 oz X = 8 oz
Sugar 4 oz X = 2 oz
Egg yolks 6 oz (4) X = 3 oz
Vanilla .33 oz (2 tsp) X = .16 oz (t tsp)
Egg whites 10 X = 5 oz
Sugar 2 oz X = 1 oz
Praline paste 5 oz X = 2.5 oz
Make Up Instructions:
1. Work flour and butter together to form a paste.
2. Dissolve sugar in the milk and bring to a boil. Remove from heat.
3. With whisk, beat in the flour paste. Beat vigorously to remove lumps.
4. Return mixture to heat and bring to boil, beating constantly. Simmer for several minutes until mixture is very thick and no starchy taste remains.
5. Transfer mixture to a bowl. Cover and let cool 5-10 minutes.
6. Blend in praline paste with the base. Beat in egg yolks and vanilla.
7. Chill mixture and scale portions of the base to order. Souffles may be made ahead of time up to this point.
8. Prepare souffle dish by buttering the inside well and coating with granulated sugar. The butter and sugar coating should come all the way to the top and slightly over the rim.
9. Whip egg whites until they form soft peaks. Add sugar and whip until the mixture forms firm, moist peaks.
10. Fold egg whites into the soufflé base.
11. Pour mixture into prepared baking dishes and smooth the tops.
Baking Instructions:
1. Bake at 375 for about 15 minutes for single-portion dishes, or 30 min for larger dishes.
2. Optional – 3 to 4 minutes before baking is done, dust tops generously with confectioners’ sugar.
3. Serve as soon as removed from oven.
PÂTE A CHOUX
Shoe pastry
Ingredients: Bread flour, salt, milk or water, butter or oil & eggs (optional chemical leavener)
Objective: Prepare a variety of choux products including complimentary sauces, creams, fillings, & glazes to present finished products. This will be accomplished in two weeks of classes.
Production will include:
- Pate a choux
- Pastry Cream
- Crème Chantilly
- Diplomat Crème
- Chocolate Glaze
- A variety of Savory fillings
Pate a choux or choux paste (pronounced “pot a shoo”) means cabbage paste referring to the fact that cream puffs look like little cabbages. It is very simple dough to put together and like puff pastry is leavened by steam. There are a variety of formulas to use and some may contain a chemical leavener as a backup ingredient, however no matter what formula you choose to use one thing all chefs agree on is that the more eggs you are able to add to base dough (without causing it to lose its shape when piped), the higher and lighter your finished product will be.
The paste should be firm enough to hold its shape when piped from a pastry bag. You may occasionally find a formula that produces slack dough in which case you should reduce the amount of milk or water to the overall formula. The paste should not be too dry or rough looking either. Paste that has this character will not rise well in oven and product will be heavy.
Typically, this type of product is baked on silpats or parchment lined sheet pan.
Proper baking temperatures are important as well. Start at a high temperature (400-425) for first 15min to develop steam. Then reduce the heat to (325-375) to finish baking and set the structure. They should be firm and dry before removing them from the oven. If removed from oven to soon or cooled too quickly they are more likely to collapse.
General Production Process:
Step 1
Bring Fats and liquids to a full rolling boil
** This is necessary for the fat to be evenly distributed in the dough when the flour is added.
Step 2
Add the flour quickly in one stage and begin mixing in pot by hand with a wooden spoon until smooth and all of the flour is incorporated. The dough will pull together into a ball easily and begin to leave a thin film on the bottom of the pan while being mixed at this stage.
** Important to mix and cook dough over the heat for about 2-3 min before removing from heat to begin cooking proteins and gelatinizing starches before you pull from heat.
Step 3
Add dough to tabletop mixer and mix with paddle attachment for 2-3min to develop the gluten structure and cool the dough in preparation for the addition of eggs.
**This serves as a tempering technique, so eggs do not scramble upon addition to the dough.
Step 4
Begin adding eggs slowly on second speed until dough paddle when removed from bowl, dough drops from the paddle forming a smooth peak and has developed an elastic consistency when stretched between your fingers. Stop adding eggs as soon as you reach this stage. You must check the consistency every so often to avoid adding too much egg.
Piping
Baking instructions
Pre-heat oven to 400 degrees
After doubled in size and puffed, usually around 15 min, drop the oven temp to 350 and bake until you reach a rich golden color. At that point turn off oven and prop open doors to carry over cook with residual heat until cool. To check doneness, take one and cut open to inspect interior, then bag and freeze until needed.
Do Not – I repeat! Do not take out of oven to cool or they may collapse and do not freeze while still warm!
Pate a choux should be hollow and dry on the inside. Pate choux that is still moist is more likely to collapse while cooling, resulting in an inferior product.


Yield: 59 oz.
- Water 18 oz
- Butter 9 oz
- Salt .18 oz; 1 tsp
- Bread flour 10 oz
- Pastry flour 2 oz
- Eggs 20 oz approx
Make Up Instructions:
1. Combine liquid, butter, and salt in a heavy saucepan; bring to a full rolling boil
2. Add flour all at once, stir quickly
3. Over moderate heat, stir vigorously until dough forms a ball and pulls away from the sides of the pan
4. Transfer dough to the bowl of a mixer or if mixing by hand, leave in saucepan
5. With paddle attachment, mix at low speed until dough has cooled slightly. It should be about 140 degrees F which is still very warm but not too hot to touch
6. On medium speed, beat in eggs a little at a time. Add no more than one-quarter of the eggs at once, and wait until they are completely absorbed before adding more. Do not add all the eggs before checking texture. The paste should be smooth and moist but firm enough to hold its shape. If the paste teaches this texture before all the eggs are added, stop adding eggs. The paste is now ready for use.
Baking Instructions:
- For the cream puffs and éclairs: Bake at a higher temp at first, 400 degrees, for steam, after doubling in size and puffing up; then drop down to 350 until golden brown.
- Then turn off oven, and prop open with wooden spoon.
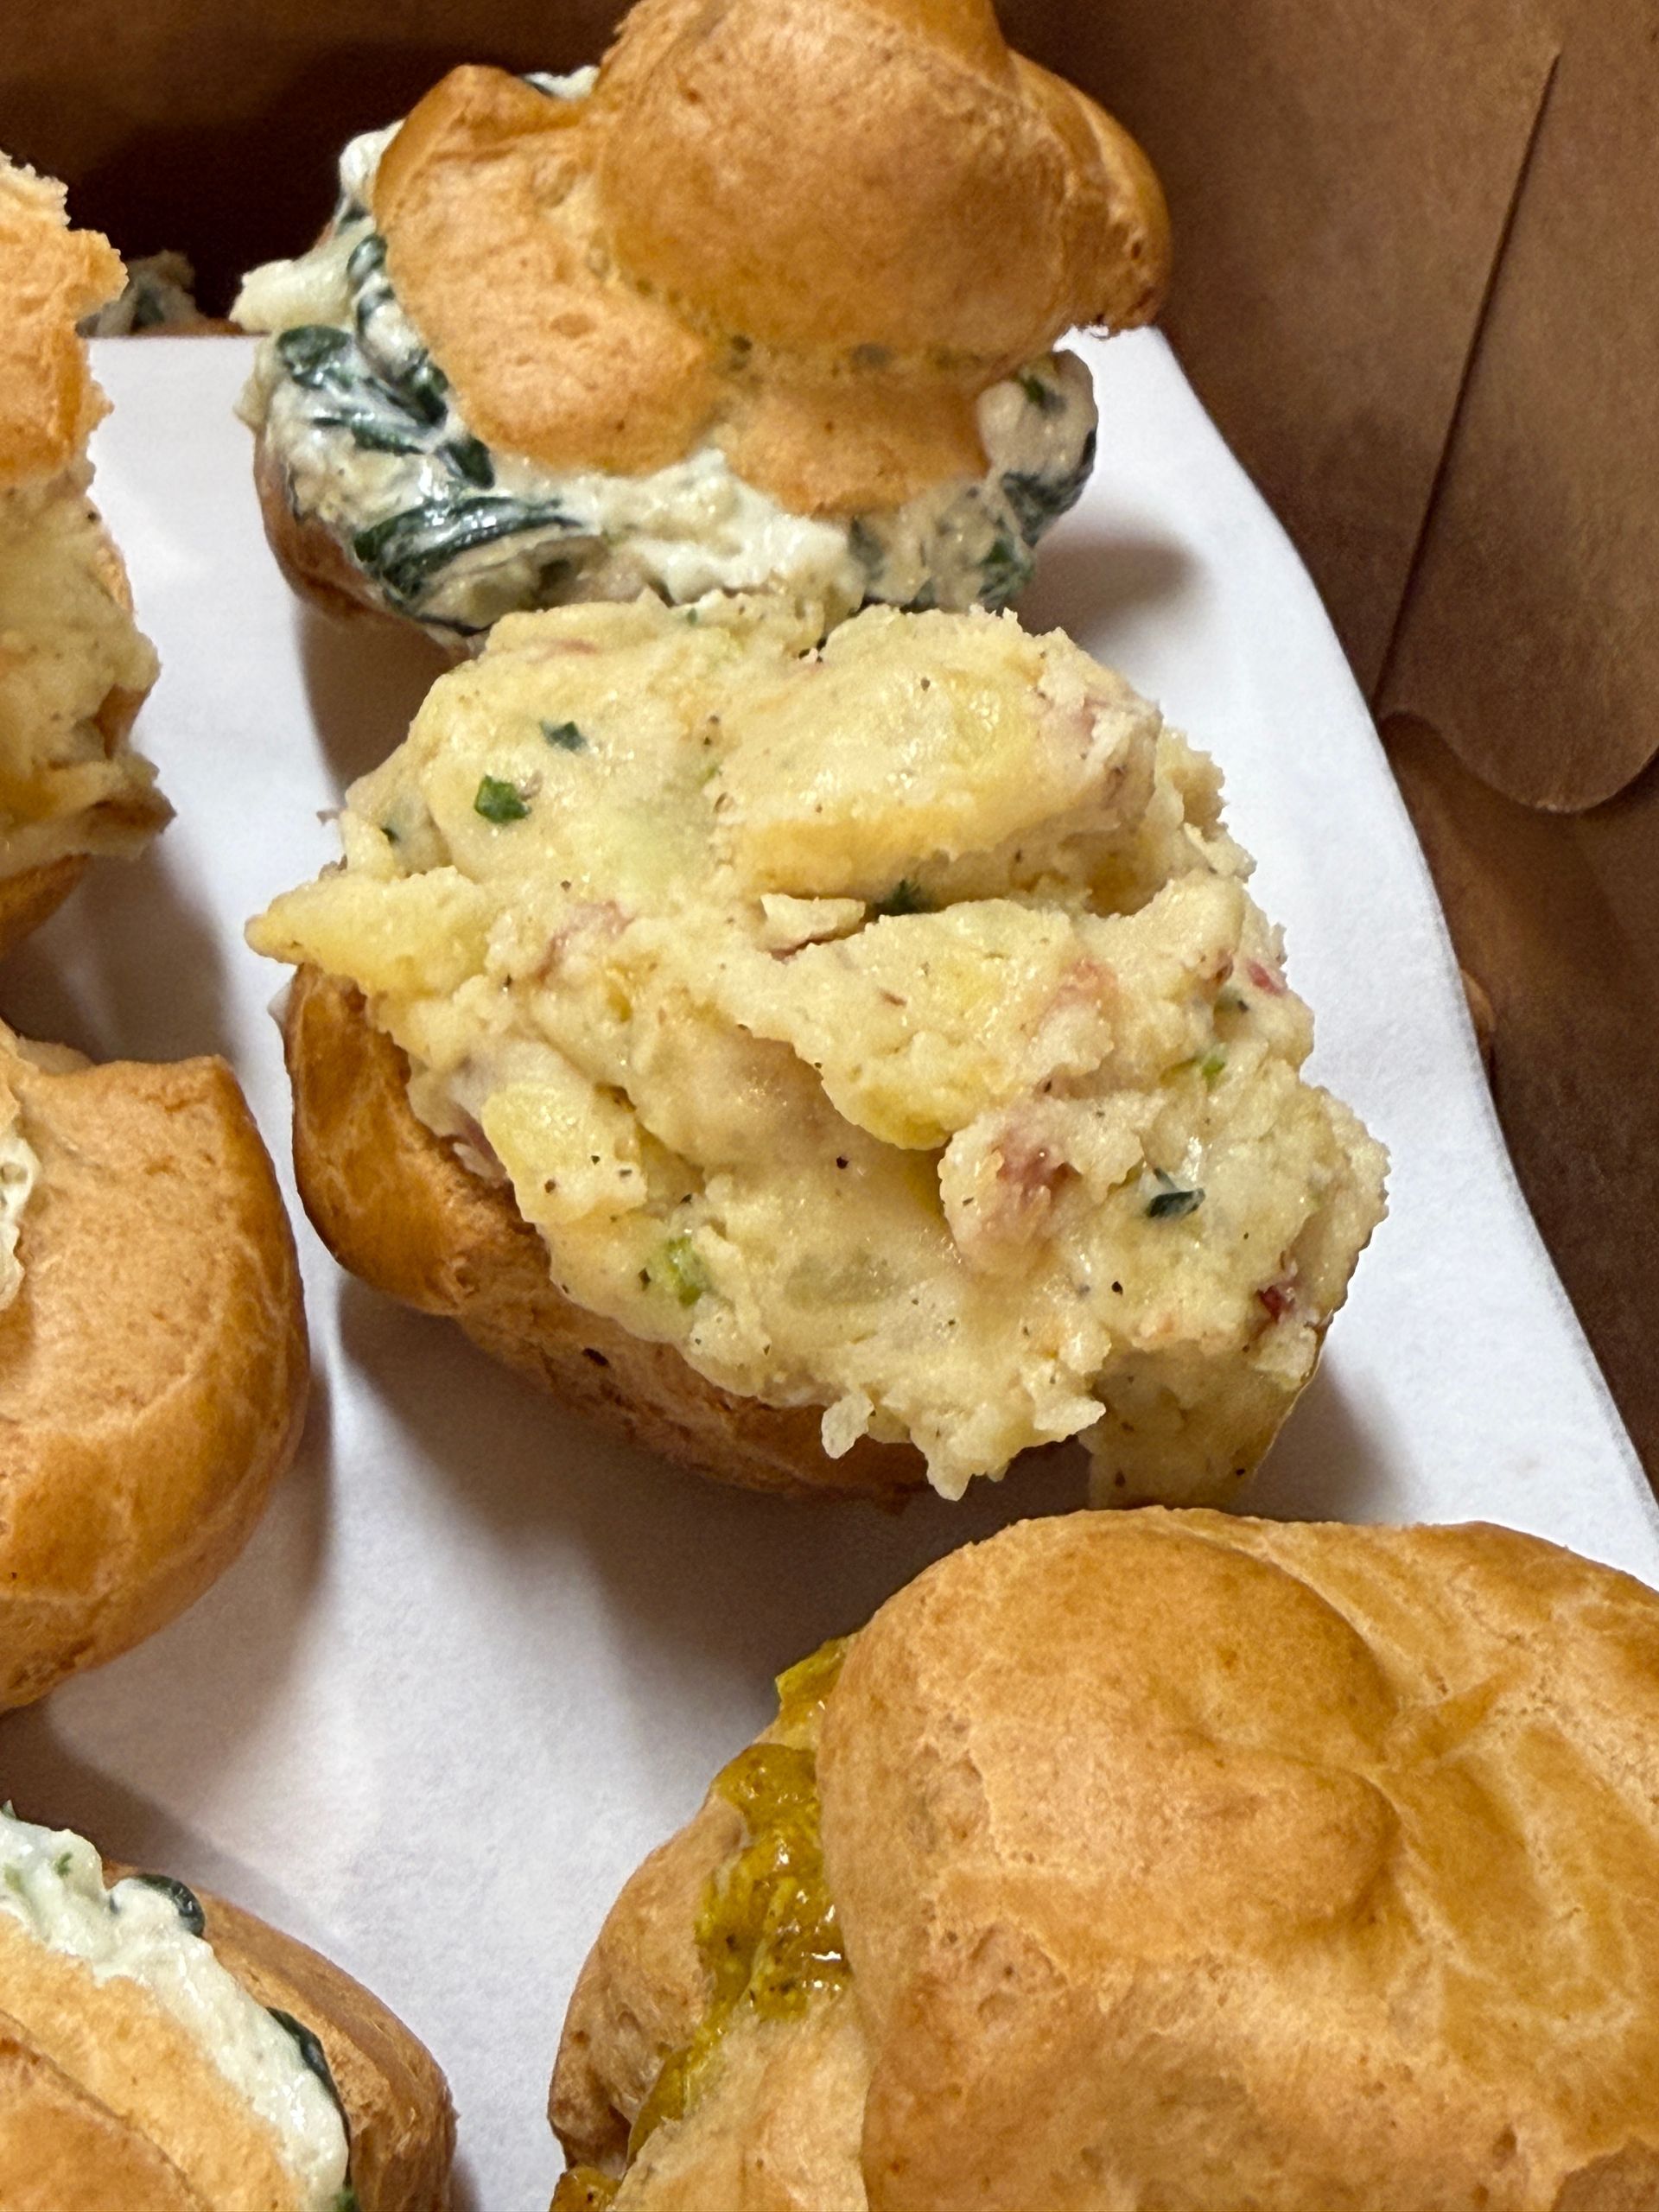
Potato Filling, Chicken & Spinach, Jalapeno Popper
Potato filling
• 5 lbs Golden Potatoes
• Cheddar Cheese
• Bacon
• Sour Cream
• Chives
• Butter
• Salt
• Pepper
• Garlic Powder
Instructions:
- Peal and cut potatoes to medium sized pieces. Boil potatoes until tender but not falling apart. Cook bacon in oven until crisp. Remove grease with paper towels and chop. Mix together all ingredients until happy.
- *Please leave chunks of potato in the mixture.
- Chicken, Spinach and Artichoke Filling
Ingredients
• 6 tablespoons olive oil
• 30-ounce baby spinach
• 9 cloves garlic minced
• Salt and freshly ground black pepper to taste
• 6 boneless skinless chicken breast halves approximately 3 pounds, cooked, cooled and diced (Boil in chicken stock)
• 2 can (15-ounce) artichoke hearts drained, squeezed of excess moisture and chopped
• 3 container (6.5-ounce) herb and garlic cheese spread such as Boursin
• 1.5 cup freshly grated Parmesan cheese
• 1.5 cup mayonnaise
• 6 tablespoons chopped fresh chives
Instructions
1. Heat oil in a skillet or sauté pan over medium-high heat. Add the baby spinach and cook, 3-4 minutes or until wilted. Stir in garlic and cook 30 seconds more or until fragrant. Transfer baby spinach to a sieve or colander to drain. Gently press on the spinach with a wooden spoon to extract any excess moisture.
2. Combine spinach, chicken, artichoke hearts, herb and garlic cheese spread, Parmesan cheese, mayonnaise and chives in a small bowl. Season to taste with salt and black pepper.
Classic Jalapeño Popper Filling
- 8 oz Cream cheese (softened)
- 1 ½ cups Sharp cheddar cheese, shredded
- 2–4 Jalapeños (seeds/membranes removed for less heat), finely diced
- 6 slices Bacon, cooked and finely crumbled
- 1 tsp Garlic powder
- 1 tsp Onion powder or chopped chives
- Optional: Dash of hot sauce or Cajun seasoning for extra kick
Instructions
- Prep: Mix softened cream cheese with shredded cheddar, diced jalapeños, bacon, and seasonings until well combined.
- Fill: Pipe into cooled pate a choux shells.
- Optional: For a firmer, sharper filling, chill for 30 minutes before filling. Serve immediately or slightly warm.
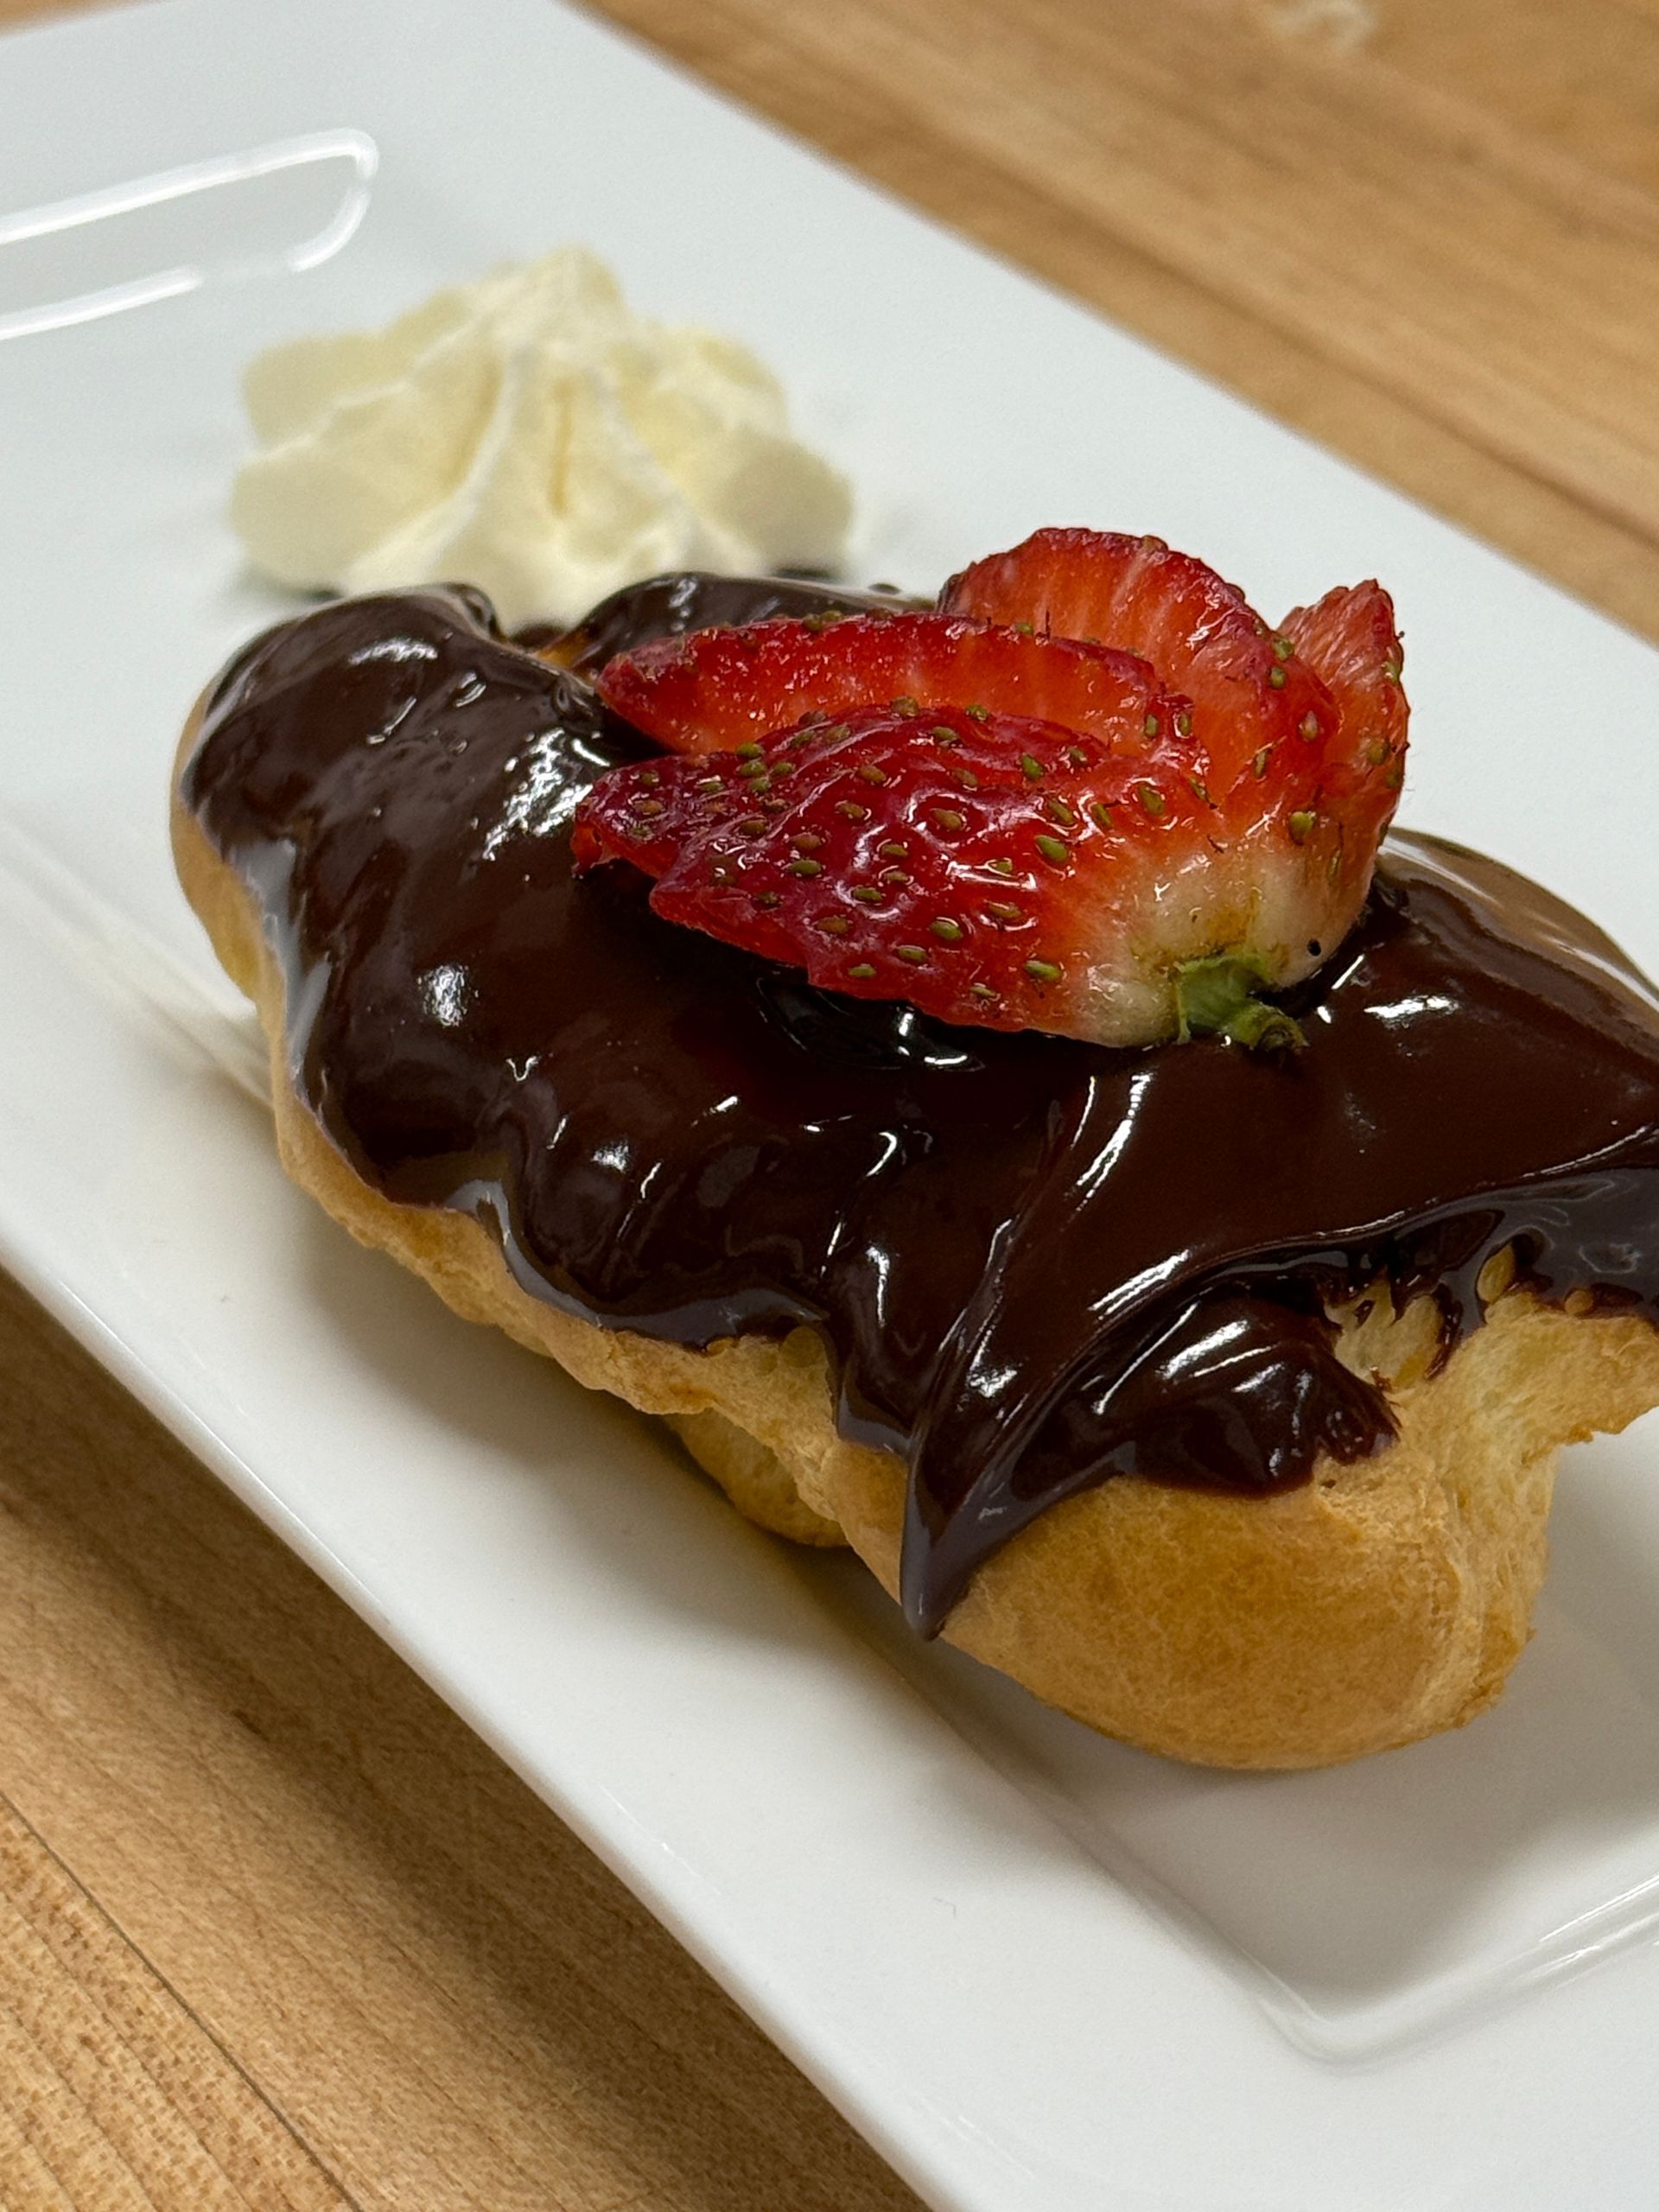
Pastry Cream, Chocolate, Dulce de Leche
Pastry Cream, p. 273
- 1 qt (32 oz) whole milk
- 4 oz. sugar
- 3 oz. egg yolks
- 4 oz. whole eggs
- 2.5 oz. cornstarch
- 4 oz. sugar
- 2 oz. butter
- .5 oz./1 Tbsp vanilla extract
- In a heavy saucepan, dissolve the sugar in the milk and bring just to a boil.
- With a whip, beat the egg hyolks and whole eggs in a stainless steel bowl.
- Sift the cornstarch and sugar into the eggs. Beat with the whip until perfectly smooth.
- Temper the egg mixture by slowly beating in the hot milk in a thin stream.
- Return mixture to heat and bring to a boil, stirring constantly.
- When the mixture boils, contineu to stir constantly and boil for up to 2 min., until the cream has no raw, starchy taste.
- Remove from heat. Stir in butter and vanilla. Mix until the bhutter is melted and completely blended in.
- Pour out into a cleaen, sanitized hotel pan or other shallow pan. Cover with plastic film placed directly in contact with the surface of the cream to prevent a crust from forming. Cool and chill as quickly as possible.
- For filling pastries like èclairs and napoleons, whip the chilled pastry cream until smooth before using.
For chocolate pastry cream: For each 12 oz. pastry cream, stir in 4 oz. melted semisweet or bittersweet chocolate while the pastry cream is still warm. (For praline, stir in 4 oz. softened praline paste for every 12 oz. pastry cream.) For coffee, add 2 Tbsp instant coffee powder or coffee compound flavoring to the milk in step 1.
Dulche de leche
- 2 pt (1 qt) or 32 oz milk
- 12 oz. sugar
- 1/4 tsp baking soda
- 1/2 tsp vanilla extract
- Combine milk, sugar, and baking soda in a heavy saucepan. Set over medium heat. Bring to a slow boil without stirring.
- As the mixture approaches the boil, it will foam up. Quickly remove it from the heat before it boils over; stir.
- Turn heat to low. Set the pan back on the heat and cook slowly, stirring frequently with a wooden spoon for about 45-60 minutes. The mixture will gradually caramelize.
- When the mixture is a rich caramel brown and thickened but still pourable, remove from heat and stir in vanilla.
- Cool thoroughly
HOMEWORK ASSIGNMENT#3
Homework Assignment #3
Chapter 11: Doughnuts, Fritters, Pancakes, and Waffles
Read - Chapter 19 pgs. 240-241, 244-245
Answer Questions for Review #'s 1-3 (Pg. 259) and Key Points to Review #'s 1-2 (Pg. 241)
Please submit this assignment as a typed Word Document. Use complete sentences and please number your answers.
Questions for Review
- Two yeast doughnut formulas have the same quantities of fat and milk, but one has more sugar than the other. Which one do you expect would require a higher frying temperature? Why?
- The one with less sugar, in order to avoid excessive browning
- Why is it important to carefully control the mixing time when making cake doughnuts?
- Mix until smooth, but don’t over or under mix. Under-mixed doughs result in a rough appearance and excessive fat absorption. Overmixed doughs result in tough, dense doughnuts.
- List seven rules for maintaining frying fat to produce good-quality fried foods.
- Use good quality, flavorless fat—the best fat has a high smoke point
- Fry at proper temperature. Too low extends frying time, causing excessive greasiness
- Maintain the fat at the proper level in the fryer; when additional fat is needed, allow time for it to heat
- Don’t fry too many doughnuts at the same time; overloading will lower the fat temperature, won’t allow room for expansion of the doughnut, and makes them harder to turn
- Keep the fat clean
- Discard spent fat; old fat loses frying ability, browns excessively, and imparts a bad flavor
- Keep the fat covered when not in use; aerate it as little as possible when filtering
Key Points to Review
- What is the mixing method used for yeast-raised doughnuts?
- Modified straight dough method
- How are yeast doughnuts handled differently from other yeast products, such as breads and rolls?
- Dough for yeast doughnuts is like regular sweet dough or bun dough, but it is not as rich—doughnuts are made with less fat , sugar, and eggs. Doughs that are too rich will brown too fast and absorb too much frying fat.
Terms for Review
- Modified Straight Dough Method
- French Doughnut – made from Éclair paste that is piped into ring shapes and deep fried
- Glaze – a method used for finishing doughnuts such as a simple thinned icing
- Fritter – used for a great variety of fried items, both sweet and savory, including many made with vegetables, meats, or fish. Fried items of all types are often referred to by the French term for fritter, beignet. In the pastry shop, we are concerned with two basic types: simple fritters, like doughnuts, portions of dough that are deep fried dusted with sugar and served with a sauce or preserve; and fruit fritters made by dipping pieces of fresh, cooked, or canned batter and then deep frying them
- Beignet Souffle – French doughnut made with milk, butter, salt, sugar, bread flour and eggs; piped with a large star tip in a circular shape, then fried
- Cannoli – an Italian dessert with the outer shell made from bread flour, pastry flour, sugar, salt, butter, eggs and dry white wine or Marsala. The dough is worked on a bench and given time to rise, then rolled out, cut into circles, and wrapped around a cannoli tube; deep fry until golden brown, then fill.
- Gaufre – French waffle
- Crêpe – made from thin, unleavened batters made of milk, egg, and flour
- Crêpes Suzette – traditional in fine-dining restaurants commonly prepared tableside (though not as much anymore); involves dipping the crêpes into the sauce to coat, folding them into quarters in the pan, and flame by tipping the pan toward the burner until the cognac ignites
Midterm Exam Review
- What is a coulis?
- In modern cooking, it is a thickened sauce made of pureed fruits or vegetables like raspberry or tomato. Originally, the term referred to juices from cooked meats, then later a thick soup (Escoffier's time).
- A dessert syrup is a flavored simple syrup used to moisten and flavor sponge cakes and various desserts.
- Pâte a choux steps:
- Add liquid, butter, salt. Bring to a boil. Add in all the flour. Stir until a ball forms and pulls away from sides of pot and leaves a film
- Mix with paddle attachment on low speed until it reaches 140 degrees F, then turn to medium speed and add eggs one at a time until the dough is smooth, moist, shiny. Not all eggs may be used.
- The shoe paste is now ready for use.
Pastry Cream
- Contains a starch thickener that stabilizes the egg. It can boil and in fact should in order to cook properly and get rid of the starch taste.
- Used as fillings for cakes and pastries, filling for cream pies, and as puddings. With additional liquid it can be used as a custard sauce.
- Cornstarch can be used as the thickener when used for pie filling so slices hold their shape.
- When flour is used as the thickener, twice as much is used.
- Whipped cream may be folded in to lighten and make creamier. This is called Crème Mousseline.
Custards
- A custard is a liquid thickened or set by the coagulation of egg protein.
- Two types: stirred and baked.
Soufflés are lightened with beaten egg whites and then baked. Baking causes the soufflé to rise like a cake because the air in the egg foam expands when heated. Toward the end of the baking time the egg whites coagulate, or become firm. However, soufflés are not as stable as cakes. Shortly after they are removed from the oven they will fall. That's why they should be served immediately.
A soufflé has three elements: Base (many kinds are used for dessert soufflés and most are heavy, starch-thickened preparations like pastry creams or sweetened white sauces); Flavoring ingredients (added to the base and mixed in well. Popular flavorings include chocolate, lemon, and liqueurs); and Egg whites (whenever possible, egg whites should be whipped with some of the sugar. This makes them more stable.)
DOUGHNUTS
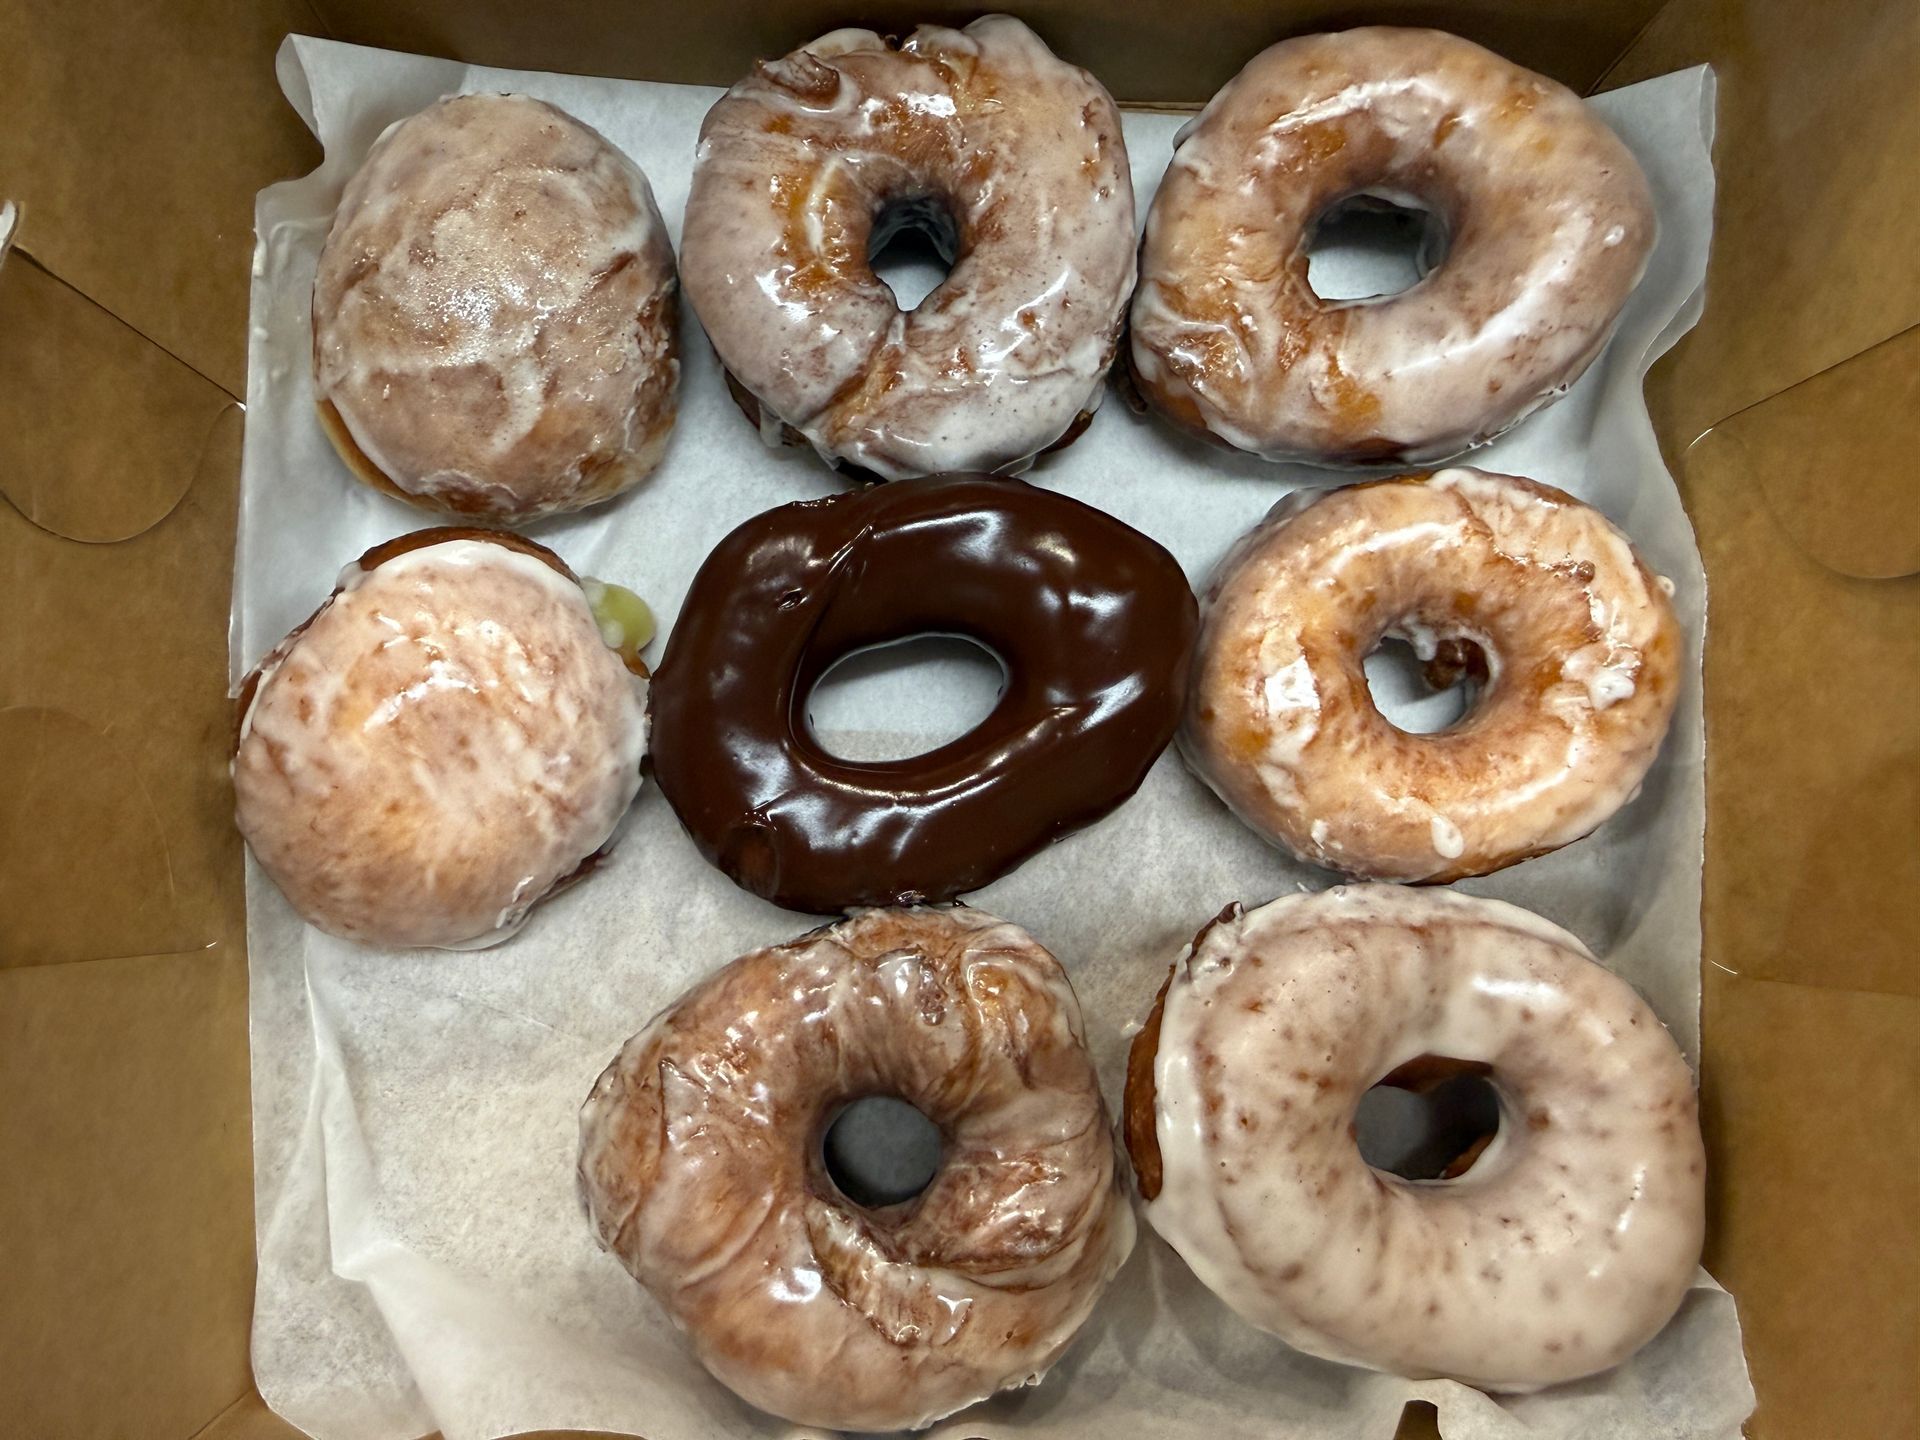
A doughnut (also spelled donut) is a sweet, deep-fried piece of dough or batter. The two most common types are the torus-shaped ring doughnut and the filled doughnut, a flattened sphere injected with jam, jelly, cream, custard, or other sweet filling. A small spherical piece of dough may be cooked as a doughnut hole. Baked doughnuts are a variation that is baked in an oven instead of being deep fried.
Doughnuts are formed either by joining the ends of a long, skinny piece of dough into a ring or by using a doughnut cutter, which simultaneously cuts the outside and inside shape, leaving a doughnut-shaped piece of dough and a doughnut hole from dough removed from the center. This smaller piece of dough can be cooked or re-added to the batch to make more doughnuts.
Cake vs. Yeast
Type of Doughnuts
Doughnuts are fried sweet dough that are either yeast leavened (yeast-raised doughnuts) or chemically leavened (cake doughnuts).
Cake Doughnuts
Cake doughnuts (or cake donuts) are made from sweetened dough that is leavened with baking powder [1], and generally dense and cake-like. A popular type is the traditional doughnut dusted with sugar and cinnamon. Cake doughnuts are versatile that it can be made with different shapes and flavors, and can be filled, iced or glazed.
Yeast-raised doughnuts
Yeast-raised doughnuts are generally made from sweet dough fermented with yeast to obtain its leavening action or expansion. After being fermented, the dough’s are sheeted or rolled to the desired thickness and cut out by an automatic cutter. The pieces are made into typical doughnut shapes or rolled into a variety of shapes. Then they go through a proof box and are allowed to rise before frying.
Yeast-raised doughnuts are lighter in texture than cake doughnuts, but because of the proofing time, they take longer to produce.
Comparison of cake donut and yeast-raised donut
In this particular sample of two equal sized donuts, the cake donut weighs heavier than the yeast-raised donut.
2. Texture
The different leavening action produces different textures. The yeast provides more expansion resulting in a lighter texture.
3. Method and length of cooking
More steps are involved in preparing yeast-raised donuts. Because of time required for fermentation and proofing, it also takes longer to make yeast-raised donuts.
A cake donut, generally, involves a simpler method of preparation. Once mixing and a short rest time (10-15 mins), the batter is ready to use on a donut fryer.
4. Shape possibilities
However, cake donuts can only derive its form from the type of plunger or attachment connected to the depositor. The selection is still wide: cake donuts in shapes such as old-fashioned, star, French cruller, krinkle, ball, stick or Long Johns, crescent or dunkerette, in addition to the regular ring and the mini donuts.
While yeast-raised donuts take longer preparation time than cake donuts, it makes it up for the wider variety of shapes it can be formed into, as more elaborate shapes can be cut out from the dough.
Mixing procedure for Yeast Raised Doughnuts:
Because this is considered a sweet yeast dough the preferred method is Sponge Method.
This will give the fermentation a head start and help to shorten final proofing times.
Some exceptions to be aware of in the 12 step production method are no bench rest before rolling and cutting. Dough is taken from bulk fermentation, lightly folded to redistribute yeast and temperatures and immediately rolled and cut. Proof immediately in proofer set at 80 degrees and 80% humidity until it has reached about ¾ proof. Doughnuts will retain their shape better if taken to the fryer a bit young or not quite a full proof. Over proofed dough tends to absorb more oil during frying and will brown quicker. Frying over proofed doughnuts often results in raw doughnut dough on the interior due to a false indication of doneness due to its dark color while frying. Another point to remember is to not over crowd the fryer with doughnuts. Too many doughnuts in the fryer will drop the temperature too quickly and make for a longer frying time and doughnuts will absorb too much oil in the process. Greasy doughnuts not a good thing!
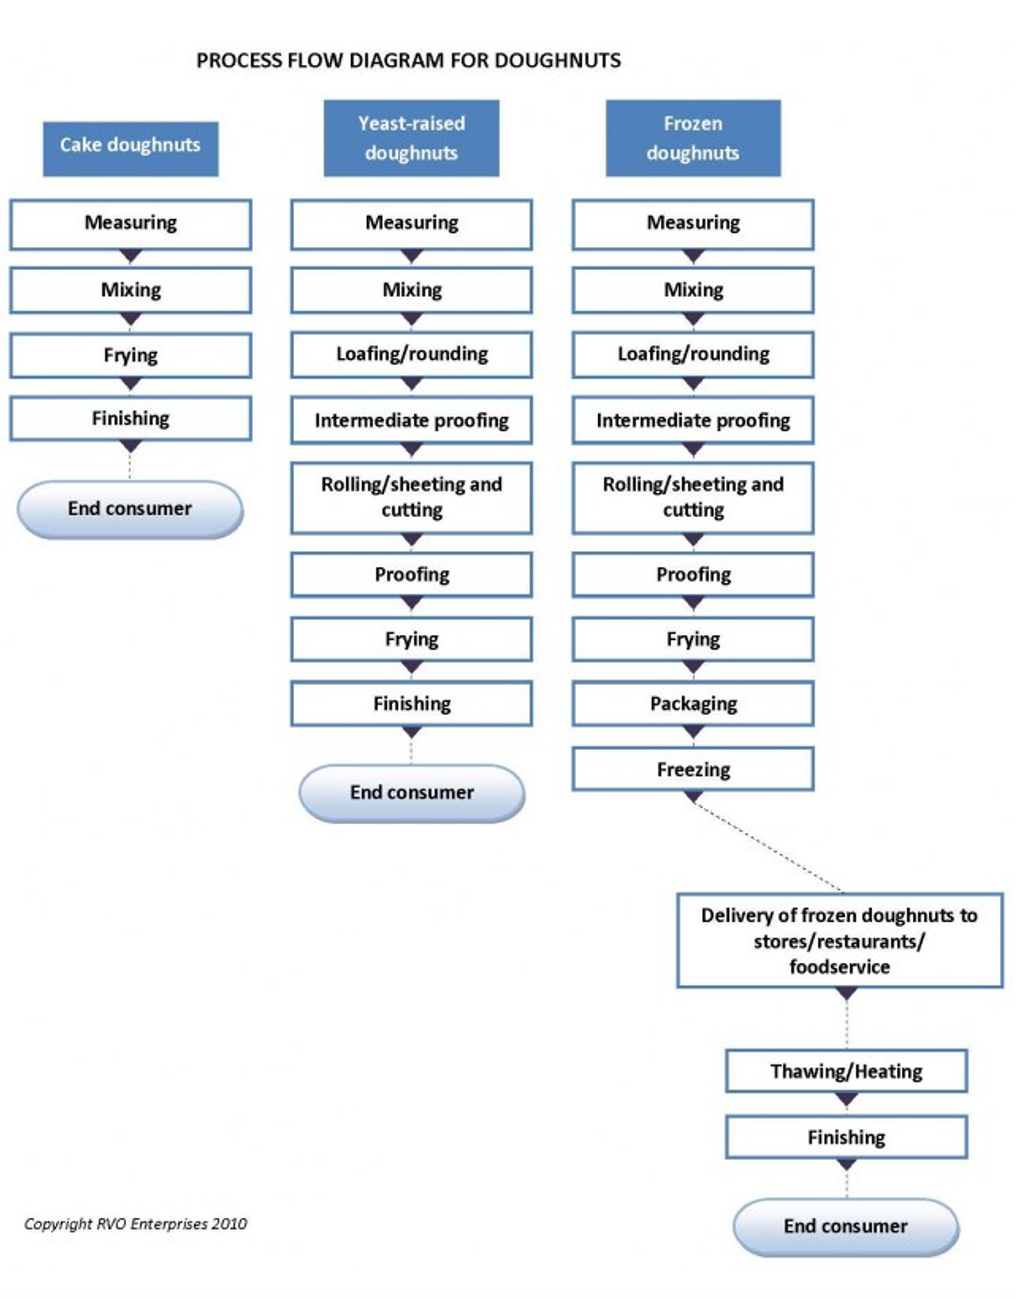
The following flowchart shows the process diagram of producing cake doughnuts, yeast-raised doughnuts and frozen doughnuts.


Ingredients
- 3 oz. shortening
- 4 oz. sugar
- .5 oz salt
- 1/2 tsp mace
- 1.5 oz. nonfat milk solids
- 4 oz. eggs
- 29 oz. bread flour
- .5 oz. instant yeast
- 16 oz. water
Instructions
- Using the modified straight dough method, p. 192, develop the dough completely, about 6-8 min. on second speed. Proof for about 1 1/2 hrs (we did 45 min. in class).
- Roll the dough out to 1/2" thick and make sure it is even thickness. Let the dough relax, 15 min.
- Cut out the doughnuts with a doughnut cutter, cutting as close together as possible. Combine the scraps and let them relax. Roll out again and continue cutting.
Fry at 360 degrees for 90 seconds on each side. Lift from fat and let excess drip off. Place doughnuts in one layer on paper towels/parchment. Glaze or allow to cool.
Description Title
Long Johns
- Roll out dough to 1/2" thick, as for ring doughnuts. With a pastry wheel, cut into strips 1 1/2" wide and 3 1/2" long.
Jelly Filling
- Use a round cutter (not the doughnut cutter) and fry as in the ring doughnuts. Make filling. Fry doughnut, and with a dowel and finger, make a hole in the side of the doughnut. Fill using a piping bag.
Cake doughnuts
- 3 oz. shortening
- 7 oz. sugar
- .25 oz. salt
- 1.5 oz nonfat milk solids
- 1 3/4 tsp mace (optional)
- .5 oz vanilla extract
- 3 oz. whole eggs
- 1.5 oz. egg yolks
- 20 oz. cake flour
- 12 oz. bread flour
- 1.25 oz baking powder
- 16 oz. water
Using the creaming method, p. 224, mix teh dough until it is smooth, but do not overmix. Pleacethe dough on the bench and form into a smooth rectangular shape, rest 15 min.
Roll out to about 3/8" thick, even thickness. Cut doughnuts with cutters. Collect scraps and let it relax, and roll it out again.
Place doughnuts on a lightly floured pans and let relax 15 min.
Fry at 375 degrees F.
Chocolate Glaze
- 24 oz Bittersweet Chocolate
- 12 oz Butter
- 3 oz Light Corn Syrup
- Pinch of Salt – not kosher
Instructions:
Mix melted butter, light corn syrup and salt. Pour over chocolate and let sit for 5 minutes. Stir with a rubber spatula until chocolate is melted. If chocolate pieces remain, place bowl on top of a double boiler with simmering water and stir until all chocolate is melted.
This glaze is best used warm. Make it as close to production time as possible. Reheat stiffened glaze over a double boiler as necessary.
Cover with plastic wrap until use.
Vanilla Glaze
- .24 oz Gelatin
- 16 oz Water
- 4 oz Corn Syrup
- .5 oz Vanilla
- 5 lbs Powdered Sugar
Instructions:
Soften the gelatin in the water. Heat the water until the gelatin dissolves. Add the remaining ingredients and mix until smooth. Dip the doughnuts into the warm glaze. Rewarm the glaze as necessary.
Chocolate Bavarian Cream
- .75 Gelatin
- 5 oz Water, cold
- 4 oz Egg yolks
- 4 oz Sugar
- 16 oz Milk
- .25 oz Vanilla
- 16 oz Heavy Cream
- 6 oz Semisweet Chocolate
Instructions:
Soak the gelatin in the cold water.
Prepare the crème anglaise. Whip the egg yolks and sugar until thick and light. Scald the milk and slowly stir it into the egg yolk mixture, beating constantly. Cook over a hot-water bath, stirring constantly, until it thickens slightly. Temperature should not exceed 180 degrees.
Remove from heat and stir in the vanilla and the semisweet chocolate until completely melted and blended in.
Stir the gelatin mixture into the hot custard sauce until it is dissolved.
Cool the custard sauce over crushed ice, stirring constantly to keep the mixture smooth.
Whip the cream until it forms soft peaks. Do not overwhip.
When the custard is very thick but not yet set, fold in the whipped cream.
Place the Bavarian cream into a piping bag and use immediately.
HOMEWORK ASSIGNMENT#4
Chapter 9: Rich Yeast Doughs and Chapter 14: Pastry Basics
Read - Chapter 9 pgs. 198-199 and pg. 210 -Makeup Techniques
Read - Chapter 14 pgs. 329-332 and pg. 335
Define the following terms:
- Laminated Dough – Laminated or rolled-in dough contains many layers of fat sandwiched between layers of dough. These layers create the flakiness you are familiar with. In Danish pastry. In the classic pastry shop, there are two basic rolled-in yeast doughs: croissant dough (Danish pastry dough, croissant-style and Danish dough, brioche-style—also called brioche feuilleté or flaky brioche).
- Croissant Dough – also called Danish pastry dough, croissant-style, resembles a puff pastry with the addition of yeast. It is based on a dough made of milk, flour, a little sugar, and, of course, yeast. The rolled-in butter gives the dough its flaky texture.
Danish Dough – Can be called Croissant dough (Danish pastry dough, croissant style) or Danish dough, brioche-style. Both doughs are used in making Danish pastries, but the first one is generally used for croissants. Danish dough, brioche-style, is a richer dough containing eggs, although it is not as rich in eggs as regular brioche - Puff Pastry – One of the most remarkable products in the bakeshop. It includes no added leavening agent and even still can rise to eight times its original thickness when baked. Puff pastry is a laminated or rolled-in dough, like Danish and croissant dough. This means it is made up of many layers of fat sandwiched between layers of dough. Puff pastry contains no yeast, unlike Danish and croissant dough. Steam, created when the moisture in the dough is heated, is responsible for the rising power of puff pastry.
- Locking-In – The rolling-in procedure has two major parts: 1) enclosing the butter in the dough, locking-in, and 2) rolling out and folding the dough to increase the number of layers.
- Fold – A simple fold is a three-fold that encloses the butter into the dough.
- Turn – Each complete rolling and folding step is called a turn.
- Butter Block – a flattened, chilled sheet of high-fat European-style butter (82-84% fat) used for lamination created by pounding and rolling butter, often mixed with a small amount of flour, into an even rectangle to ensure consistent, thin layers.
- Plasticity – The higher the plasticity and hardness of the butter, the higher elastic of the dough and vice versa. Too high of dough elasticity makes the dough difficult to laminate and proof.
Answer the following questions:
- What is the preferred fat used in laminated doughs? Why? What makes it difficult to work with?
- Butter is the preferred fat to use in laminated doughs because of its flavor and melt-in-the-mouth qualities. Temperature can make it difficult to work with, making sure it is not too hard (cold) or too soft (warm).
LAMINATED DOUGH
We are working with:
Classic Puff Pastry. It is different from Croissant and Danish Pastry dough because it does not contain yeast.
Ingredients (total production yield = 48 oz)
- 21.1 oz. bread flour
- .4 oz. salt
- 3.3 oz butter, melted (regular butter)
- 10.6 oz. water
- 12.5 oz. butter (the good stuff, for locking-in)
The dough weighed about 35 oz.
Instructions
- Mix the salt and flour (sift) and make a mound. Create a large well in the center. Pour melted butter and water into center of well. Gradually stir from the wall of the well inward to incorporate the flour and the liquids, making a dough.
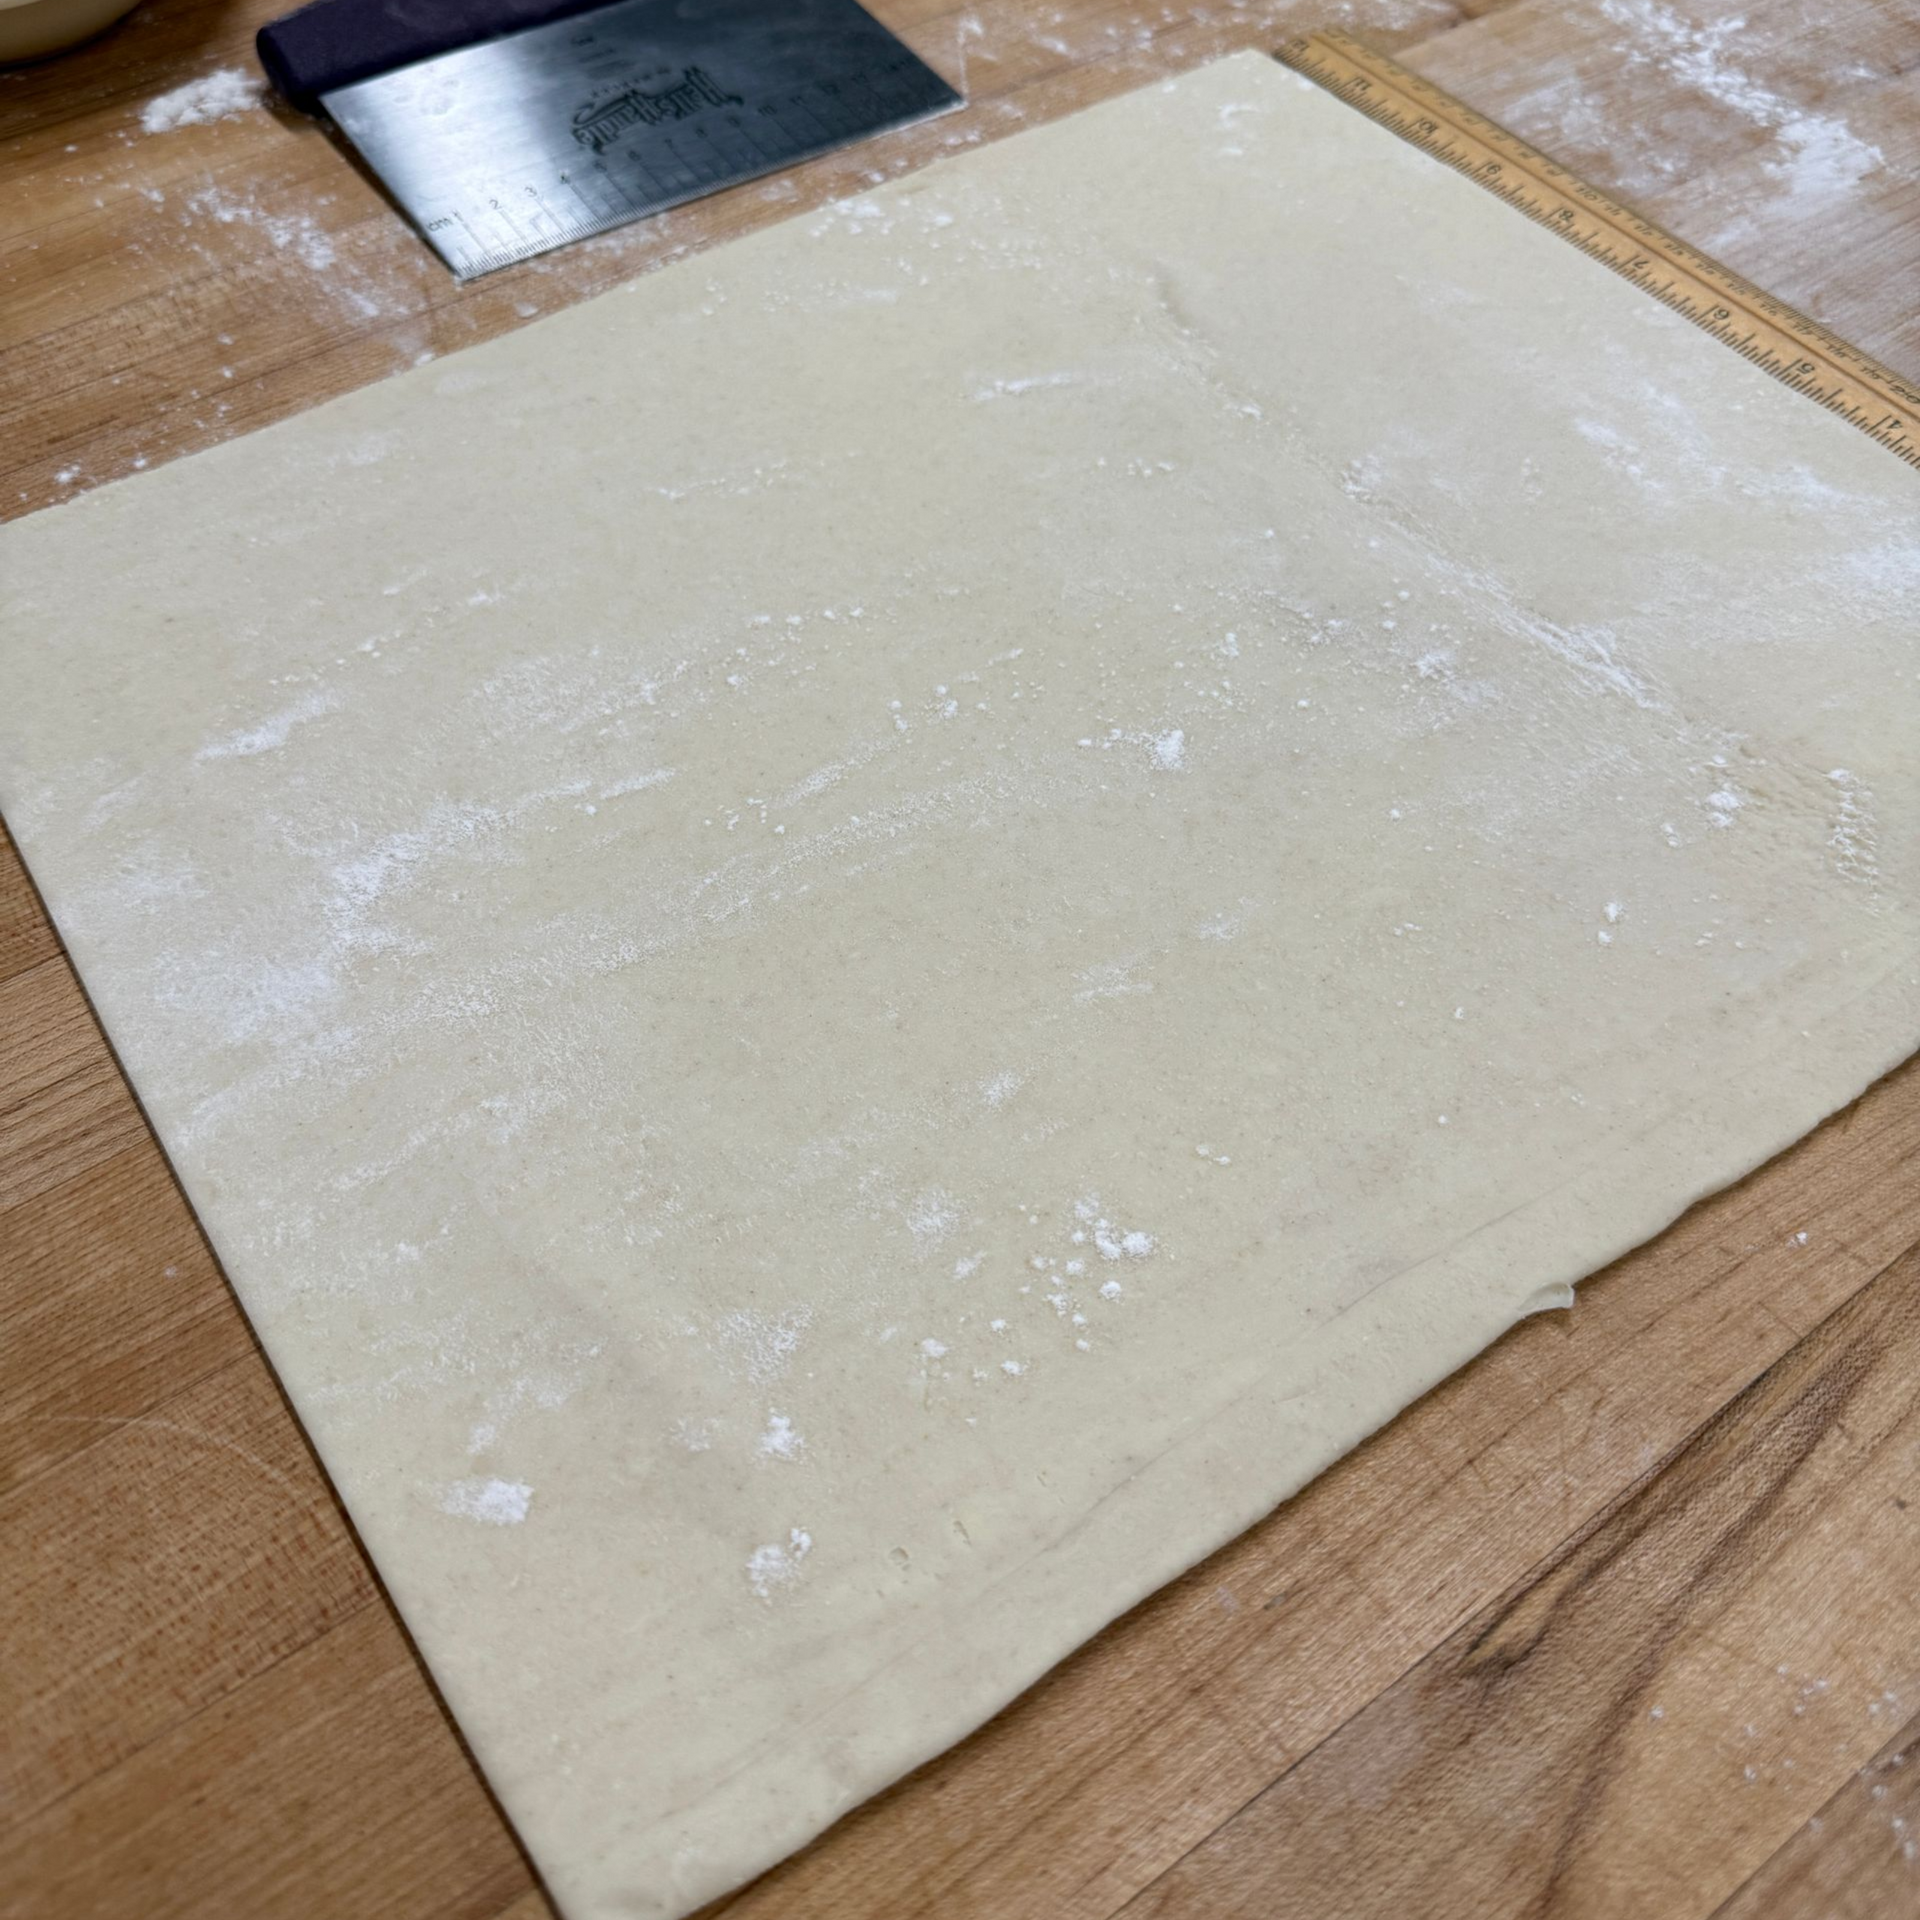
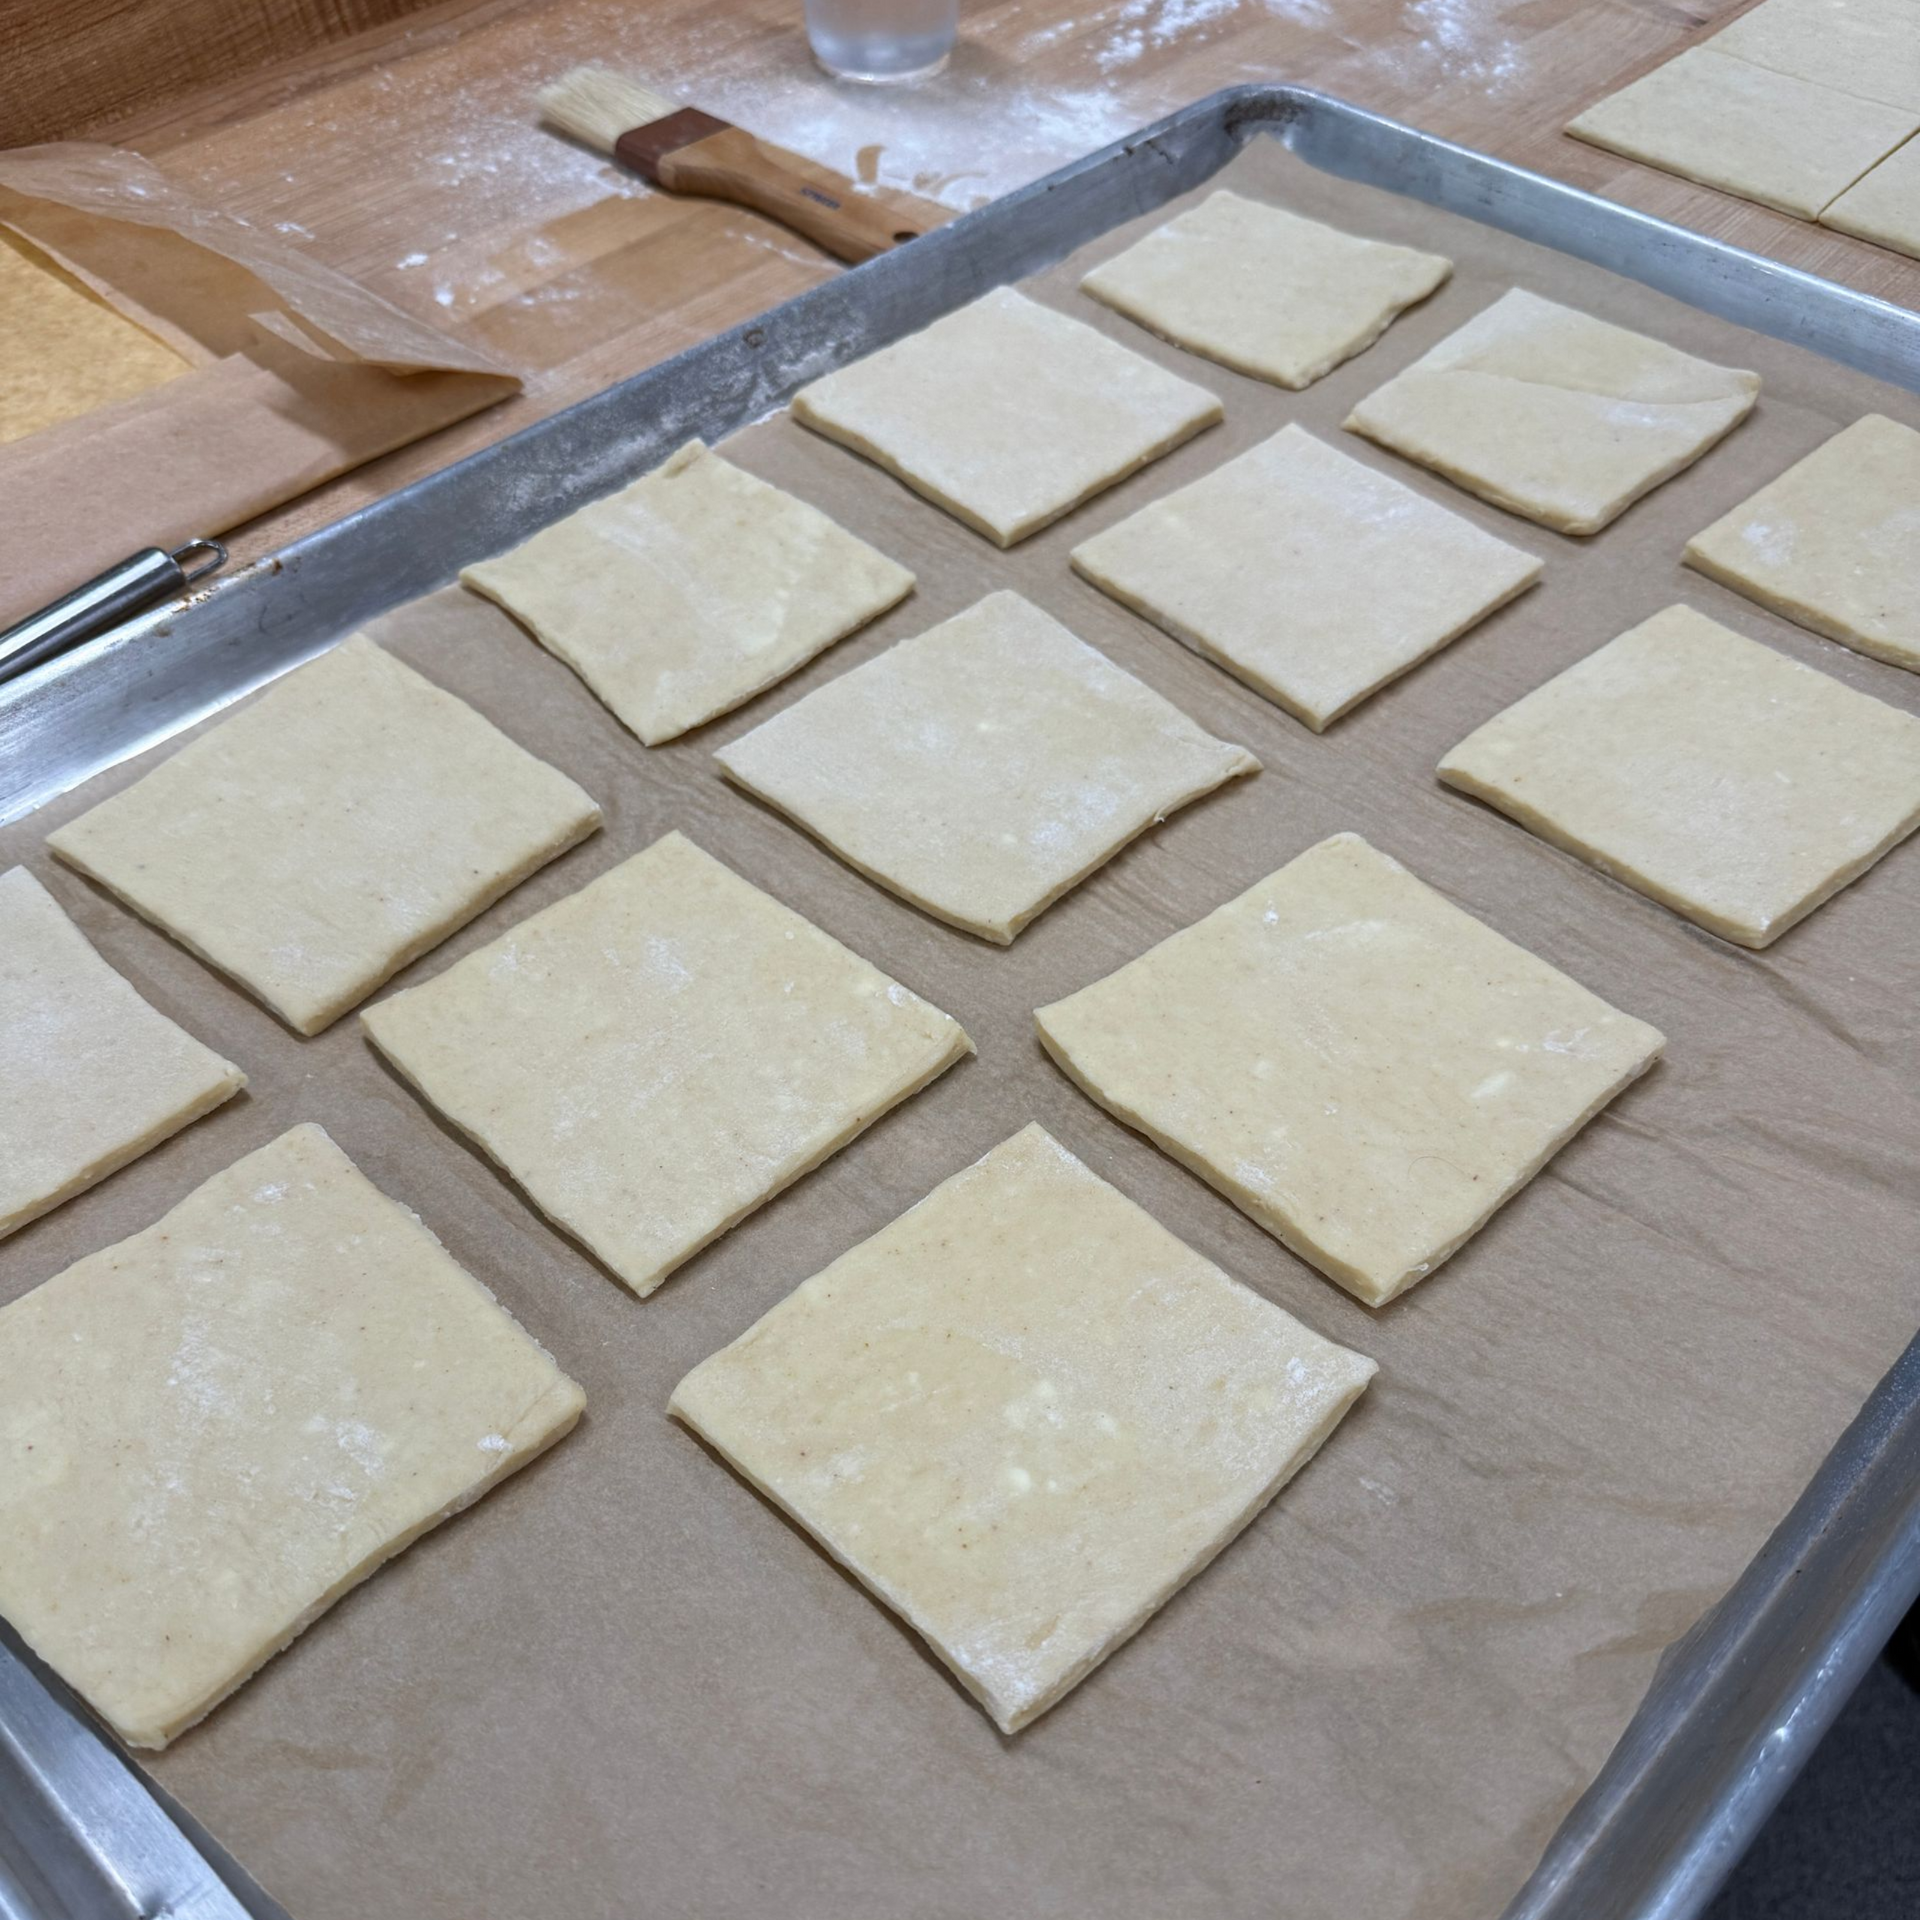
- Once dough has formed, knead briefly, just until smooth. Do not overwork. Dough will become too elastic and difficult to work with otherwise. Gather into a smooth ball. Roll out the dough to a dimension of 7.5 x 12" and make it as rectangular/square as possible with neat lines and sharp edges. Rest in the refrigerator for 30 minutes. Decide on which method to enclose butter.
- For our class, we created the butter block with the dimensions 7 x 5.5" at 60-65 degrees F. It should bend slightly off the table.
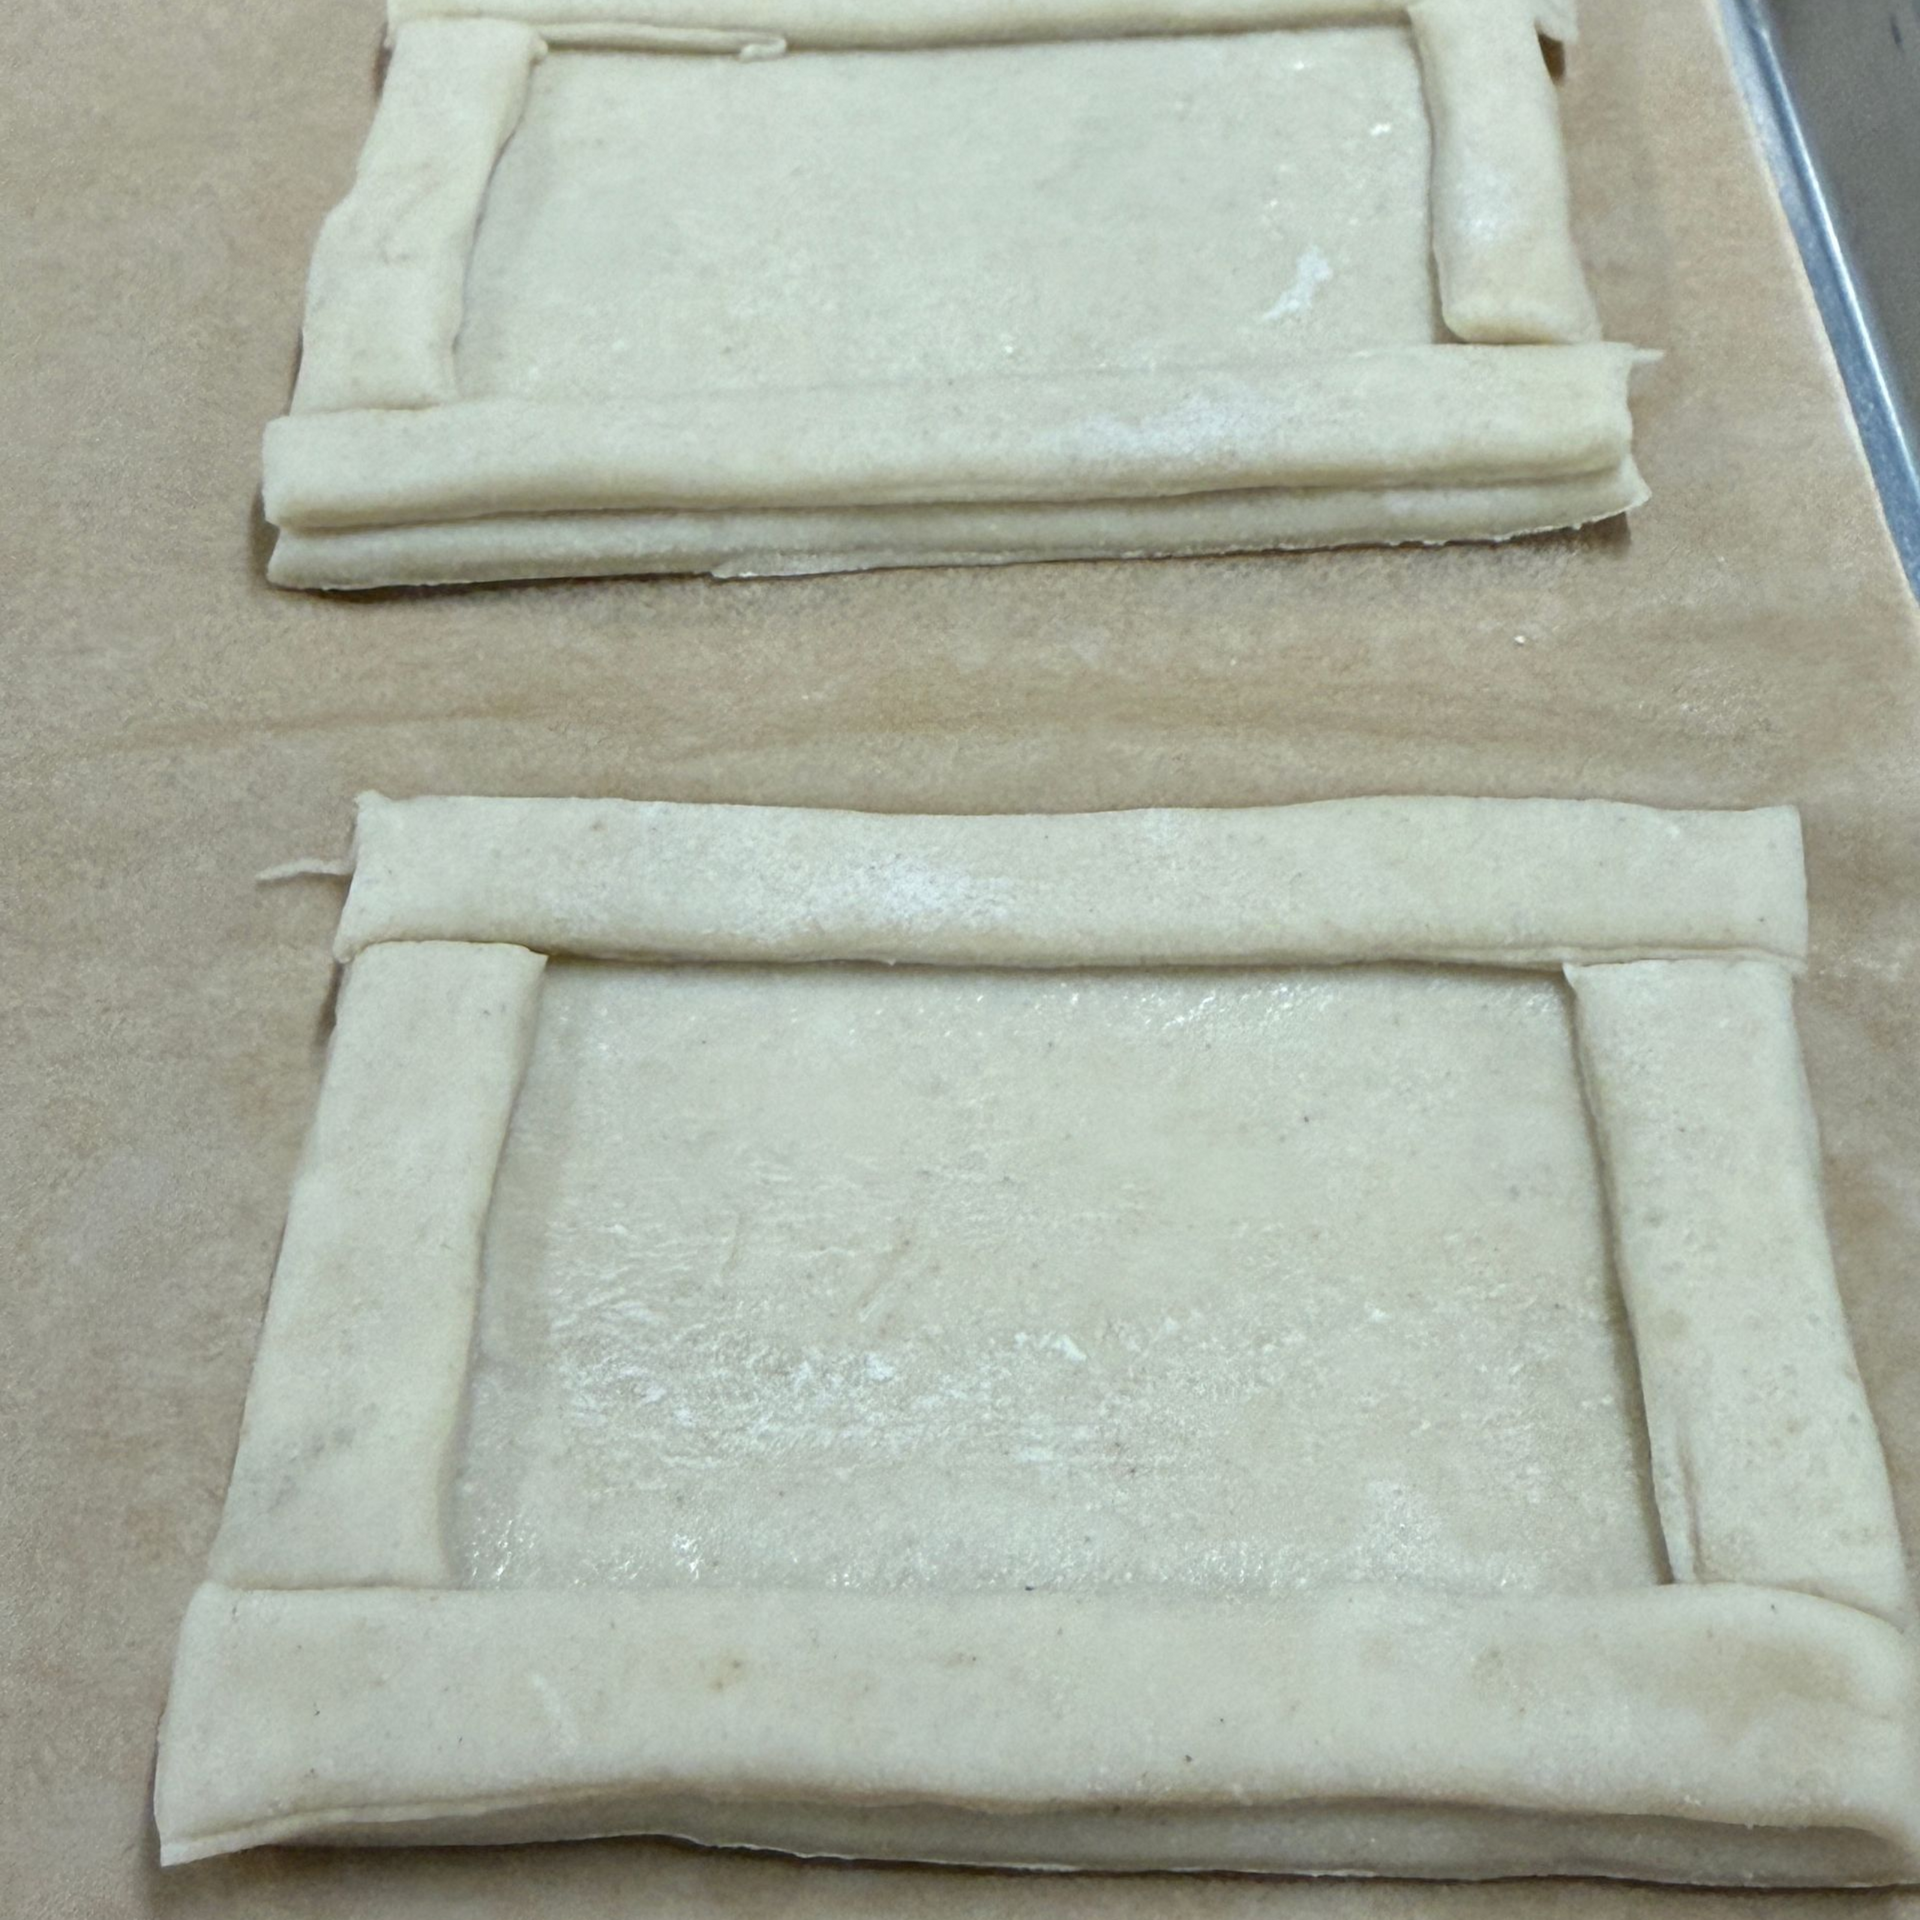
- After 30 minutes, place the butter block on the lower half of the dough and fold the upper half over. Pinch all sides together so that it closes.
- Roll out dough carefully to a 8.5 x 15" dimension. Perform a four fold. Top to center, bottom to center, and close both together like a book. There will be 4 layers (a four fold). Rest for 30 minutes. We did not put back in the fridge, but maintain about 65 degrees for the dough.
- Roll out again, again in a 8.5 x 15" dimension. This time, we'll do a three fold. Top comes down to the middle, and folds over the remaining half once more for a total of three layers.
- Repeat the last 2 steps for another four fold and another three fold.
- The dough is now ready to be cut into the shape of the product you're making.


Danish Dough is a rich-yeast dough that, when we worked with it, was pretty wet and not as firm as the puff pastry. We did four 3-folds, and then rolled out to 1/4" thick.
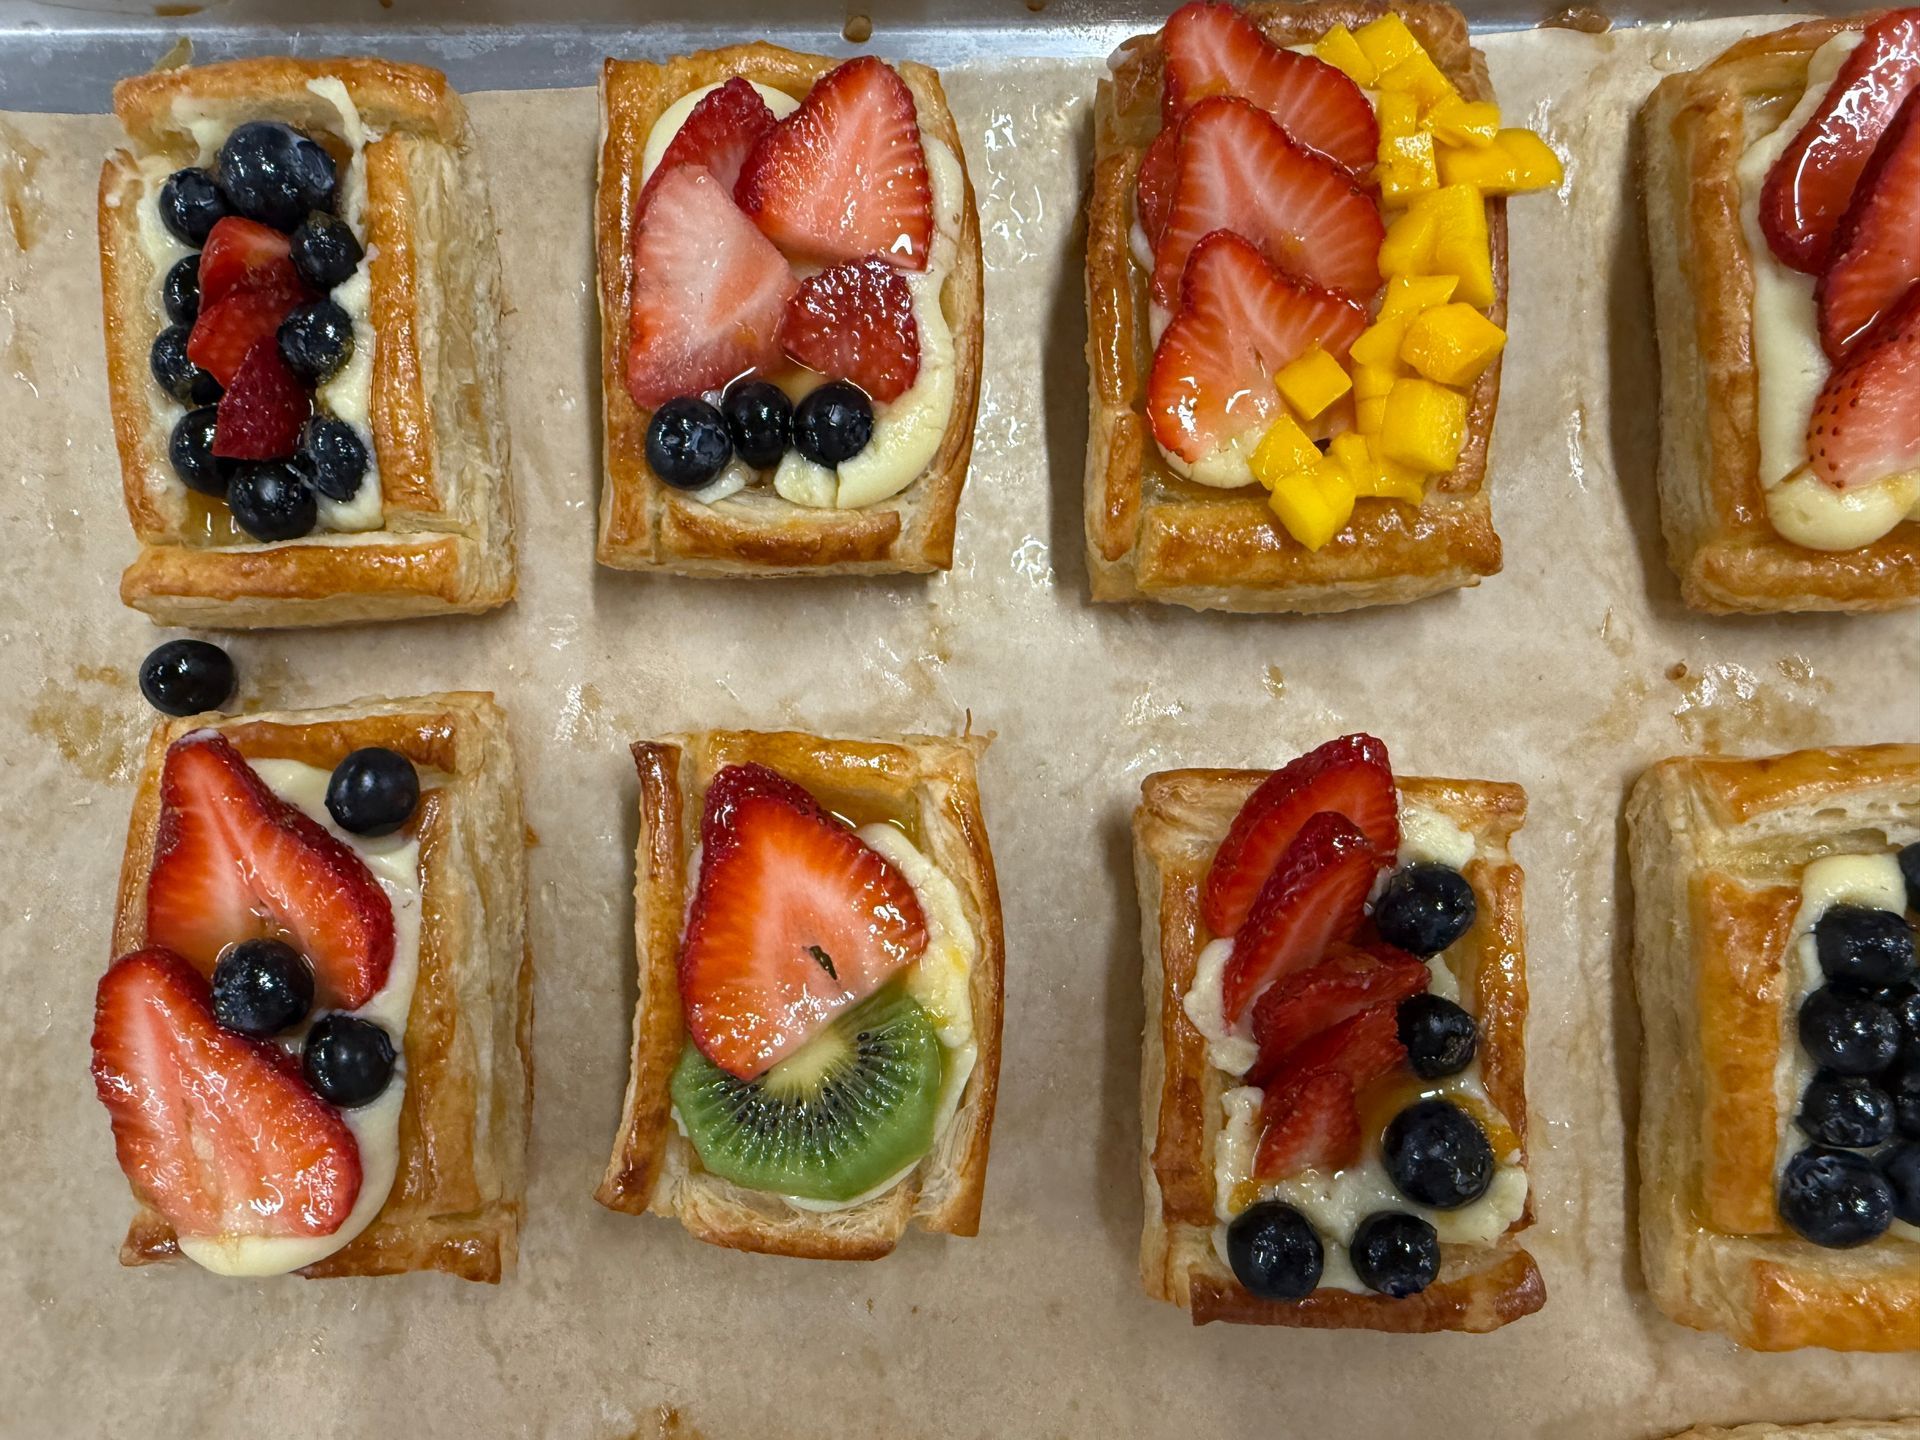
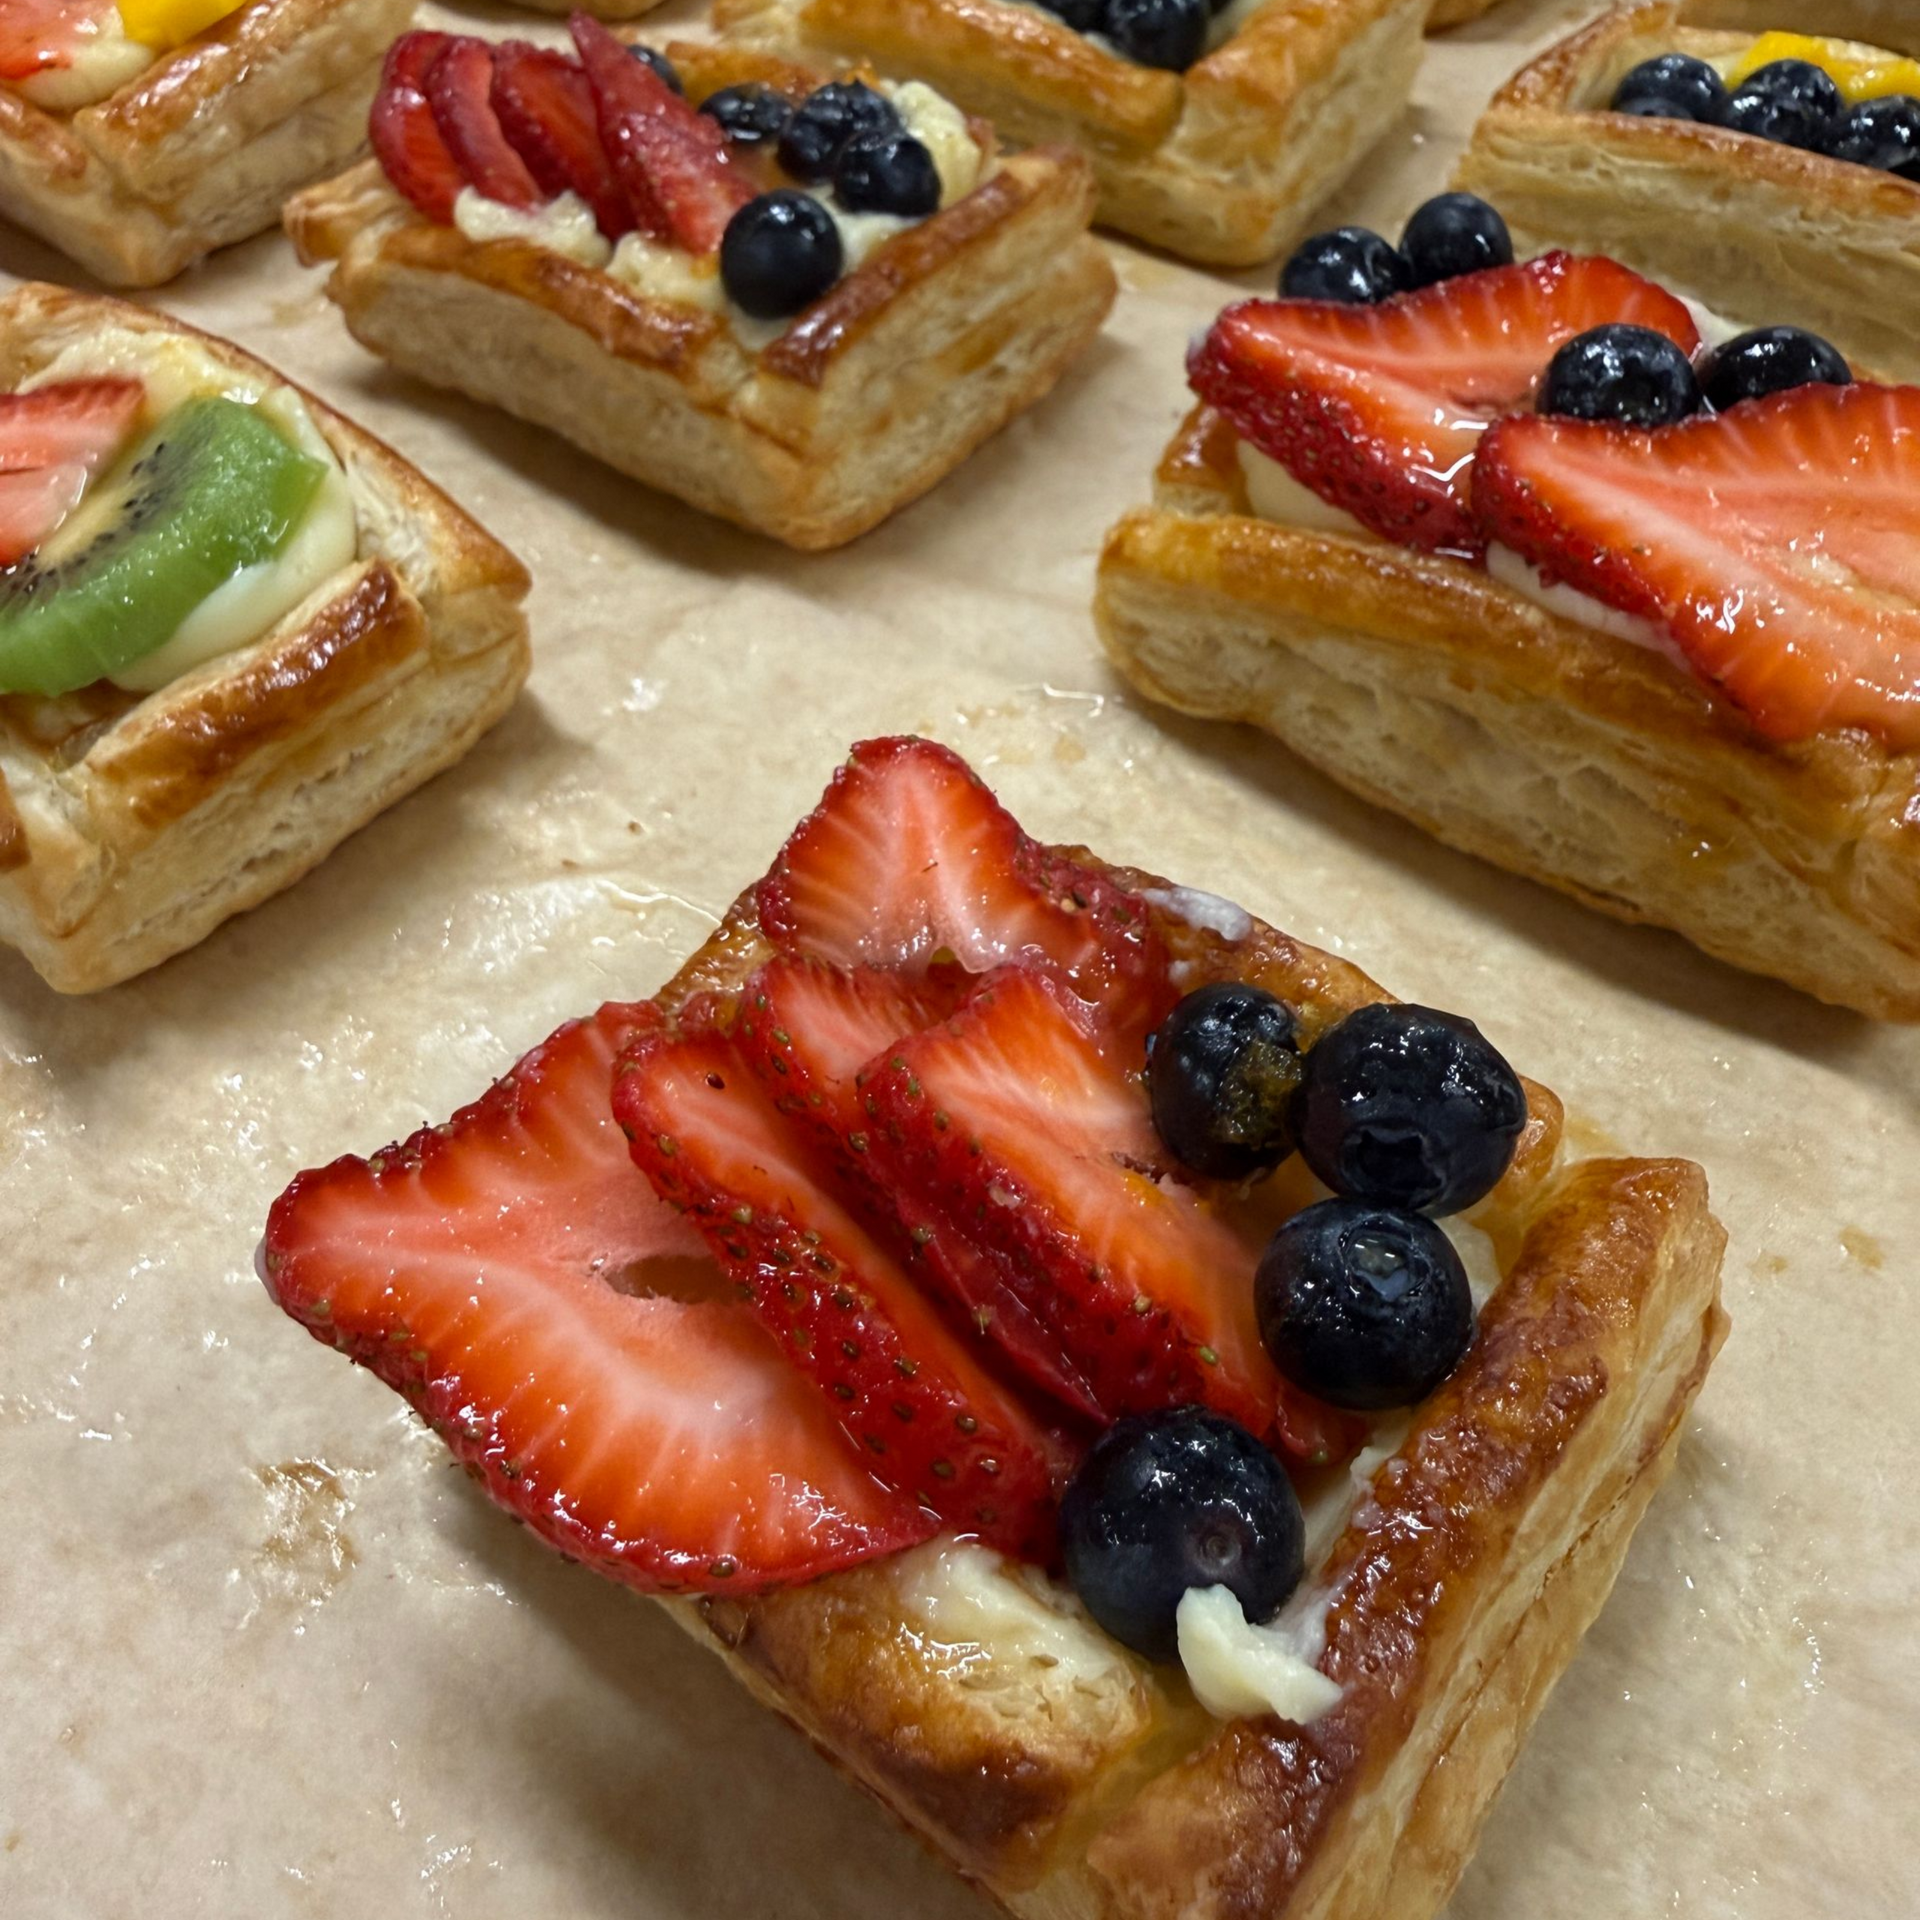
The difference in the Danish dough is quite noticeable. It's softer like Brioche and presented all the layers as the classic puff pastry did, but in a slightly different way. Overall, I like each for what they bring to the table. The Danish dough seemed to be a little more desirable for the products that we made--pinwheels and vol au vents. With the classic puff, we made products like the puff fruit tarts, palmiers, turnovers, and sacrisaints.
Ingredients: (50 oz, no yield change from book)
- Butter, 2.5 oz
- Sugar, 3 oz
- Nonfat milk solids, 1 oz
- Salt, .4 oz
- Cardamom or mace, .04 oz (1/2 tsp)
- Whole egg, 4 oz
- Egg yolk, 1 oz
- Bread flour, 16 oz
- Cake flour, 4 oz
- Yeast, .4 oz
- Water, 8 oz
- Butter for rolling in, 10 oz.
Instructions--Modified Straight Dough Method
- Develop dough, 3-4 min. on second speed
- Instant yeast = mix with flour
- Combine fat, sugar, salt, milk solids, flavorings, and mix until well combined
- Add eggs gradually, but as fast as they are absorbed
- Add liquid, mix briefly
- Add flour and yeast, mix to a smooth dough
- Shape into a rectangle = 1" thick and wrap up (in class, this was the stopping point.
Without the class period, allow to rest, 30 min. keeping at 60-65 degrees. Perform four 3-folds (not the book style, but overlapping with 3 layers)
To lock-in the butter block:
- The butter block will go 2/3 the length of the dough (not half like the puff pastry). I rolled mine out to 9.5" x 6"
- 9.5 x 1.5 = 14.25" length of the pastry, with 6" wide.
- Fold the top down to middle, buttom up to middle, and roll out.
- Then roll out to 14.25x6" again, perform 3-fold, and repeat 2 more times for three total.
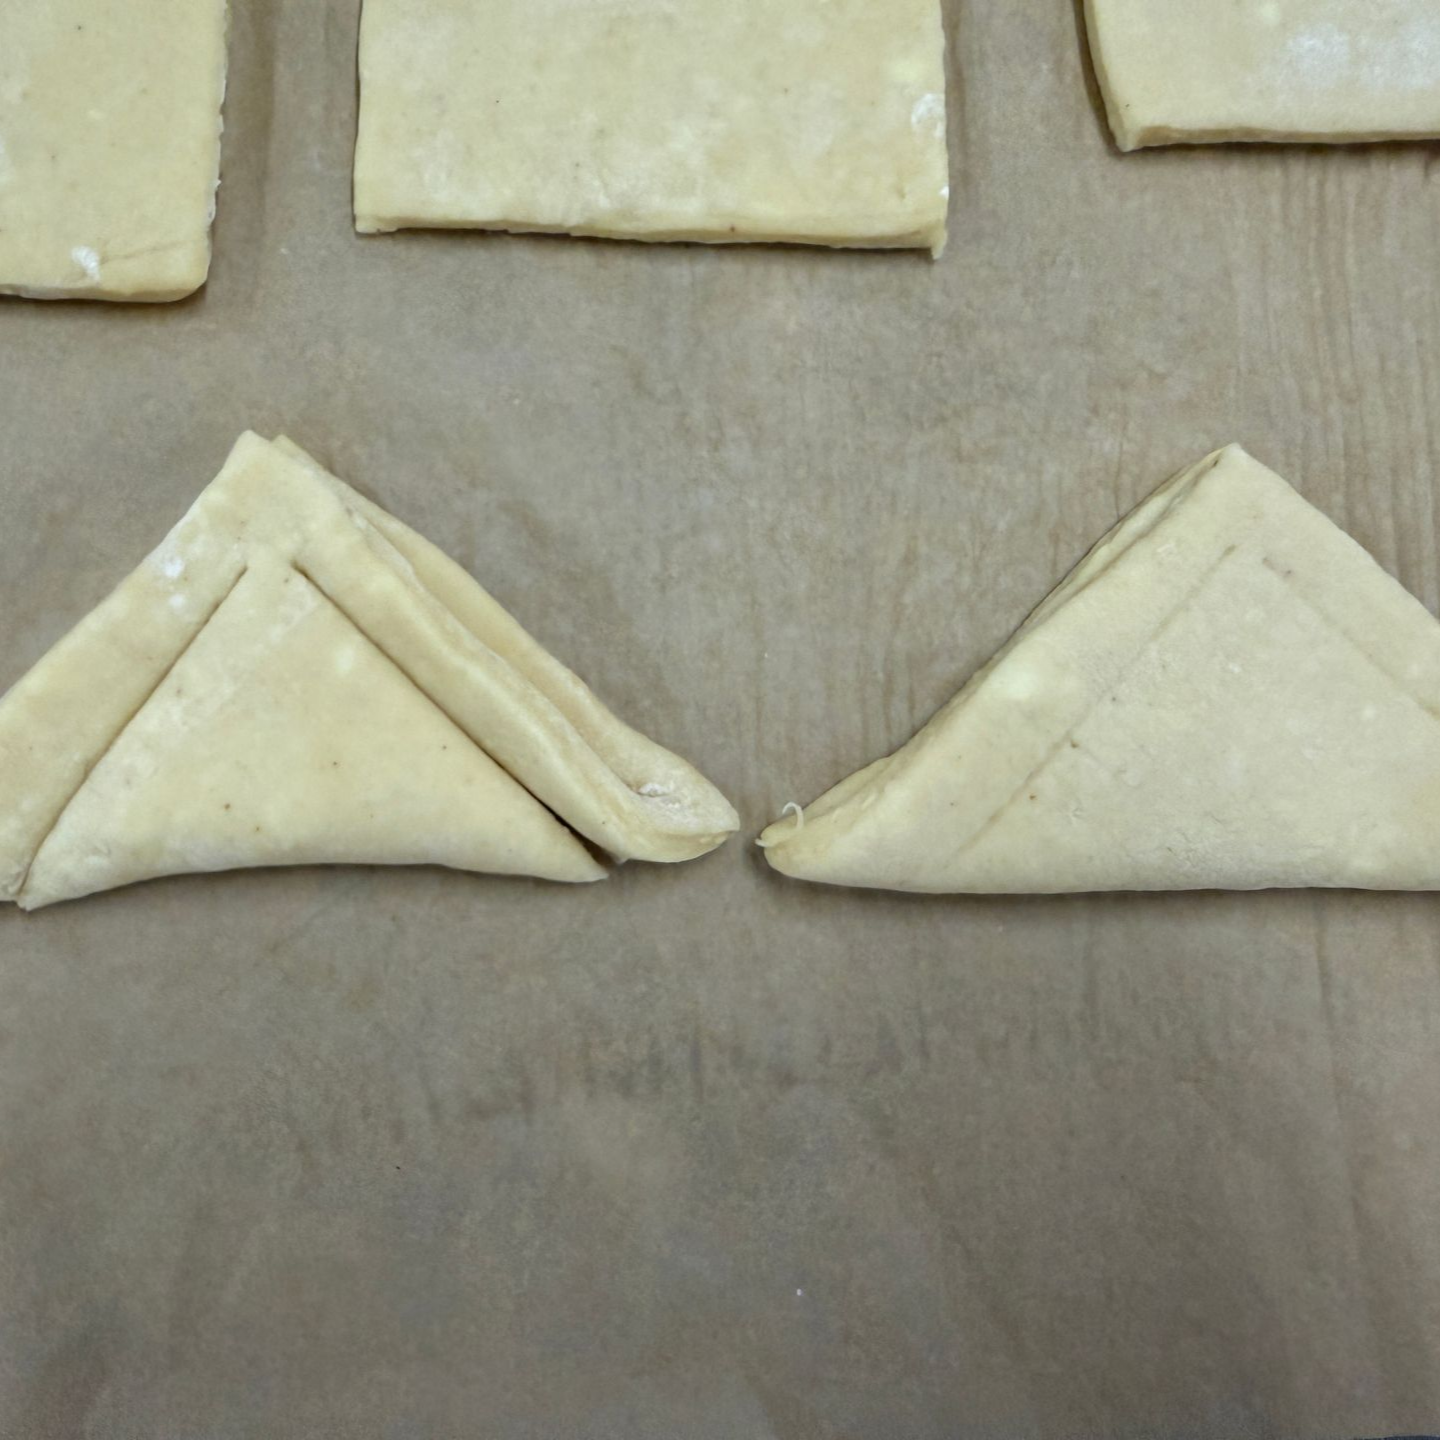
For the Vol au Vents and Pinwheels, we cut the Danish dough out to 4x4 squares.
Vol au Vents:
- Fold squares in half to make a triangle.
- Make cut lines about 1/2" on the dough from the top of the triangle toward each of the points, and then with bench scraper cut into dough making sure not to cut through the top.
- Unfold the square. Brush with egg wash.
- Fold each cut strip to the opposite side to make a diamond-shaped pastry with a raised border all around. Press corners to seal
- Proof for 20 min at 85 degrees F
- Egg wash again
- With a pastry bag or spoon, deposit about 2 tsp pastry cream in the center of each pastry. Fill with filling (cherries). You will need about 1 oz cherries or filling for each pastry.
Pinwheels
- Take the square, make a cut about 1 ½” long from the corner of each square toward the center
- Brush each square with egg wash. Fold alternating corner flaps toward the center to make a pinwheel
- Proof for 20 min at 85 degrees F
- Egg wash again
- With a pastry bag or spoon, deposit 2 tsp pastry cream at center of each pinwheel. Place an apricot half or other filling on top of the pastry cream, cut side down.
Bake at 350 degrees F for 15 min or until golden brown. Cool and brush with clear glaze or apricot glaze.


Croissant dough is
Ingredients: (50 oz, no yield change from book)
- B
Instructions--Modified Straight Dough Method
- Devel
To lock-in the butter block:
- The
MOUSSE
Mousse
12. Truffles
Truffles are made of ganache, a simple recipe that consists of only a few ingredients: heavy cream, vanilla extract, dark chocolate, and butter.
MERINGUES

Truffles are made of ganache, a simple recipe that consists of only a few ingredients: heavy cream, vanilla extract, dark chocolate, and butter.
ICE CREAM
Truffles are made of ganache, a simple recipe that consists of only a few ingredients: heavy cream, vanilla extract, dark chocolate, and butter.
PLATED DESSERT
Final Practical Exam
We are tasked with creating a plated dessert for our final practical exam. Multiple items must be included:
- Meringue disc (with inclusions) p. 356
- Mousse or bavarian, p. 544
- Old fashioned pound cake, p. 410
Plus one or more of the following:
- Jam/jelly
- Fresh fruit
- Nuts
- Crème chantilly
- Vanilla cream, p. 438
- Ganache
Read p. 622 (plating); p. 458 (cake components); and pp. 557-559 (entremets).
Our dessert must be presented with three identical desserts, plated together or separately.
Practical Plating Guidelines
Baker's art consists of two stages: first, cooking and baking doughs, batters, fillings, creams, and sauces; and second, assembling these components into finished desserts and pastries.
Balancing dessert components: The basic elements of a plated dessert are-
- Main item
- Secondary items and décor
- Sauce
In classical cuisine, secondary items or supporting items are called garnish. Many of today's pastry chefs avoid that term because it suggests simple add-ons. In modern plating, supporting items serve more important roles.
Décor is used to refer to small food items whose main purpose is decoration. But carefully selected décor items have other functions as well: they add important flavor and texture accents to the dessert plating.
In its simplest form, a dessert can be a portion of a single main item, like a slice of cake or wedge of pie, served unadorned on a plate. When deciding what to put on the plate, consider the five characteristics of the dessert. The first three are related to taste and mouth feel (the most important) and the last two are visual elements.
- Flavor
- Texture
- Temperature
- Color
- Shape
Planning and Assembling Specialty Cakes
Much of the pastry chef's job is assembly work. There are the basic elements like creams, fillings, and baked doughs and batters that the pastry chef builds by putting different elements together in different and attractive ways. This is especially true of European-style cakes. Keep in mind, a cake that has too many flavors is less pleasing than one with fewer flavors that blend well or have a pleasing contrast. Texture is also a consideration. A mix of creamy, crisp, and cake-like textures is more interesting to the palate than a cake that's mostly mousse-type ingredients that include fruits, nuts, nougatine, caramel, chocolate, etc.
Basic cake components:
- Optional bottom layer
- Baked short dough circle, p. 328
- Baked meringue or japonaise pp. 356-357
- Optional cake ring linings, p. 461
- Cake layers
- Genoise or other plain sponge, p. 417
- Almond sponge or other nut sponge, pp. 417, 423, 424, 426
- Chocolate sponge, pp. 417, 424, 426
- Additional specialty layers
- Puff paste disks, pp. 332-335
- Japonaise or meringue disks, pp. 356-367
- For moistening and flavoring cake layers, dessert syrup p. 264
- Fillings
- Jam or jelly, especially apricot and raspberry
- Buttercream, pp. 434-438
- Crème chantilly, p. 267
- Ganache, pp. 283-284
- Chocolate mousse. p. 284
- Pastry cream and variations, pp. 272-273
- Bavarian cream, p. 541
- Fruits, fresh, poached, or canned
- Icings and coatings
- Buttercream, p. 434-438
- Poured fondant, pp. 432-433
- Whipped cream, pp. 265-266
- Marzipan, p. 671
- Glazes, pp. 443-445
- Rolled coatings, p. 445
Entremets
Entremets are desserts that feature a large proportion of mousse or other light, creamy fillings, in addition to other components such as cake layers. Two basic methods are used to assemble entremets: bottom-to-top procedure, also called the bottom-up procedure, and the top-to-bottom procedure, also called the upside-down assembly.
Bottom-up: The dessert is assembled right-side up, just as it will be displayed and served. In most cases, it is assembled inside a metal cake ring or charlotte ring to hold the components. The ring is removed before the dessert is finished and displayed.
Upside-down: The dessert is assembled inside a cake ring or a flexible mold. Desserts made with this procedure typically have a mousse or other soft filling deposited in the mold first. Inserts are added (inserts are mousse, crémeux, or other light filling, jellies, or cake layers). Finally, the bottom layer is added on top. The dessert is then usually frozen. Before final decoration and serving, it is inverted onto a cardboard cake circle or other surface and unmolded.
"Fiesta Margarita" Entremet
For my dessert, what I dubbed a Fiesta Margarita, I used the pound cake recipe in the book and infused the sugar with lime zest and added tequila. My orange meringue served as the base. I used two creams: an orange Bavarian cream and a margarita mousse. I accented my piece with candied lime.
With all the hopes and optimism in the world, it just did not pan out the way I expected. The mousse could not support the cake. I don't think I used the molds correctly. The acetate sheets were messy. The whole thing ended up in kind of a disaster. Looking around at the rest of the class entremet-like desserts made me incredibly sad because mine was literally the worst looking one. Granted, it wasn't the worst tasting one. The margarita flavors came through in the mousse and cream. The meringue disc and cake helped separate the textures. It simply looked sloppy, but I put a lot of work into it.
I had a disappointing end to the semester in advanced pastry, where I seemed to enjoy lots of success. It's one thing to follow recipes and perform the steps you're given. It's another to try to come up with the entire thing, from the concept to completing each step successfully.
I vow to try another entremet, using the mold and acetate, and come up with something that I will be proud to show the world!
But, I did get the grade of an 88 AND the comment left by Chef Brandi was pretty cool:
One of the best flavor profiles of the class. I was impressed by the amount of thought and practice that you put into the dessert. I was very happy to see that you ended up with a much better result when you attempted the product again at home!
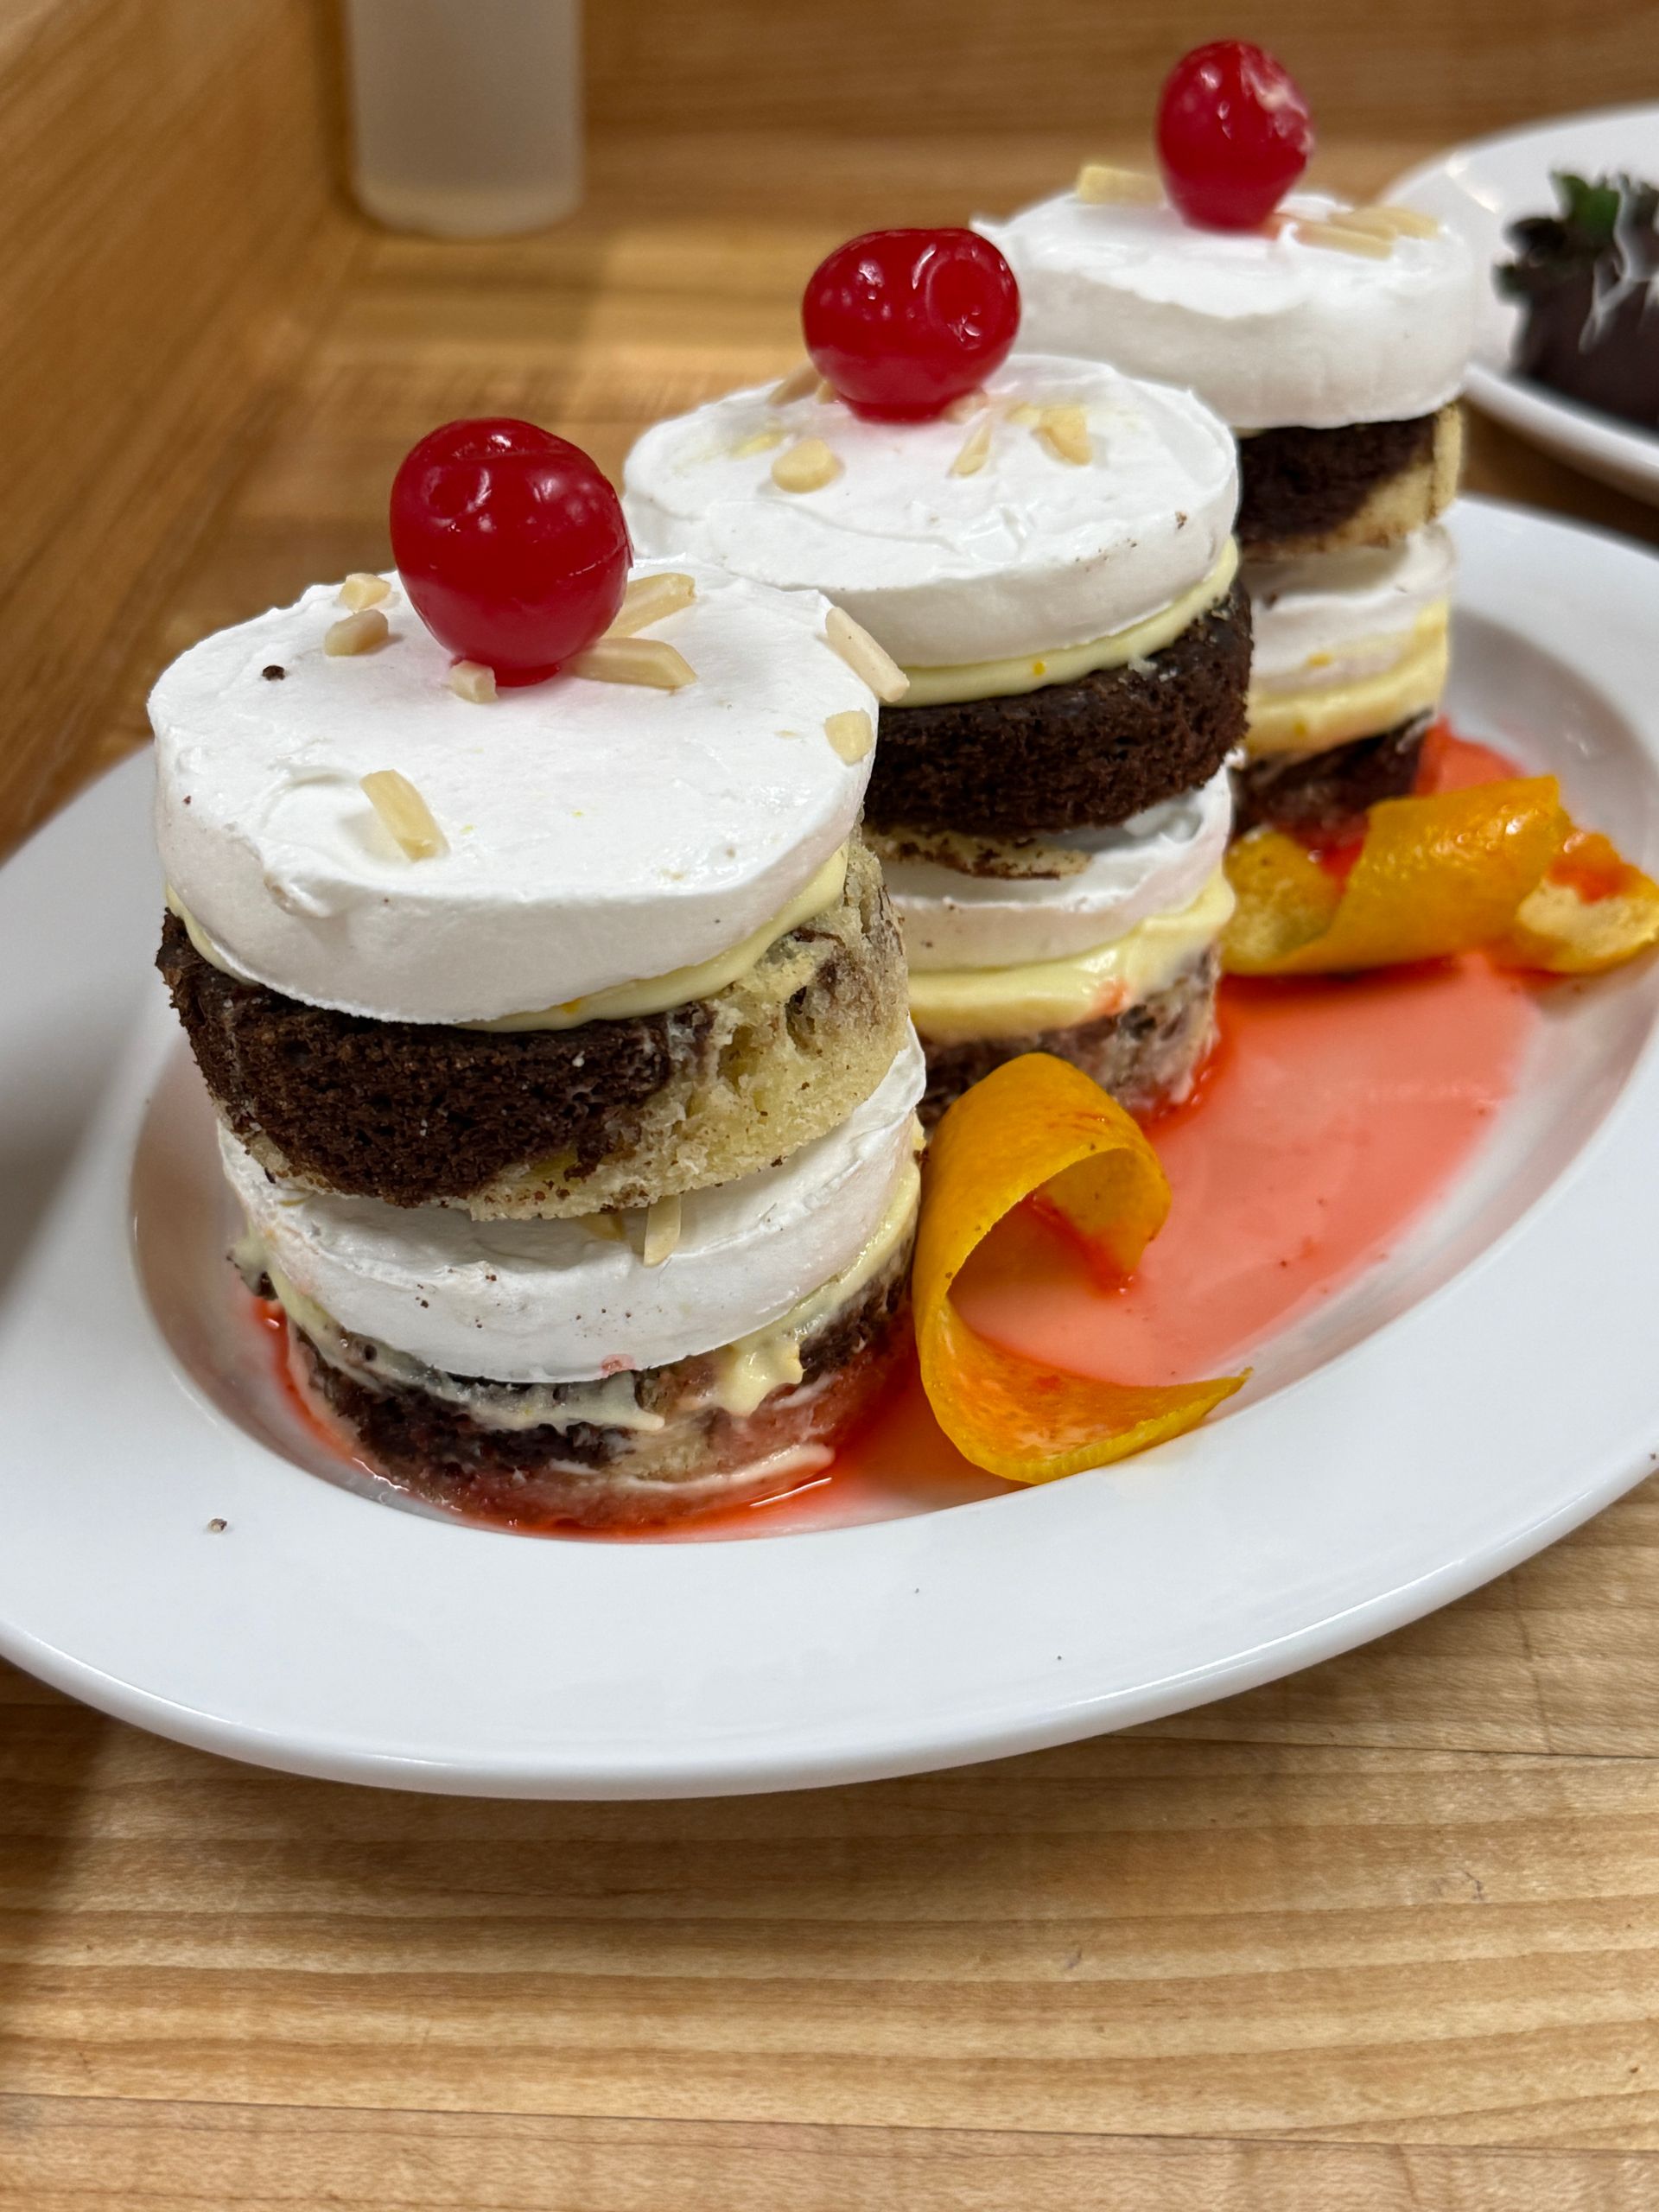

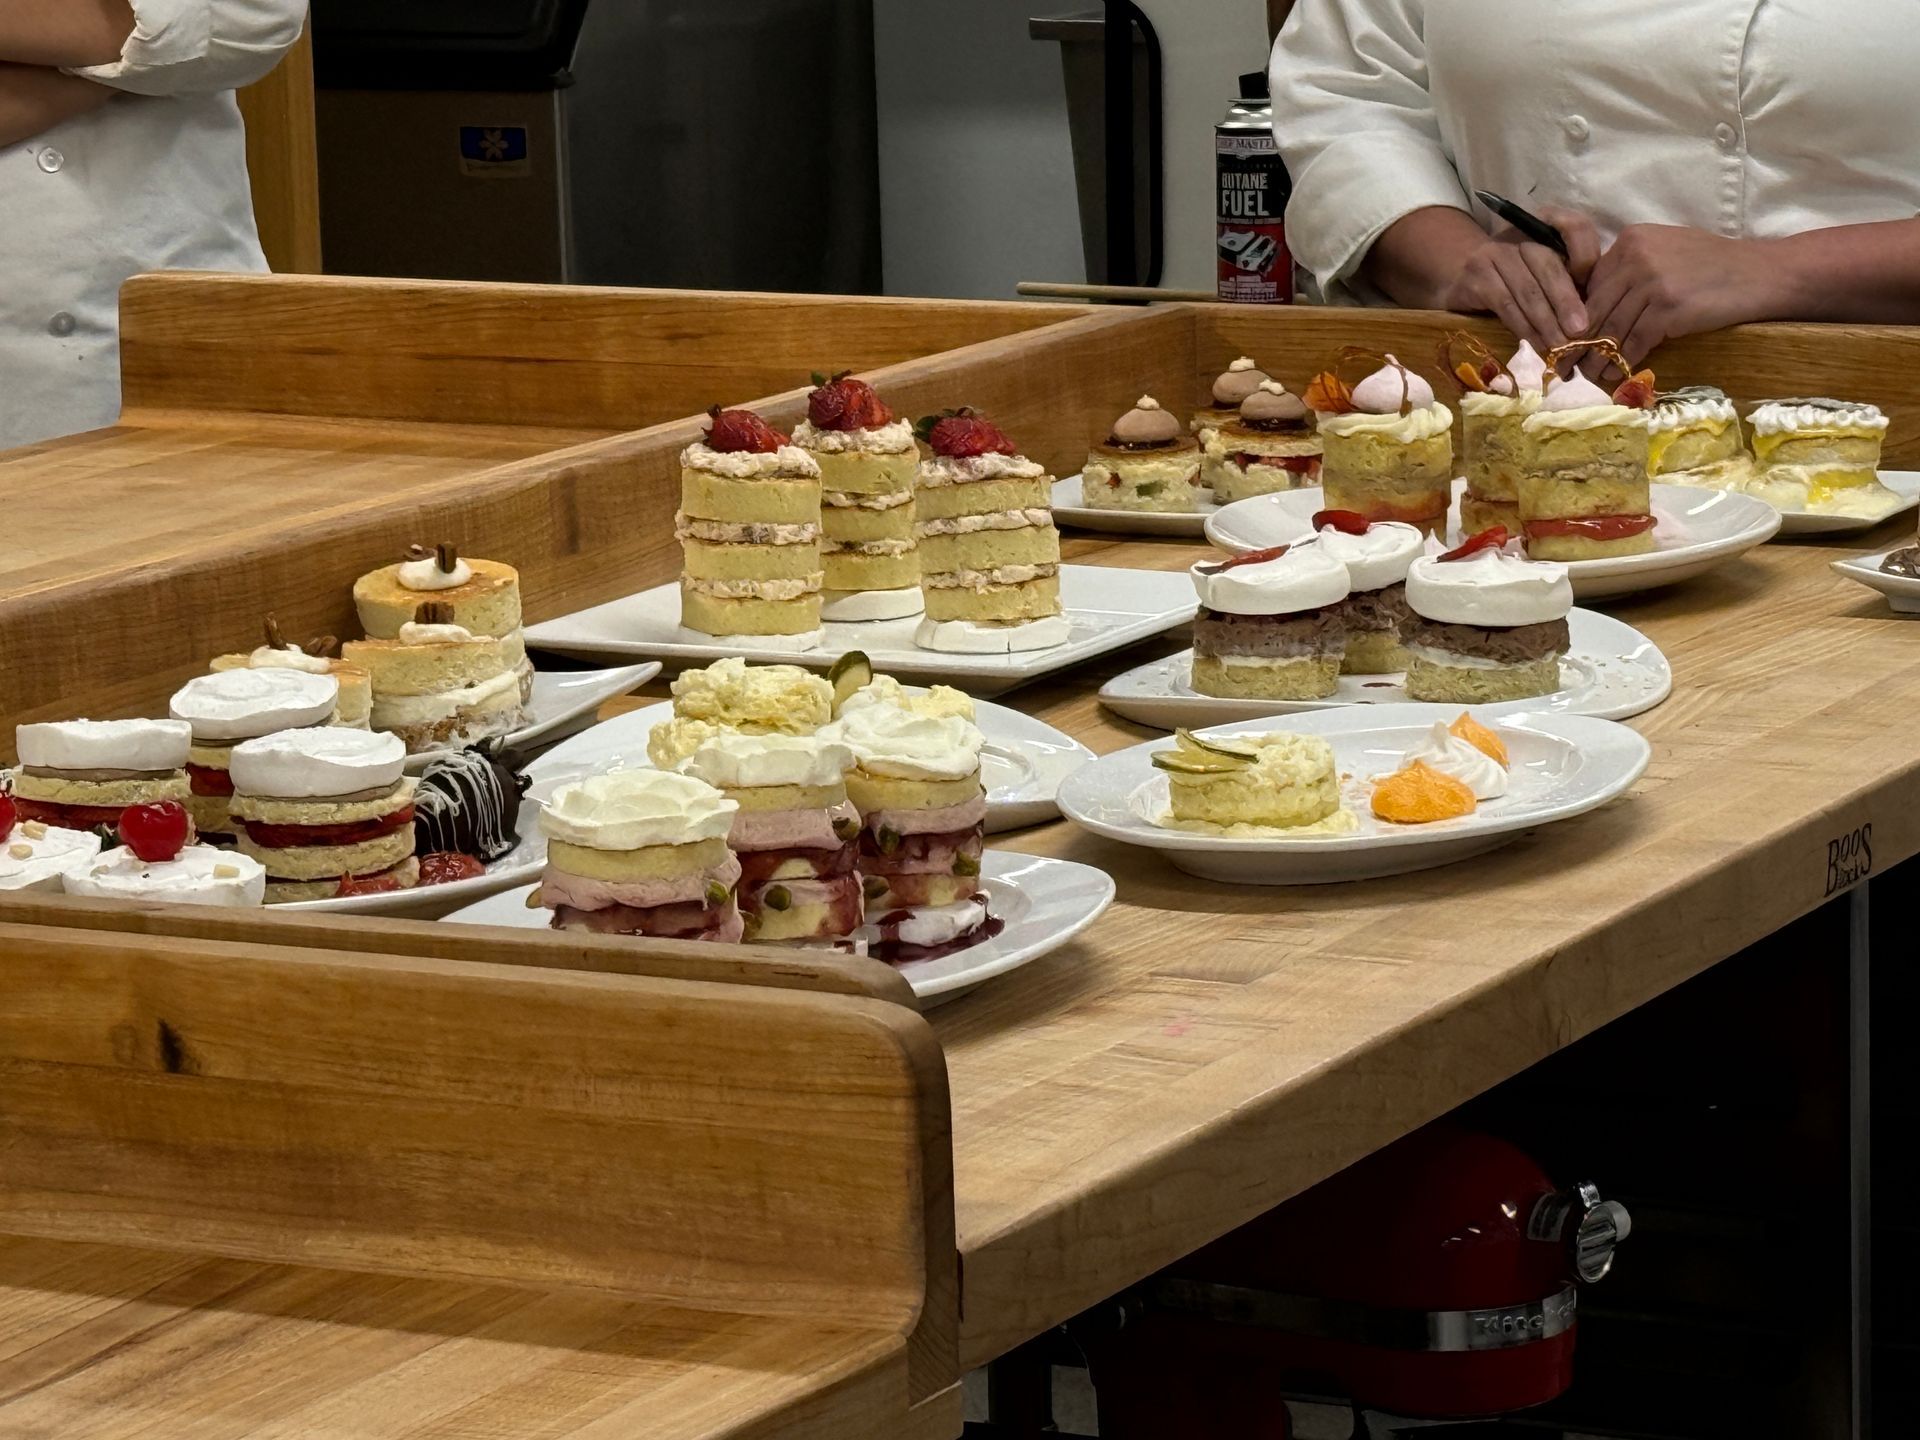
I repeated the assignment at home that weekend, using textbook formulas: the marble pound cake from the book, a chocolate meringue, which was a variation found in the book, and I decided on a strawberry mousse from the internet to complement the flavors of the chocolate in the cake and meringue. It was definitely better, but still got work to do.
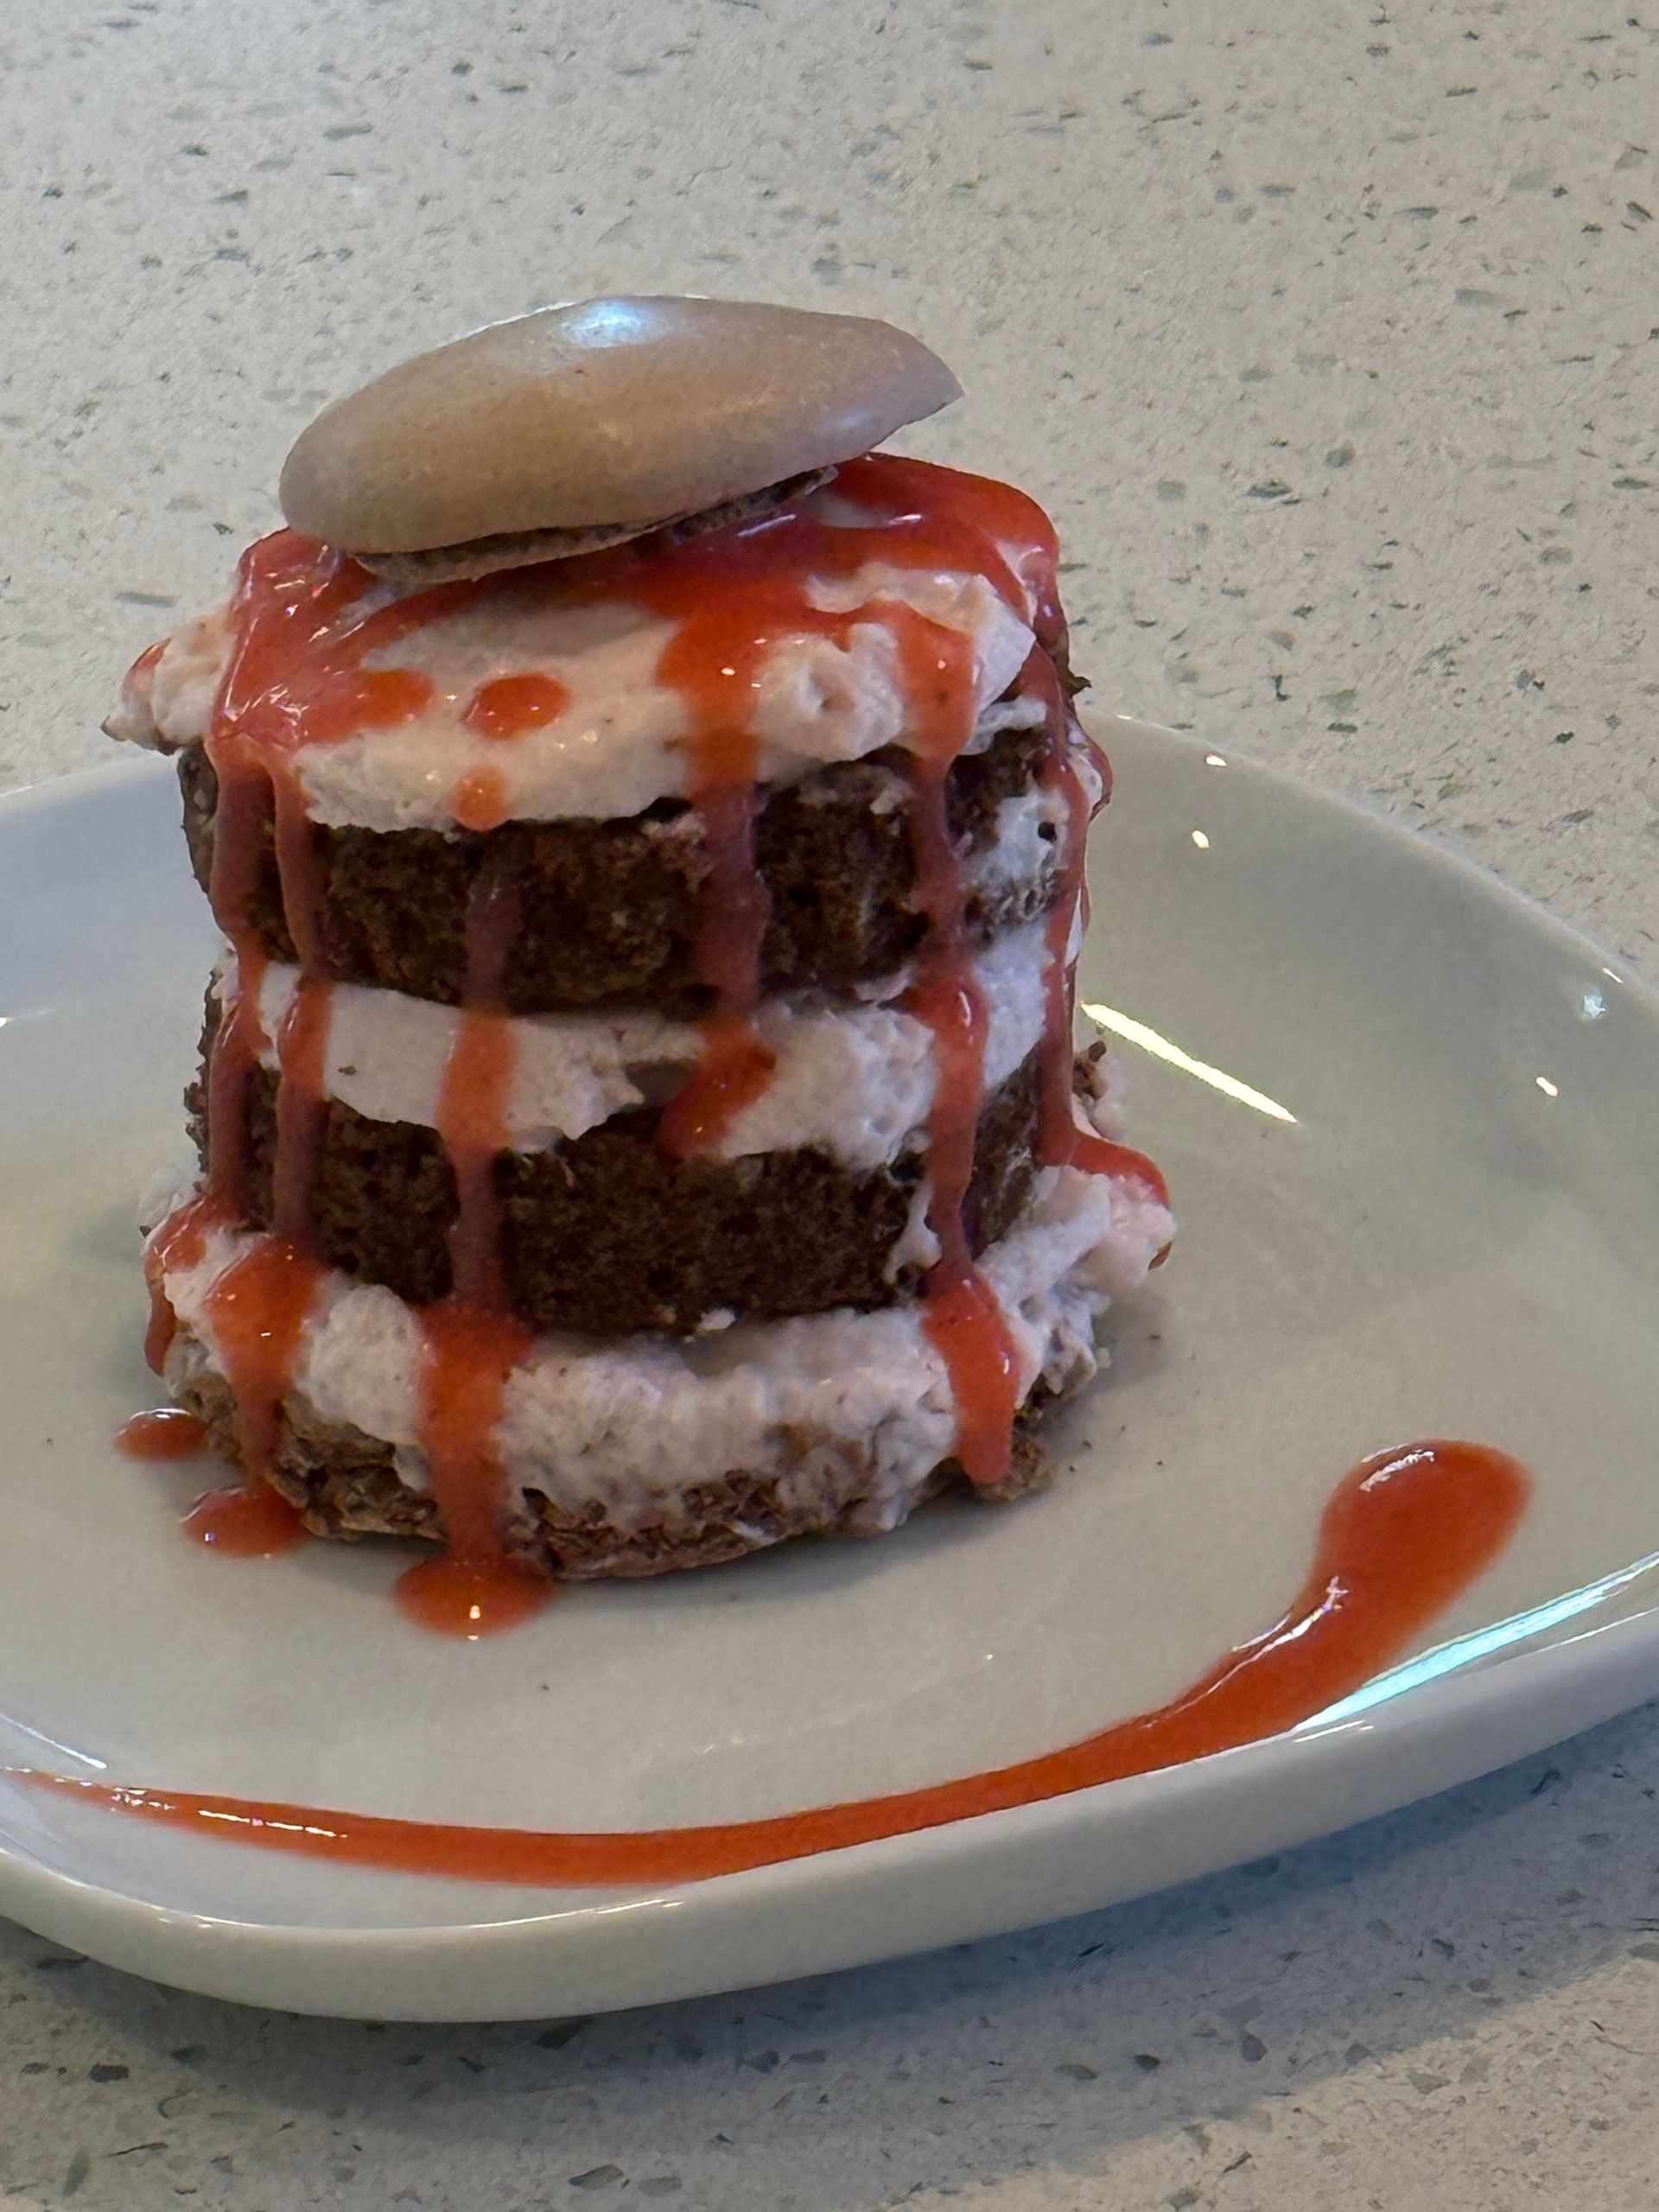
Final Written Exam Review
Ch. 14 Puff Pastry – Pgs. 329-331 & 335
What is the leavening agent in puff pastry?
Steam is primarily responsible for leavening puff pastry, even though there is no additional leavening agents included (there is no yeast).
How much can puff pastry rise when baked?
Puff pastry can rise to eight times its original thickness when baked
Review guidelines for makeup and baking of puff pastry products.
1. Make a well in the mound of flour and add liquids.
2. Work the ingredients into a dough.
3. Knead the dough until it is smooth. Refrigerate for 30 min. Roll out into a large rectangle.
4. Prepare the butter by softening it with beating with a rolling pin.
5. Square off the butter. Roll it into a smooth rectangle two-thirds the size of the dough rectangle.
6. Place the butter on the dough so it covers the bottom two-thirds of the rectangle.
7. Fold down the top unbuttered third of the dough so it covers half the butter.
8. Fold the bottom third over the center. The butter is now enclosed.
9. To give the dough its first four-fold, roll the dough into a long rectangle. Before rolling, beat the dough lightly so that the butter is evenly distributed.
10. Before folding, always brush off excess flour.
11. Fold down the top edge of the dough to the center.
12. Fold up the bottom edge to the center.
13. Fold in half to achieve the finished four-fold.
The dough should be cool and firm when it is rolled and cut.
-Avoid touching edges or the layers may stick together.
-Avoid letting the egg wash run down the edges. Egg wash can cause the layers to stick together.
-Rest made-up products for 30 min. or more in a cool place/refrigerator before baking. This relaxes the gluten and reduces shrinkage.
-Trimmings can be used again, but will not rise as high.
-Baking temps from 400-425 are best for most puff dough. Cooler temps will not create enough steam to leaven them well.
Ch. 9 Croissant and Danish Pastry – Pgs. 198-199 and 210
-What are some of the main differences between croissant and Danish pastry?
-Croissant Dough – also called Danish pastry dough, croissant-style, resembles a puff pastry with the addition of yeast. It is based on a dough made of milk, flour, a little sugar, and, of course, yeast. The rolled-in butter gives the dough its flaky texture.
-Danish Dough – Can be called Croissant dough (Danish pastry dough, croissant style) or Danish dough, brioche-style. Both doughs are used in making Danish pastries, but the first one is generally used for croissants. Danish dough, brioche-style, is a richer dough containing eggs, although it is not as rich in eggs as regular brioche
What kind of dough is used for croissant and Danish pastry?
-Laminated or rolled-in doughs including croissant dough (also called Danish pastry dough, croissant-style) and Danish dough, brioche style.
What is a butter block?
-A flattened, chilled sheet of high-fat European-style butter (82-84% fat) used for lamination created by pounding and rolling butter, often mixed with a small amount of flour, into an even rectangle to ensure consistent, thin layers.
What is lamination?
-Dough consisting of many alternating layers of dough and butter or other fat. Laminated or rolled-in dough contains many layers of fat sandwiched between layers of dough. These layers create the flakiness you are familiar with. In Danish pastry. In the classic pastry shop, there are two basic rolled-in yeast doughs: croissant dough (Danish pastry dough, croissant-style and Danish dough, brioche-style—also called brioche feuilleté or flaky brioche).
-What are we looking for in a properly made butter block?
-Even and consistent thickness and shape, in a rectangular shape, that is the width of the dough but at least half the length or more of the dough. It should have enough plasticity to bend without cracking, but not too warm so that it is greasy, sticky, or soft. It should have straight sides, and sharp corners.
Why do we give the doughs long periods of rest between turns?
-That allows the gluten to relax so that it is not too stiff.
What is the difference between a turn and a fold?
-Fold – A simple fold is a three-fold/four-fold that encloses the butter into the dough and used throughout the process to continually add layers.
-Turn – Each complete rolling and folding step is called a turn.
What are the two types of folds that we used in our productions?
-Four-fold and three-fold
Ch. 12 Meringues – Pgs. 267-268, Ganache – Pgs. 278-279 and Pg. 660
What are the uses for a meringue? What are the favorable conditions for making a successful meringue?
-Meringues are frequently used for pie toppings and cake icings. They provide volume and lightness to buttercream icings and mousses or dessert souffles. They can also be baked off to a slow crisp to be cake layers or pastry shells to make light, elegant desserts. Meringues do well in less humid environments. The egg whites should be room-temp. The mixing bowl should be wiped clean of any potential fat with vinegar.
What is the difference between a soft meringue and a baked meringue?
-A soft meringue for pie toppings can be made with a pound of sugar per pound of egg white. Hard meringues that are baked until crisp are made with up to twice as much sugar as egg whites.
What are chocolate truffles made from? What is ganache? What can it be used for?
-Truffles are made from ganache, which is simply chocolate couverture and heavy cream.
-Equal parts chocolate and cream can make a soft ganache suitable for a glaze. Two parts chocolate to one part cream make a firm ganache for truffles and other confections.
Ch. 11 Doughnuts – Pgs. 240-241
What mixing method is used to make yeast-raised doughnuts? What mixing method is used to make cake doughnuts? What factors can cause a doughnut to become greasy? Know the differences between cake doughnuts and yeast doughnuts.
-Modified straight dough method is used for yeast-raised doughnuts. The creaming method is used for cake doughnuts.
-Frying at improper temps (too low of a temp) extends frying time and causes excessive greasiness.
Review preparation and care of frying fat
-Use good quality, flavorless fat. The best has a high smoke point – the temp at which fat begins to smoke and break down.
-Fry at proper temps.
-Maintain the proper level of fat in the fryer.
-Don’t fry too many doughnuts at a time.
-Keep the fat clean.
-Discard spent fat. Keep the fat covered when not in use.
Ch. 23 Chocolate – Pgs. 649-650
Review tempering. Why is it necessary? What are the basic steps?
-Tempering is the process of preparing couverture for dipping, coating, molding, and other purposes. Couverture will not handle properly when simply melted. It’ll take too long to set. The object of tempering is to get the melted chocolate to form many of the stable crystals (V) and few of the unstable ones. When chocolate is tempered, stable crystals form first.
-Chop the chocolate into small pieces and place in a stainless-steel bowl.
-Set the bowl in a pan of warm water. Stir the chocolate constantly.
-Stir until melted and reaches the proper temp.
-Remove the bowl from the water bath; wipe all traces of moisture to avoid contaminating the chocolate.
-Pour two-thirds of the chocolate onto a marble slab, spread the chocolate and quickly scrape bath together, mixing until it cools uniformly.
Ch. 19 Bavarians and Mousses – Pgs. 541-543
Review Bavarians and Mousses. What is the difference? How are they made and what makes them set?
-Bavarians are classic gelatin desserts containing custard and whipped cream. Mousses have a softer texture and many, like chocolate mousse, are made without gelatin or only a small amount. The light texture of mousse is created by adding whipped cream, meringue, or both.
-Bavarian creams are made of three elements: custard sauce or crème anglaise, gelatin, and whipped cream.
-Some mousses contain both beaten egg whites and whipped cream